Candy Christmas Trees Recipe
If you’re looking for a festive treat that’s both adorable and delicious, this Candy Christmas Trees Recipe is exactly what you need! I love how these little trees come together with just a few simple candies, making them perfect for holiday parties or to give as sweet gifts. Plus, the vibrant green and glimmering gold foil make every tree look like a miniature Christmas miracle.
What makes this Candy Christmas Trees Recipe really special is its ease and charm. You don’t have to be a baking pro to wow your friends and family with this eye-catching dessert. I always have those green Reese’s cups and Rolos on hand during the holidays, and turning them into these festive trees is such a joyful grab-and-go snack that everyone enjoys.
Ingredients You’ll Need
These candies not only deliver great flavor but also stack perfectly into that iconic Christmas tree shape. You’ll find that the textures and sizes work together like a charm for building without fuss or mess.
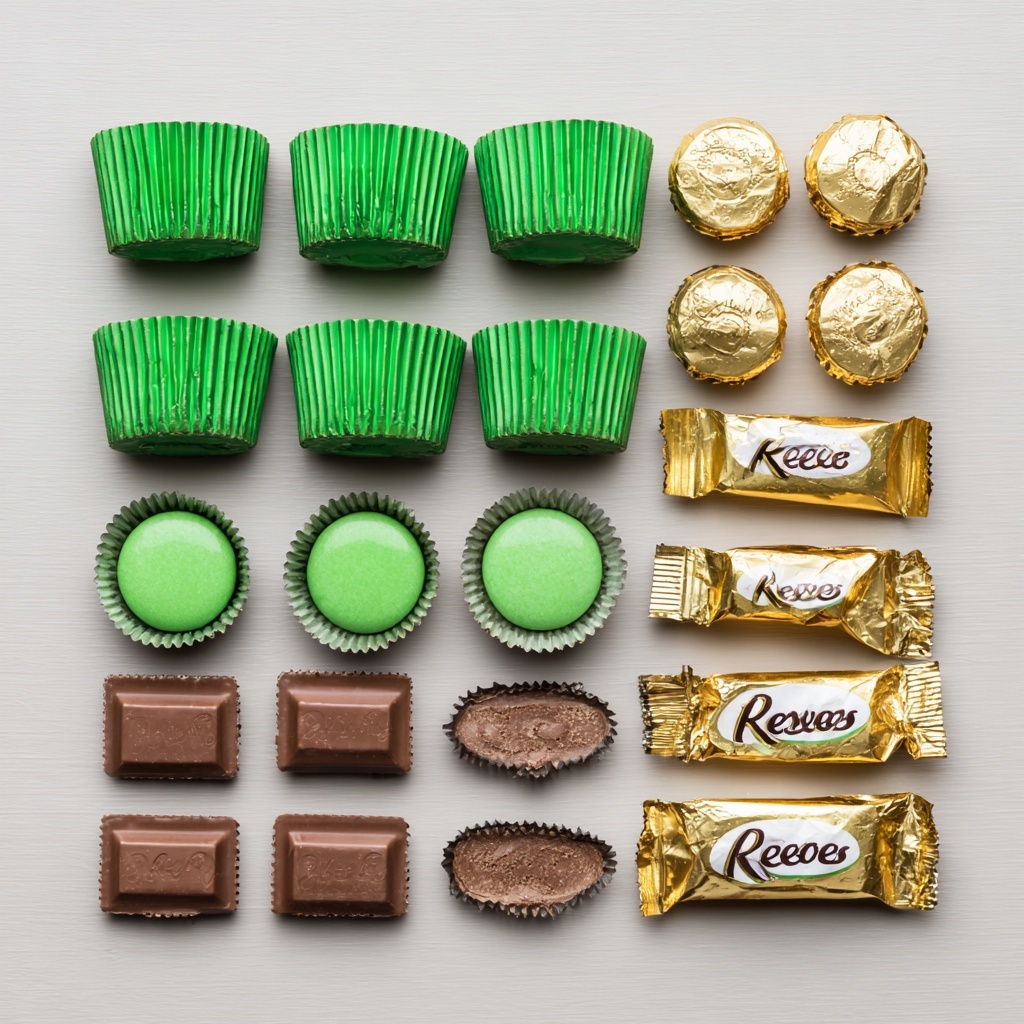
- Green Individually Wrapped Mini Reese’s Cups: Their green wrapping adds instant holiday vibes, and their peanut butter center balances the sweetness.
- Individually Wrapped Rolos (gold foil): These make fantastic “ornaments” thanks to their shiny wrappers and rich caramel-chocolate combo.
- Green Kisses: Perfect for “tree tops” or to tuck between layers for extra chocolatey goodness. The foil cover keeps them from melting too quickly.
Variations
I like to switch things up depending on the crowd or my mood. Don’t be afraid to personalize this Candy Christmas Trees Recipe to suit your flavor preferences or dietary needs — that’s half the fun!
- Nut-Free: Swap out Reese’s cups for green-wrapped chocolate or mint-flavored candies so everyone can enjoy the festive treat.
- Classic Red and Green: Use red Kisses or even red foil candies alongside green ones for a more traditional color combo; looks stunning on a dessert table.
- Extra Sparkle: Add tiny edible silver balls or sugar pearls glued on with a dab of icing for a tree that really shines.
How to Make Candy Christmas Trees Recipe
Step 1: Lay Out Your Candy “Branches”
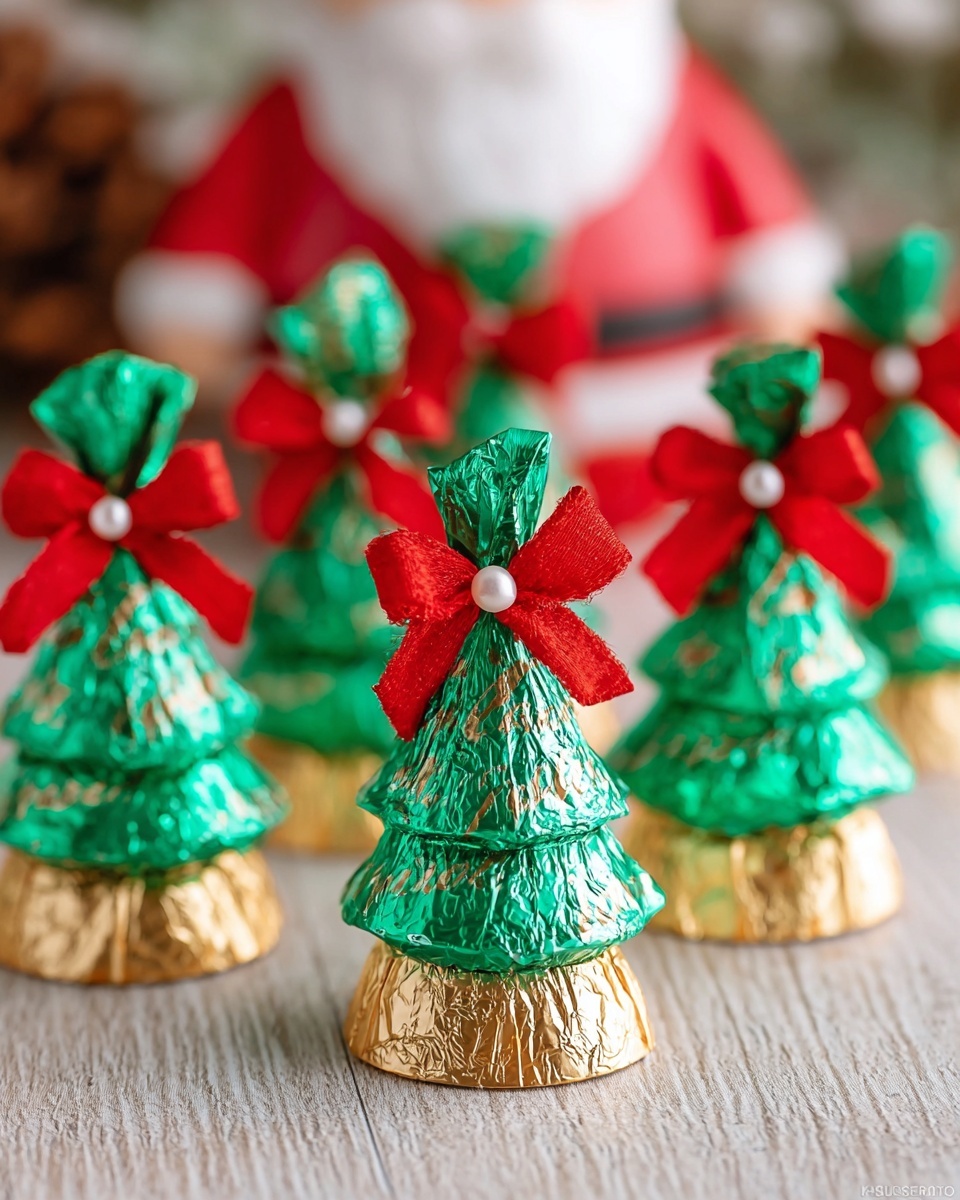
Start by unwrapping your chocolates carefully if you want to use the candies themselves, but since the wrappers add charm and structure, I usually keep them on. Arrange three green Reese’s cups side-by-side—this will be the base of your tree. Using the wrappers keeps the candies from sticking together, making your “tree” easy to handle.
Step 2: Add the Middle Layer with Rolos
Next, place two gold foil Rolos right above the Reese’s cups, centered so they sit snugly. Their slightly smaller size creates that tapered hill effect. You want your tree to narrow as it climbs, just like one in real life.
Step 3: Place the Top with a Green Kiss
Finally, crown your Candy Christmas Tree Recipe with a single green Kiss at the very top. It’s like the star on the tree—a simple but striking finishing touch. If you want, a tiny dab of icing underneath can help keep it from sliding around.
How to Serve Candy Christmas Trees Recipe
Garnishes
I love sprinkling a little edible glitter or crushed peppermint candies around each tree when I serve them. It makes the presentation sparkle and adds a festive crunch that’s so satisfying alongside the soft caramel and chocolate.
Side Dishes
These candy trees pair wonderfully with warm drinks like hot cocoa or peppermint tea. I often set them up next to a plate of gingerbread cookies or mini fruit tarts for a variety of textures and flavors that everyone can enjoy during the holidays.
Creative Ways to Present
For holiday parties, I place these Candy Christmas Trees Recipe on small white plates lined with snowflake parchment paper. You can also fix them onto mini Styrofoam cones sprinkled with some artificial snow for a 3D effect. Kids adore picking out their own tree from a candy “forest” like this!
Make Ahead and Storage
Storing Leftovers
I keep any leftover Candy Christmas Trees Recipe in an airtight container at room temperature. Because everything’s wrapped and stable, they hold up really well for a few days without losing their charm or flavor.
Freezing
Freezing isn’t my go-to for this recipe because the texture of caramel and chocolate can shift when thawed. But if you must, freeze unpackaged candies wrapped well in a freezer-safe container and thaw slowly at room temp to avoid condensation.
Reheating
Since this is a no-bake treat, reheating isn’t really necessary. If you want to soften the candies a bit for assembly, a quick warm-up in your hands or a few seconds in a microwave on low power suffices. Just don’t overdo it, or they’ll melt!
FAQs
-
Can I make Candy Christmas Trees Recipe with different candies?
Absolutely! The key is to choose candies that stack nicely and have shapes that resemble tree layers. Chocolates in cone or round shapes wrapped in festive colors work best.
-
Is it necessary to keep the candy wrappers on?
Not entirely, but wrapping helps prevent melting and keeps the candies from sticking together, plus it adds to the festive look. If you unwrap, be gentle and assemble quickly.
-
How long do these candy trees stay fresh?
When stored properly in an airtight container at room temperature, they usually last about 5-7 days. Just watch out for heat or humidity, which can soften the candies too much.
-
Can kids help make this Candy Christmas Trees Recipe?
Definitely! This is a fantastic kid-friendly activity because it’s simple, safe, and the results are instantly rewarding. Just supervise younger kids with small candy handling.
Final Thoughts
This Candy Christmas Trees Recipe holds a special place in my heart because it’s so easy to make yet always brings a smile to everyone who sees or tastes it. It’s a no-fuss, cheerful project that anyone can whip up in minutes, making your holidays just a little sweeter and brighter. So, grab your favorite candies and try it yourself—you’ll be surprised how these little trees can bring so much joy to your celebrations!
Print
Candy Christmas Trees Recipe
- Prep Time: 10 minutes
- Cook Time: 0 minutes
- Total Time: 10 minutes
- Yield: 10 candy Christmas trees 1x
- Category: Holiday Treats
- Method: No-Cook
- Cuisine: American
Description
Create delightful and festive Candy Christmas Trees using mini Reese’s Cups, Rolos, and green Hershey’s Kisses. This no-bake, easy-to-assemble treat is perfect for holiday parties, offering a fun and colorful way to celebrate the season with a sweet twist.
Ingredients
Ingredients
- 20 green individually wrapped Mini Reese’s Cups
- 10 individually wrapped Rolos with gold foil
- 10 green Hershey’s Kisses
Instructions
- Arrange the Base: Start by placing two green Mini Reese’s Cups side by side on your work surface. This forms the base of your tree.
- Layer the Second Row: Place two more Mini Reese’s Cups on top of the base row, positioning them slightly inward to create a tapered tree shape.
- Add the Middle Layer: Place two additional Mini Reese’s Cups on top of the second row, again positioning inward, continuing to create the conical form of the tree.
- Top with a Rolo: Place one gold foil-wrapped Rolo candy above the last layer of Reese’s Cups to add height and create the middle highlight of the tree.
- Finish with a Kiss: Finally, top the tree with a single green Hershey’s Kiss to serve as the tree’s star.
- Repeat: Repeat these layering steps to make as many candy trees as desired for your holiday spread.
Notes
- Use a clean flat surface to assemble the trees so they don’t slide apart.
- Choose green-wrapped candies for a festive and consistent appearance.
- These candy trees are best served the day they are made for optimum freshness.
- Could be glued lightly with very small dots of melted chocolate if needed for sturdiness in display.
- Perfect for gifting or party treats that require no baking or complicated steps.
Keywords: Candy Christmas Trees, Holiday Treats, Mini Reese’s Cups, Rolos, Hershey’s Kisses, No Bake Dessert, Festive Candy