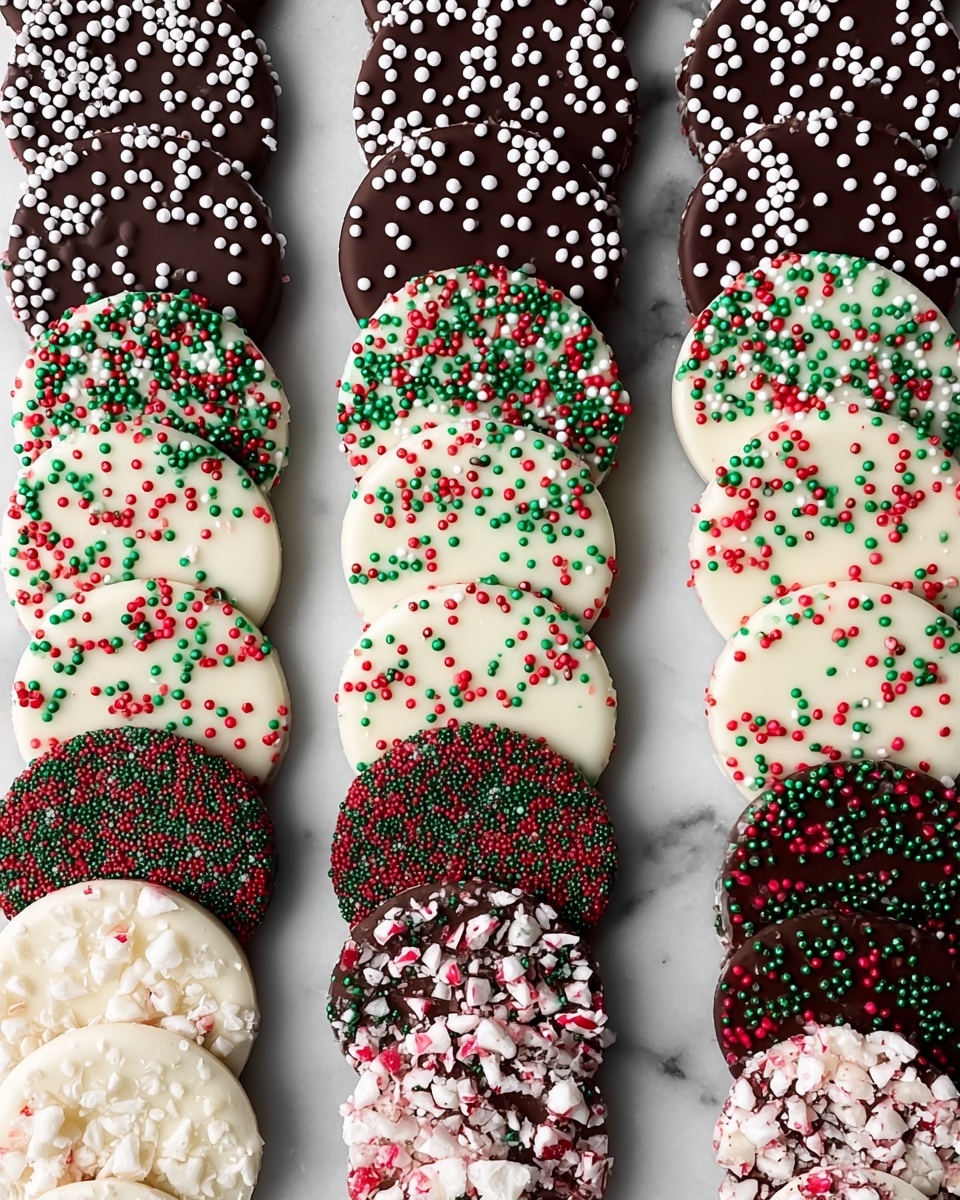
Chocolate Christmas Candy with Sprinkles and Candy Canes Recipe
There’s something truly magical about making chocolate treats during the holidays, and this Chocolate Christmas Candy with Sprinkles and Candy Canes Recipe is my absolute favorite go-to for gift-giving and sharing with loved ones. The combination of creamy semi-sweet and sweet white melting chocolates creates such a rich base, while the festive sprinkles and crushed candy canes add that perfect holiday crunch and color. Honestly, it’s like catching a little bit of Christmas in every bite!
I first whipped this up on a whim for a holiday party, and everyone went nuts over how cute and delicious these candies were. They’re easy enough that you can get the kids involved—sprinkling the toppings is their favorite part! Plus, this Chocolate Christmas Candy with Sprinkles and Candy Canes Recipe works wonderfully as a quick dessert, hostess gift, or even a festive addition to your holiday cookie tray. You’re going to love how simple and versatile it is.
Ingredients You’ll Need
The ingredients here come together beautifully, balancing smooth chocolate with the joyful texture and appearance of festive decorations. When shopping, look for good-quality melting wafers—they melt easily and give the candy a silky finish without having to temper chocolate.
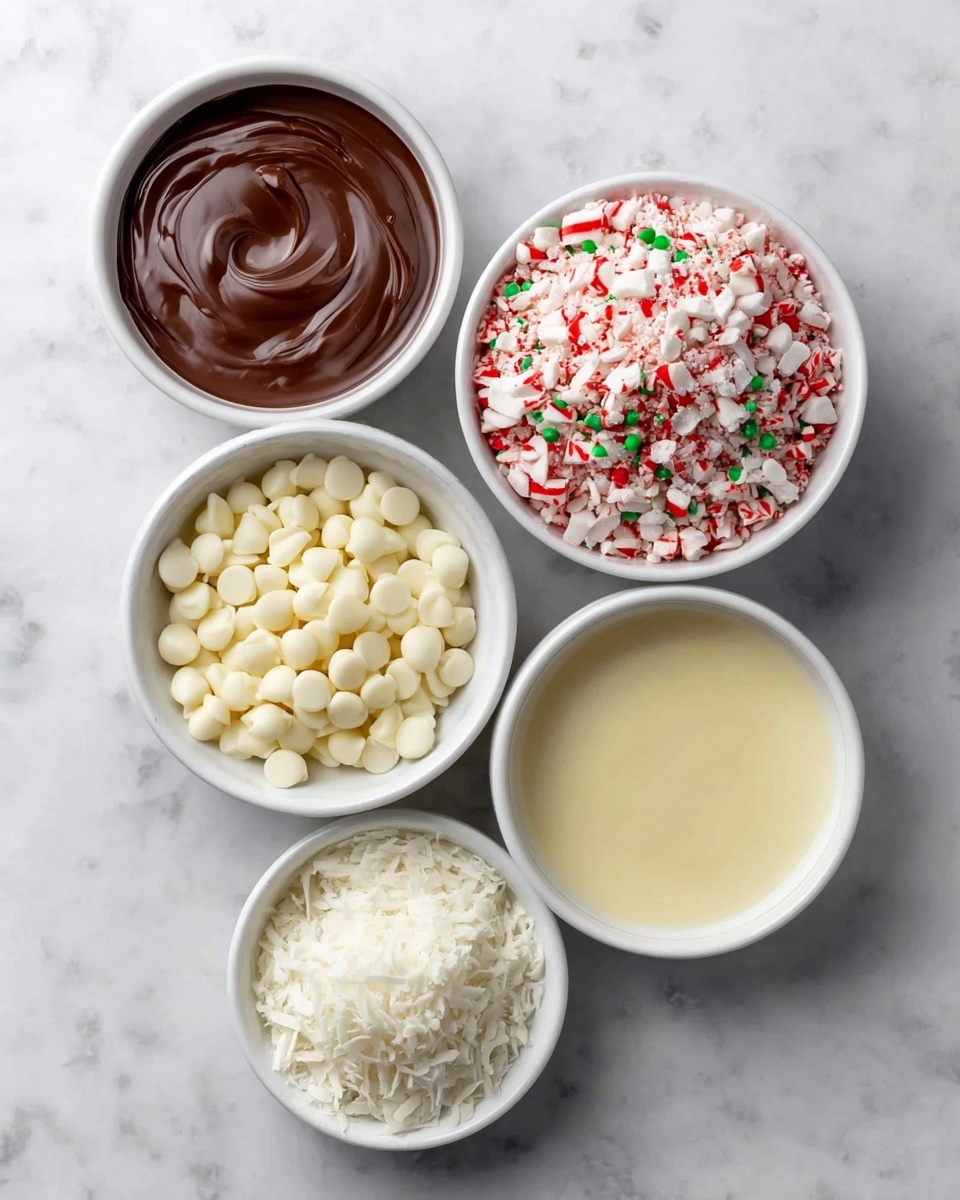
- Semi-sweet melting chocolates: These give the candy that rich cocoa flavor with just the right amount of sweetness. I usually go for quality brands to ensure smooth melting.
- White chocolate melting wafers: Their creamy sweetness contrasts perfectly with the semi-sweet base and adds a lovely color pop.
- White non-pareil sprinkles: These tiny sugar pearls add a delicate crunch and a classy touch to your candy.
- Red, green, and white non-pareil sprinkles: This colorful mix screams holiday spirit, making your candy instantly festive.
- Crushed candy canes: My secret weapon! They add that minty kick and amazing crunch—plus that gorgeous holiday look.
Variations
I love making this Chocolate Christmas Candy with Sprinkles and Candy Canes Recipe my own by experimenting with different toppings or chocolate blends. Don’t hesitate to personalize it—after all, a bit of creativity makes the holidays even sweeter.
- Darker chocolate base: Once, I swapped out semi-sweet for dark chocolate and it added a robust cocoa flavor that chocolate lovers will appreciate.
- Nutty twist: Adding chopped pistachios or almonds gives a nice crunch and a slightly savory compliment to the sweet chocolate.
- Gluten-free or vegan versions: Use vegan melting chocolates and ensure the sprinkles are gluten-free to suit dietary needs without losing the festive flair.
- Seasonal colors: Swap sprinkles for autumn hues to enjoy this chocolaty fun beyond Christmas.
How to Make Chocolate Christmas Candy with Sprinkles and Candy Canes Recipe
Step 1: Melt Your Chocolates Gently
First things first—set up a double boiler or use the microwave in short bursts to slowly melt the semi-sweet melting chocolates and white chocolate wafers separately. Take your time here; overheating can cause the chocolate to seize and get grainy. I like stirring every 20-30 seconds when microwaving—that way I can keep an eye on the texture and keep it silky smooth.
Step 2: Prepare Your Candy Molds or Lined Tray
While your chocolates melt, line a baking sheet with parchment paper or grab festive candy molds if you have them around. I usually prefer the molds because they give a nice, uniform shape and make transferring the finished candies easier. But if you don’t have molds, no worries—the parchment-lined tray works just fine for a rustic, homemade look.
Step 3: Pour and Layer the Chocolates
Pour the melted semi-sweet chocolate evenly into your molds or spread it on the parchment paper, then drop spoonfuls of the melted white chocolate on top. Use a toothpick or skewer to gently swirl the two chocolates together—it creates a beautiful marbled effect that looks like holiday art! This step is so fun to do, and it never looks the same twice.
Step 4: Add Sprinkles and Candy Canes
While the chocolate is still warm and soft, sprinkle generously with the white non-pareil sprinkles, the colorful red, green, and white non-pareil mix, and crushed candy canes. Don’t be shy here — the more festive toppings, the merrier! They adhere best while the chocolate hasn’t fully hardened, so this timing is key.
Step 5: Chill Until Set
Pop your tray or molds in the refrigerator for at least 30 minutes to set completely. When I’m short on time, I sneak a peek after 20 minutes, but 30 is usually ideal to ensure the chocolate is firm but not brittle. Once set, gently pop the candies out of the molds or break into pieces if you used a tray.
How to Serve Chocolate Christmas Candy with Sprinkles and Candy Canes Recipe
Garnishes
I like to add an extra sprinkle or two of crushed candy canes on top right before serving for that fresh crunch and cool peppermint taste. Sometimes I dust a bit of edible glitter for a subtle shimmer effect—makes it feel extra special for guests or gift boxes.
Side Dishes
These candies shine on their own but pair beautifully with hot cocoa, mulled wine, or your favorite holiday coffee blend. They also add a sweet contrast to a cheese board or spiced nuts if you’re hosting a party.
Creative Ways to Present
For fancy gatherings, I like placing the candies in mini decorative cupcake liners arranged on tiered trays alongside Christmas cookies and peppermint bark. Wrapping little bunches in cellophane tied with ribbon makes cute handout gifts too. Presentation really turns these simple treats into something to remember.
Make Ahead and Storage
Storing Leftovers
I keep leftover chocolate candies in an airtight container in a cool, dry place to prevent them from sweating or melting. They’ve held up beautifully in my kitchen for up to two weeks, staying crisp and festive.
Freezing
Freezing works well too! Pop the candies in a freezer-safe container with parchment between layers, and they’ll stay fresh for up to three months. When it’s time to enjoy, just thaw them in the fridge overnight to keep their shine and texture.
Reheating
Generally, these candies are best eaten cold or at room temperature, but if you want to soften them a bit before serving, let them sit out for 10 to 15 minutes. I don’t recommend direct reheating because the chocolate might lose its smooth texture or bloom.
FAQs
-
Can I use regular chocolate bars instead of melting wafers?
You can, but melting wafers melt more smoothly and set nicely without tempering. If using regular chocolate bars, chop finely and melt gently to avoid burning or seizing. Adding a little coconut oil can help with smoothness when melting bar chocolate.
-
What if I don’t have candy molds?
No worries! You can simply spread the melted chocolates on parchment paper and break the set chocolate into irregular pieces—this rustic look is charming and just as tasty.
- How do I prevent sprinkles from sinking?
To keep sprinkles on the surface, add them immediately after pouring the chocolate while it’s still warm but starting to thicken. Quick work is key so they don’t sink to the bottom.
- Can I make this candy gluten-free?
Absolutely! Most sprinkles and melting chocolates are naturally gluten-free, but double-check labels to be sure. Using gluten-free certified sprinkles is a safe bet.
- What’s the best way to crush candy canes?
I like to put candy canes in a sealed plastic bag and gently crush them with a rolling pin or the bottom of a heavy pan. This gives a nice coarse texture—not too powdery.
Final Thoughts
Honestly, this Chocolate Christmas Candy with Sprinkles and Candy Canes Recipe feels like a little holiday hug in dessert form. It’s simple enough to make on a whim but special enough to impress anyone you share it with. Whether you’re gifting neighbors, fueling a festive party, or just treating yourself, I hope you enjoy every bite as much as I do each year. Give it a try—once you do, I bet it’ll become a favorite holiday tradition in your kitchen too.
Print
Chocolate Christmas Candy with Sprinkles and Candy Canes Recipe
- Prep Time: 15 minutes
- Cook Time: 10 minutes
- Total Time: 25 minutes
- Yield: Approximately 24 candies depending on size 1x
- Category: Dessert
- Method: No-Cook
- Cuisine: American
- Diet: Vegetarian
Description
This festive Chocolate Christmas Candy recipe combines smooth semi-sweet and creamy white melting chocolates to create delightful holiday treats. Decorated with colorful non-pareil sprinkles and crushed candy canes, these candies are perfect for gifting or enjoying during the Christmas season. Easy to make and visually attractive, they bring holiday cheer in every bite.
Ingredients
Chocolate Bases
- 2 cups semi-sweet melting chocolates
- 2 cups white chocolate melting wafers
Decorations
- ½ cup white non-pareil sprinkles
- ½ cup red, green, and white non-pareil sprinkles
- ½ cup crushed candy canes
Instructions
- Melt the Semi-Sweet Chocolate: Gently melt 2 cups of semi-sweet melting chocolates in a microwave-safe bowl, heating in 30-second intervals and stirring well each time until smooth and fully melted.
- Melt the White Chocolate: Similarly, melt 2 cups of white chocolate melting wafers in a separate microwave-safe bowl, using the same method of 30-second bursts with stirring to prevent burning and ensure a smooth texture.
- Prepare Molds or Baking Sheet: Line a baking sheet with parchment paper or prepare candy molds for shaping the chocolates prior to decorating.
- Pour Semi-Sweet Chocolate: Carefully pour or spoon the melted semi-sweet chocolate onto the prepared surface or into molds, creating desired shapes for the candies.
- Decorate with Sprinkles and Candy Canes: While the semi-sweet chocolate is still warm and soft, evenly sprinkle ½ cup white non-pareil sprinkles, ½ cup mixed red, green, and white non-pareil sprinkles, and ½ cup crushed candy canes over the surface to add festive color and crunch.
- Pour White Chocolate Layer: Optionally, drizzle or spoon the melted white chocolate over the decorated semi-sweet chocolate to create a marbled or dual chocolate effect, enhancing both flavor and appearance.
- Set the Candies: Allow the chocolates to cool and harden completely at room temperature or chill briefly in the refrigerator until firm and set.
- Remove and Serve: Once fully hardened, gently remove the candies from the molds or break into pieces if set on a baking sheet. Store in an airtight container until ready to enjoy or gift.
Notes
- Melting chocolates at a low microwave power helps prevent scorching and ensures a smooth finish.
- Using quality melting wafers guarantees a glossy and stable texture in the finished candies.
- Customize the decoration by adding nuts, dried fruit, or festive colored candies if desired.
- Store candies in a cool, dry place away from direct heat and humidity to maintain freshness.
- This recipe is suitable for gifting during the holiday season and can be tailored for various flavor variations by adding peppermint extract or sea salt.
Keywords: Christmas candy, chocolate recipe, holiday sweets, festive chocolates, candy canes, semi-sweet chocolate, white chocolate