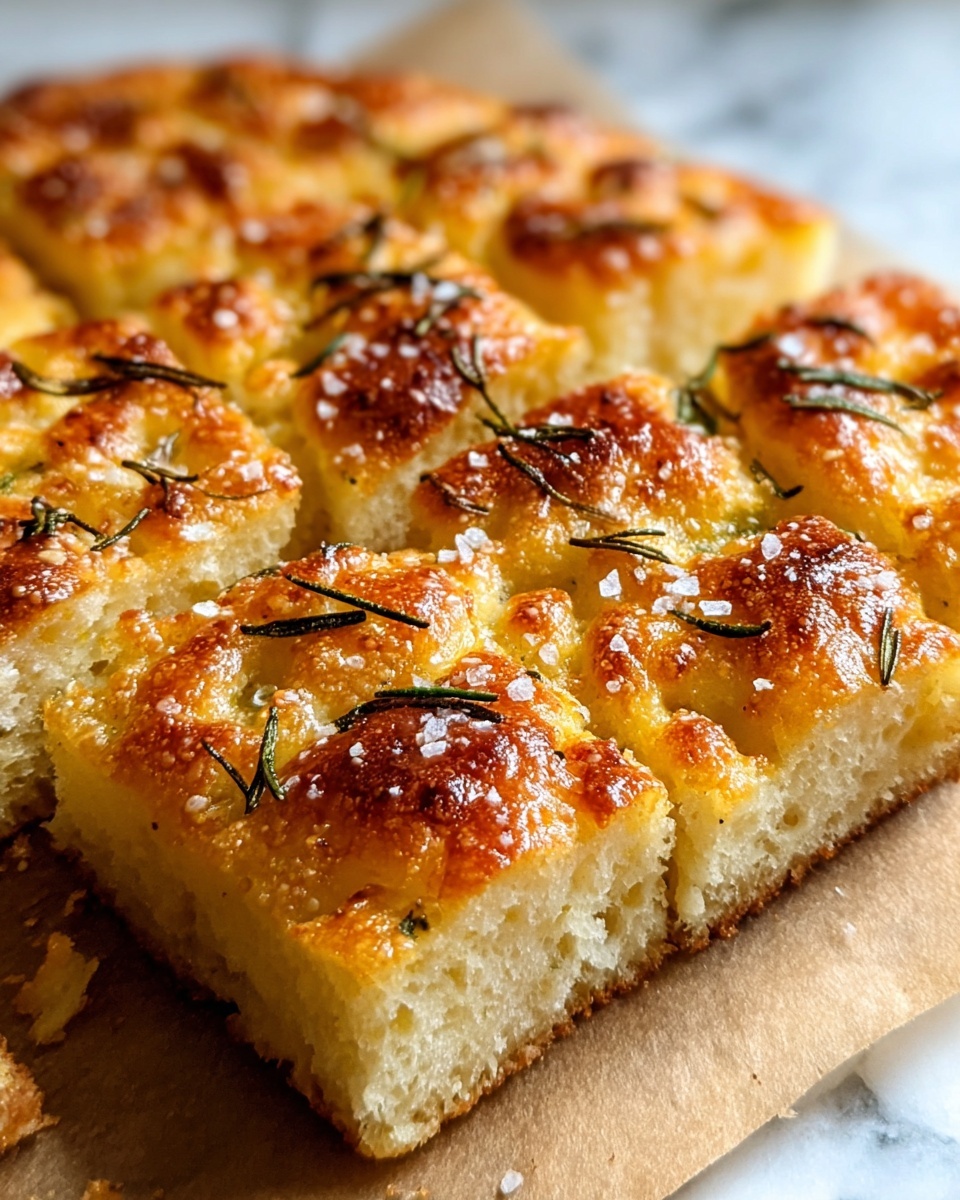
Crispy and Cheesy Garlic Parmesan Focaccia Bread Recipe
If you’re anything like me, there’s nothing quite like a warm, golden loaf of bread fresh from the oven to make your kitchen feel like home. This Crispy and Cheesy Garlic Parmesan Focaccia Bread Recipe has quickly become one of my favorites because it hits all the right notes — crispy edges, that melty cheesy goodness, and a garlicky aroma that practically pulls you into the kitchen. It’s perfect for when you want to impress company without spending hours slaving away, or simply when you need a comforting snack that pairs so well with just about everything.
What I love most about this Crispy and Cheesy Garlic Parmesan Focaccia Bread Recipe is how versatile it is. Whether you’re serving it alongside a hearty soup, chopping it up for bruschetta, or just enjoying it plain with a little extra olive oil on the side, it never disappoints. Plus, it’s one of those recipes that really thanks you for your patience—the longer you let it rise, the better the texture. Trust me, you’ll be making this again and again.
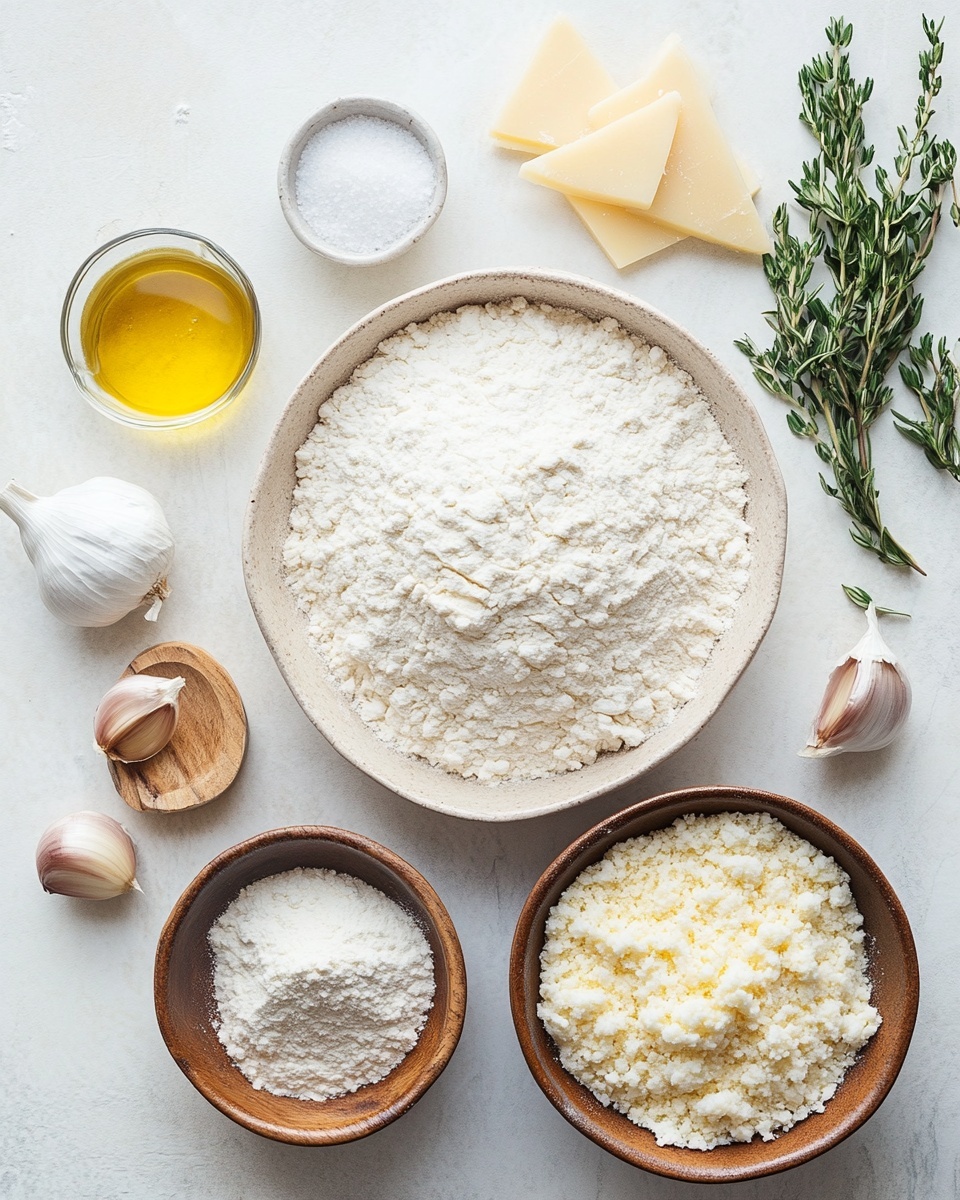
Ingredients You’ll Need
Each ingredient in this recipe plays a key role in building the focaccia’s flavor and texture. Make sure to use good-quality olive oil and fresh Parmesan for the best results — these little details really shine through in the finished bread!
- All-purpose flour: Provides the structure for the bread; don’t swap this unless you know what you’re doing, as it affects the texture.
- Active dry yeast: The magical ingredient that makes the dough rise — proof it in warm water for best activation.
- Warm water: Should be comfortably warm, not hot, to activate yeast without killing it.
- Sugar: Feeds the yeast so the dough rises beautifully and gets airy.
- Kosher salt: Adds essential flavor balancing all the savory elements.
- Olive oil: Both in the dough and on the baking pan, it gives the focaccia a crisp crust and moist crumb.
- Garlic cloves: Fresh minced garlic brings that classic punch; roasting it is an option for a milder, sweeter flavor.
- Freshly grated Parmesan cheese: Adds cheesy richness and a salty bite that melts and crisps wonderfully during baking.
Variations
One of the things I enjoy most is tweaking this Crispy and Cheesy Garlic Parmesan Focaccia Bread Recipe just a bit to suit whatever mood or occasion I’m in. You’re absolutely encouraged to put your own spin on it — that’s where the fun begins!
- Herb-infused focaccia: I sometimes add fresh rosemary or thyme on top, which gives it a beautiful herbal aroma that pairs perfectly with the garlic and Parmesan.
- Gluten-free adaptation: Using a quality gluten-free flour blend works, but keep in mind it might need an additional binder and a bit more kneading.
- Spicy twist: Sprinkle a pinch of red pepper flakes along with the garlic for a subtle kick that livens up the bread.
- Cheese variety: Swap or mix Parmesan with Asiago or Pecorino Romano for a slightly different cheesy profile that’s equally delicious.
How to Make Crispy and Cheesy Garlic Parmesan Focaccia Bread Recipe
Step 1: Proof the yeast to get that perfect rise
Start by combining warm water and sugar in a bowl, then sprinkle the active dry yeast on top. Let it sit for about 5 to 10 minutes until it becomes foamy. This step is a must—it tells you your yeast is alive and ready, so your focaccia won’t end up dense or flat. If it doesn’t foam, your yeast might be old or the water too hot, so try again with fresh ingredients.
Step 2: Mix the dough and let it rise
Once your yeast mixture is bubbly, add the all-purpose flour, kosher salt, and olive oil. Stir until it comes together into a sticky dough—don’t worry if it looks wet, that’s exactly what you want. Cover the bowl with a damp cloth or plastic wrap and place it in a warm spot. I like to preheat my oven to the lowest setting for a minute, then turn it off and let the dough rest inside. After about 1 to 1½ hours, the dough should double in size.
Step 3: Prepare the toppings and shape dough
While the dough is rising, mince your garlic and grate the Parmesan. When the dough has doubled, coat your baking pan with olive oil (this not only prevents sticking but also helps form that crispy, golden crust). Gently transfer your dough into the pan and press it out to the corners—it should be thick but spread evenly.
Step 4: Dimple the dough and add toppings
This is my favorite part—the trademark dimples! Use your fingertips to poke gentle indentations all over the dough; this helps trap the olive oil, garlic, and cheese, making every bite flavorful. Sprinkle the minced garlic evenly and cover with freshly grated Parmesan. Optional: add a pinch of herbs like rosemary or a dash of red pepper flakes for that extra zing.
Step 5: Final rise and bake until golden
Let the dough rest for another 20 to 30 minutes while you preheat your oven to 425°F (220°C). This last rise helps with that airy texture inside. Bake for 20 to 25 minutes, or until the focaccia turns a beautiful golden brown and the edges get crispy. Once out of the oven, I like to brush a little more olive oil on top for shine and flavor.
How to Serve Crispy and Cheesy Garlic Parmesan Focaccia Bread Recipe
Garnishes
I’m a big fan of fresh herbs as a finishing touch—sprinkling chopped basil or parsley adds a pop of color and freshness. Sometimes, I drizzle a tiny bit of extra virgin olive oil or even a balsamic glaze to amp up the flavor right before serving.
Side Dishes
This focaccia pairs beautifully with a fresh green salad, roasted vegetables, or a bowl of soup—especially creamy tomato or minestrone. It also stands on its own, great for dipping into olive oil and balsamic or alongside your favorite charcuterie platter.
Creative Ways to Present
For special occasions, I love cutting the focaccia into small squares and arranging them on a wooden board with an assortment of cheeses, olives, and cured meats. It makes for a beautiful appetizer spread that invites friends to nibble and chat. You can also brush on infused olive oils before baking to add layers of flavor and color.
Make Ahead and Storage
Storing Leftovers
After the focaccia cools, I wrap it tightly in plastic wrap or store it in an airtight container at room temperature. It stays fresh for about 2 days; just avoid the fridge as it can dry the bread out. For longer storage, freezing is your friend.
Freezing
I freeze focaccia by wrapping it well in foil and then placing it inside a freezer bag. When I’m ready to enjoy it again, I let it thaw at room temperature for an hour or so and then pop it in a warm oven to crisp back up. This method keeps it tasting almost as fresh as when you baked it!
Reheating
For reheating, I preheat the oven to 350°F (175°C) and warm the focaccia for about 10 minutes. If you want super crispy edges, switch to broil for the last minute or two, but watch closely to avoid burning. Avoid microwaving if you can—it makes the texture a bit rubbery.
FAQs
-
Can I use instant yeast instead of active dry yeast in this focaccia recipe?
Yes, you can substitute instant yeast for active dry yeast. Since instant yeast works faster, you can mix it directly into the flour without proofing. Just reduce the rising time slightly, but keep an eye on the dough doubling in size.
-
How do I get the focaccia extra crispy like in the Crispy and Cheesy Garlic Parmesan Focaccia Bread Recipe?
Using plenty of olive oil on the pan and dimpling the dough traps that oil, which crisps up nicely in the oven. Baking at a higher temperature (425°F) and letting the edges brown fully also helps achieve that perfect crispiness.
-
Can I prepare the dough ahead of time and refrigerate it?
Absolutely! After mixing the dough, place it in a lightly oiled bowl, cover tightly, and refrigerate overnight. This slow rise enhances flavor. Just remember to let it come to room temperature and do the final rise before baking.
-
What’s the best way to grate Parmesan cheese for this recipe?
Using a microplane grater gives you fine, fresh shreds that melt evenly and distribute flavor in every bite. Pre-grated packaged Parmesan doesn’t melt as well and can lack that fresh taste.
-
Is this Crispy and Cheesy Garlic Parmesan Focaccia Bread Recipe suitable for beginners?
Definitely! The steps are straightforward, and the dough is forgiving. Taking your time with the rises and following the tips will help ensure your success, even if you’re new to bread baking.
Final Thoughts
This Crispy and Cheesy Garlic Parmesan Focaccia Bread Recipe holds a special place in my kitchen rituals. It’s one of those recipes that fills your home with comforting aromas and gives you that satisfying crust-and-cheese combo every time. Whether you’re making it for a weeknight dinner or a weekend gathering, I promise you’ll enjoy every bite. So grab your ingredients, roll up your sleeves, and give it a try—I can’t wait to hear about how it turns out for you!
Print
Crispy and Cheesy Garlic Parmesan Focaccia Bread Recipe
- Prep Time: 15 minutes
- Cook Time: 25 minutes
- Total Time: 40 minutes
- Yield: 8 servings 1x
- Category: Bread
- Method: Baking
- Cuisine: Italian
- Diet: Vegetarian
Description
This Crispy and Cheesy Garlic Parmesan Focaccia Bread recipe delivers a golden, flavorful Italian classic with a perfectly crispy crust and a soft, airy interior. Infused with fresh garlic and parmesan cheese, this focaccia is ideal as a savory snack, appetizer, or accompaniment to any meal. Easy to prepare and bake, it’s a delicious homemade bread everyone will love.
Ingredients
For the Dough
- 4 cups all-purpose flour
- 2¼ teaspoons active dry yeast
- 1¾ cups warm water
- 2 teaspoons sugar
- 2 teaspoons kosher salt
- ¼ cup olive oil
For the Toppings
- 4 garlic cloves, minced
- ½ cup freshly grated Parmesan cheese
Instructions
- Proof the Yeast: In a mixing bowl, combine warm water and sugar. Sprinkle the active dry yeast on top and let it sit for 5 to 10 minutes until the surface turns foamy, indicating the yeast is active.
- Mix Dough: Add the all-purpose flour, kosher salt, and olive oil to the bowl with the yeast mixture. Stir until a sticky dough forms. Cover the bowl with a clean towel or plastic wrap and let the dough rise in a warm spot for 1 to 1½ hours, until it has doubled in size.
- Prepare Toppings: While the dough is rising, mince the garlic cloves and grate the fresh Parmesan cheese. Lightly oil a baking pan and carefully transfer the risen dough into it.
- Dimple Dough: With your fingertips, create indents or dimples all over the surface of the dough. Evenly sprinkle the minced garlic and grated Parmesan cheese on top. You may add optional herbs such as rosemary if desired.
- Final Rise & Bake: Allow the dough to rise again for 20 to 30 minutes as you preheat the oven to 425°F (220°C). Bake the focaccia bread for 20 to 25 minutes, or until the crust is golden brown and crispy.
Notes
- For extra flavor, drizzle additional olive oil on top before baking.
- Optional herbs like rosemary or thyme complement the garlic and parmesan nicely.
- Use room temperature water (about 110°F) to proof the yeast effectively.
- Make sure to create deep dimples in the dough to hold the garlic and cheese.
- Serve warm for best texture and taste.
Keywords: Focaccia, garlic parmesan bread, Italian bread, cheesy focaccia, homemade bread, crispy bread, savory bread