Easter Cake with Lemon Icing and Sprinkles Recipe
If you’re looking to add a bright, cheerful centerpiece to your Easter table, this Easter Cake with Lemon Icing and Sprinkles Recipe is an absolute winner. It’s got a light, fluffy texture with a hint of lemon that feels just right for spring, and the lemon icing topped with colorful sprinkles adds that perfectly playful touch. Honestly, whenever I make this cake, friends and family always ask for seconds, and I think it’s because it strikes a lovely balance of rich flavor and fresh brightness.
What really makes this Easter Cake with Lemon Icing and Sprinkles Recipe so special is how approachable it is—I love that you can prepare the dough in a bread machine or with a stand mixer, depending on what you have. Plus, the steps allow you to shape the cake in fun ways, like bundt or classic round forms, so it’s easily customizable. This recipe feels like a warm kitchen hug and is perfect not only for Easter but for any springtime gathering where a joyful, tasty treat is needed.
Ingredients You’ll Need
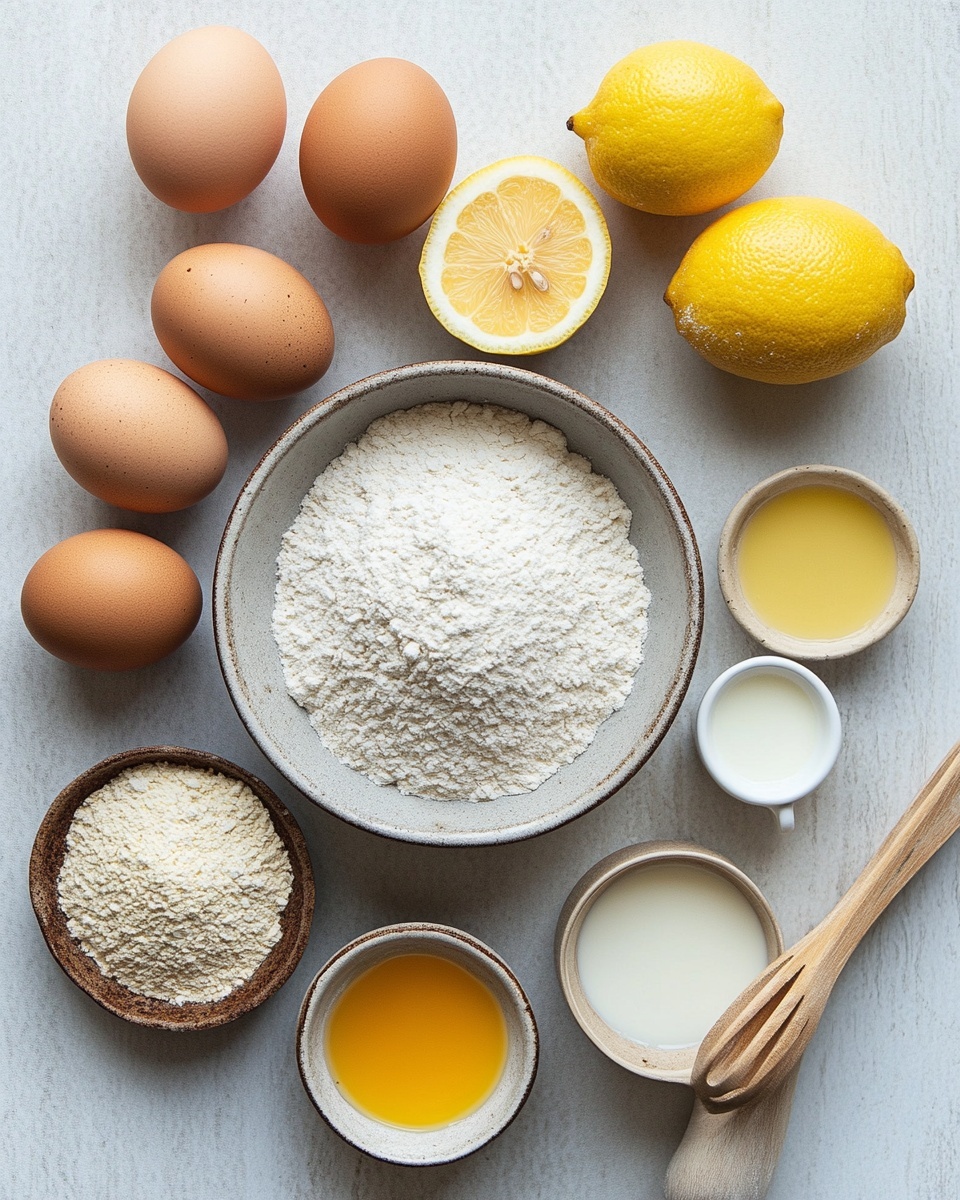
The ingredients in this Easter Cake with Lemon Icing and Sprinkles Recipe come together to create a balanced taste and texture. The light olive oil keeps it moist without heaviness, while the anisette or Sambuca provides a subtle aromatic note that complements the zingy lemon rind beautifully. I always recommend using fresh lemon rind—it really makes a difference in flavor.
- Milk: Use warm milk to activate the yeast properly and help the dough rise well.
- Eggs: They provide structure and richness—you want them beaten for good incorporation.
- Light olive oil: This keeps the cake tender without overpowering flavors.
- Anisette (or Sambuca): Adds a slight licorice flavor that pairs wonderfully with lemon; feel free to substitute your favorite liqueur.
- Lemon rind: Freshly grated lemon rind is non-negotiable for that authentic citrus burst.
- Sugar: Balances the tartness and feeds the yeast.
- All-purpose flour: Start with 6 cups and adjust as needed for the perfect dough consistency.
- Salt: Enhances all the flavors.
- Active dry yeast: The magic behind the fluffy texture—you want it active and bubbly.
- Confectioner’s sugar: For the smooth lemon icing that’s sweet but not cloying.
- Lemon juice (and/or water): Adds acidity and thins out the icing to a spreadable honey-like texture.
- Edible sprinkles: What’s an Easter cake without a bit of colorful fun on top?
Variations
One of the things I love most about this Easter Cake with Lemon Icing and Sprinkles Recipe is how easy it is to customize. I often switch up the liqueur depending on what’s in my cupboard, or sometimes I skip it altogether for a kid-friendly version. Add your favorite citrus zest, or try different toppings to make it your own—it’s all about what feels right for your celebration.
- Use orange zest instead of lemon zest: I tried this once and it gave the cake a sweeter, warmer citrus twist that was delicious.
- Omit the liqueur for a non-alcoholic version: Perfect if you’re baking for kids or prefer a simpler flavor.
- Add chopped candied fruit or dried cranberries: It’s a fun texture and flavor variation I’ve enjoyed in special family gatherings.
- Gluten-free flour blend: I haven’t tried this extensively, but using a reliable gluten-free blend could work if you adjust liquids slightly.
- Use cream cheese frosting instead of lemon icing: For a richer finish, especially if you want a less tangy top.
How to Make Easter Cake with Lemon Icing and Sprinkles Recipe
Step 1: Get your dough started right
If you have a bread machine, this is your easiest route. Add all the liquids first: warm milk, beaten eggs, light olive oil, and anisette or your chosen liqueur. Then sprinkle in the grated lemon rind—you want that fresh zest spread throughout the dough from the start. Add your dry ingredients next, except the yeast. Make a small well in the flour and add your yeast there last before starting the dough cycle. Watch the dough come together; if it seems a bit too sticky, sprinkle in a little more flour, but remember it should stay slightly sticky to keep the cake moist and tender.
Step 2: Standing mixer method if you prefer hands-on
If you’re going the stand mixer route, dissolve your yeast in the warm milk and let it bubble up—that’s your proof of active yeast. Beat the eggs and sugar until light and fluffy, then switch to the dough hook. Gently combine the milky yeast mixture, oil, liqueur, and lemon zest, then start adding flour slowly while mixing on low. Knead for about 10 minutes until your dough is elastic and slightly sticky. Shape into a ball and let it rest, covered, so it can double in size. I’ve found that the kneading time is key here—don’t rush it or your dough can’t get that perfect springy texture.
Step 3: Shape and proof your cake dough
Grease and flour your springform pans and line the bottoms with parchment—this really helps with easy removal later. After the dough has doubled, gently punch it down and divide into three equal parts for three cakes. Shape each into a round ball. If you want a classic cake, just pop the balls into the pans. For the bundt style, create a hole in the center by pinching and gently stretching the dough before placing it in your prepared pan or even a buttered glass jar filled with rice; it’s a quirky trick I picked up that works beautifully if you don’t have a bundt tin. Let them rise again, covered, in a warm spot for 3 to 5 hours until puffed up and light.
Step 4: Bake to golden perfection
Preheat your oven to 350°F (175°C). Bake the cakes for about 25 minutes, but keep an eye on them—they should be lightly golden and feel extremely airy when you lift them. I usually test by lightly pressing the surface; it should spring back. After baking, let them cool in the pan for about 45 minutes before carefully removing the sides and parchment. If you used a glass jar, twist gently to release. This wait is essential so the cake sets just right without collapsing.
Step 5: Whip up the lemon icing and decorate
While the cakes are cooling, mix the lemon icing by slowly stirring lemon juice (and some water if needed) into powdered sugar until you reach a thick honey-like consistency. I like to keep the icing covered until the cakes are cool. Then, generously spread it over each cake one at a time—do this quickly so the icing stays fresh and you can work sprinkles into it before it sets. Seriously, those sprinkles bring out such a fun, festive vibe that’s perfect for Easter morning.
How to Serve Easter Cake with Lemon Icing and Sprinkles Recipe
Garnishes
I usually keep the garnishes simple but bright—fresh lemon zest, a handful of pastel-colored edible sprinkles, or even a few fresh edible flowers when I want to get fancy come presentation time. These touches don’t just look stunning; they add fresh aroma and a little textural contrast to the soft icing.
Side Dishes
This cake pairs beautifully with a side of lightly whipped cream or fresh berries—think strawberries or raspberries—to balance the citrusy sweetness. Pairing it with a cup of mild breakfast tea or a fresh lemonade can make the whole experience feel like a special spring brunch.
Creative Ways to Present
For Easter gatherings, I love stacking the cakes or arranging smaller slices on a decorative platter surrounded by pastel Easter eggs or spring greens. Another fun idea is to make mini versions in a muffin tin and drizzle the lemon icing individually, topping each with small sprinkles—perfect for party favors or kid-friendly servings.
Make Ahead and Storage
Storing Leftovers
Once iced, store your Easter Cake with Lemon Icing and Sprinkles in an airtight container, ideally in the fridge to keep the icing fresh. I find that keeping it chilled also helps the icing stay glossy and prevents it from getting too sticky on the surface. Leftovers generally last well for 3 to 4 days this way.
Freezing
I’ve frozen this cake before, but I always freeze it without the icing because the texture of lemon icing can change and get a bit grainy. Wrap the uniced cake tightly in plastic wrap and foil, then thaw overnight in the fridge when ready to serve. Once thawed, I add freshly made icing and sprinkles right before serving for best results.
Reheating
If you like your cake a bit warm, gently reheat slices in the microwave for 10-15 seconds or in a low oven covered with foil. I avoid reheating iced cake directly to prevent melting or running icing. Instead, reheat then add a fresh drizzle of lemon icing if you have some extra on hand.
FAQs
-
Can I make the Easter Cake with Lemon Icing and Sprinkles Recipe without a bread machine?
Absolutely! The recipe includes detailed stand mixer instructions which are just as effective. If you don’t have a stand mixer, you can mix and knead by hand—it just takes a bit more time and elbow grease. The key is to knead long enough (around 10 minutes) for the dough to develop the right texture.
-
What if I don’t have anisette or Sambuca? Can I omit the liqueur?
Yes, you can omit or replace the liqueur with vanilla extract or even just leave it out. The liqueur adds a subtle, aromatic background note, but the lemon rind and icing carry most of the cake’s flavor punch. When skipping liqueur, you might want to add a little extra lemon zest or a teaspoon of vanilla to keep it flavorful.
-
How can I tell when the cake is fully baked?
The cake will be golden brown on top, feel very light when you lift the pan, and spring back when gently pressed. You can also insert a toothpick in the thickest part—the toothpick should come out clean or with only a few moist crumbs.
-
Can I decorate the cake ahead of time?
I recommend icing and decorating the cake a few hours before serving to keep the sprinkles fresh and colorful. If you need to decorate earlier, store the cake in an airtight container but watch for sprinkles that might lose their vibrancy over time.
-
Is this cake suitable for kids?
Yes! You can make it kid-friendly by simply leaving out the anisette or other liqueur. The lemon icing and sprinkles make it very appealing to children, and the soft, tender crumb is easy for little ones to enjoy.
Final Thoughts
This Easter Cake with Lemon Icing and Sprinkles Recipe holds a special place in my heart because it always brings friends around the table, sharing stories and laughter over a slice of something homemade and bright. I love how it balances the nostalgic feel of classic holiday baking with the fresh zing of lemon—making it both comforting and lively. If you’re thinking about a special Easter treat, give this recipe a try; I bet you’ll love how easy it is to make and how much joy it brings to your celebration.
Print
Easter Cake with Lemon Icing and Sprinkles Recipe
- Prep Time: 10 minutes
- Cook Time: 25 minutes
- Total Time: 4 hours 35 minutes
- Yield: 3 cakes 1x
- Category: Dessert
- Method: Baking
- Cuisine: European
Description
This traditional Easter Cake recipe yields soft, airy, and lightly flavored sweet bread enhanced with lemon zest and anisette liqueur. Perfectly topped with a smooth lemon glaze and colorful edible sprinkles, these cakes are ideal for festive celebrations. Utilizing either a bread machine or stand mixer, the dough is gently kneaded and allowed to rise slowly before baking to golden perfection.
Ingredients
Dough Ingredients
- 1 cup warm milk
- 6 eggs, beaten
- 6 oz light olive oil
- 3 Tbsp anisette (or Sambuca, or other liqueur)
- 1 large lemon rind, grated
- 1 ¼ cups sugar
- 6 cups all-purpose flour (up to 7 cups or 840 g if using metric)
- ⅛ tsp salt
- 2 ¼ tsp active dry yeast
Icing & Decoration
- 4 cups confectioner’s sugar (powdered sugar)
- 4 ½ Tbsp lemon juice and/or water
- 1 Tbsp edible sprinkles (as needed for decorating)
Instructions
- Prepare Dough in Bread Machine: Place all liquid ingredients—warm milk, beaten eggs, light olive oil, and anisette—in the bread machine container. Add grated lemon rind on top. Add dry ingredients except yeast—sugar, flour (start with minimum), and salt. Make a well in the flour and add yeast. Set the bread machine to dough cycle and run. Add more flour as needed for a slightly sticky dough consistency.
- Prepare Dough Using Stand Mixer: Dissolve yeast in warm milk and let activate. Beat eggs and sugar in the stand mixer for 3–4 minutes. Change to dough hook and add milk with yeast, oil, anisette, and lemon rind, mixing on low to combine. Gradually add flour until dough is soft and slightly sticky. Knead with dough hook for at least 10 minutes until smooth. Shape into a ball and cover.
- Prepare Pans: Butter and flour three 9-inch springform pans, lining bottoms with parchment paper for easy cake removal.
- First Rise: Allow dough to double in size. Then gently turn dough onto a floured surface, knead lightly, and divide into three equal parts.
- Shape Dough: Shape each part into round balls. For regular cakes, place balls directly into prepared pans. For bundt-style cakes, form a hole in the center of each dough ball using fingers and stretch it to create a ring shape before placing in a bundt pan or buttered jar filled with rice.
- Second Rise: Cover shaped dough and allow to rise for 3 to 5 hours, until well risen. Preheat oven to 350°F (175°C) during this time.
- Bake Cakes: Bake in preheated oven for about 25 minutes, until golden brown and very light in weight. Cakes should be fully baked through.
- Cool Cakes: Let cakes cool in pans for about 45 minutes. Carefully remove sides, parchment paper, bottoms, and any jars used for shaping.
- Prepare Icing: Mix lemon juice and/or water gradually into powdered sugar until smooth with the consistency of thick honey. Keep covered until ready to use.
- Ice and Decorate: Spread icing generously over tops of cooled cakes one at a time. Quickly add edible sprinkles before icing sets, allowing it to drip down naturally. Let icing set fully before serving or storing in airtight containers.
Notes
- For smaller batches, scale ingredients accordingly: ⅓ cup warm milk, 2 beaten eggs, 2 oz olive oil, 1 Tbsp anisette, 6½ Tbsp sugar, 2 to 2⅓ cups flour, pinch of salt, and ¾ tsp yeast.
- Adjust flour quantity as needed; dough should be slightly sticky but manageable.
- Use parchment paper in pans to prevent sticking and for easier cake removal.
- Bundt cake shaping can be done using a buttered glass or jar filled with rice if a bundt pan is unavailable.
- Allowing the dough to rise slowly contributes to the light and airy texture of the cake.
- The lemon icing should be spread quickly before setting to achieve a beautiful decorative effect.
Keywords: Easter cake, festive bread, lemon cake, sweet bread, holiday dessert, baking, anisette cake