Easter Sugar Cookies with Royal Icing Recipe
Oh, I just have to tell you about these Easter Sugar Cookies with Royal Icing Recipe that I’ve been making for years—it’s truly become my go-to treat every spring. There’s something magical about the buttery, tender cookies paired with that beautifully smooth royal icing, which practically turns them into edible little works of art. Whether you’re hosting an Easter brunch or just want to make something sweet with the kids, this recipe absolutely shines.
I love how this Easter Sugar Cookies with Royal Icing Recipe doesn’t just taste amazing but also lets you get creative with colors and designs. I’ve always found baking these cookies to be such a joyful way to spend an afternoon, especially when decorating with friends or family. Plus, the cookie dough is forgiving and easy to manage, so you’ll find yourself coming back to this recipe year after year!
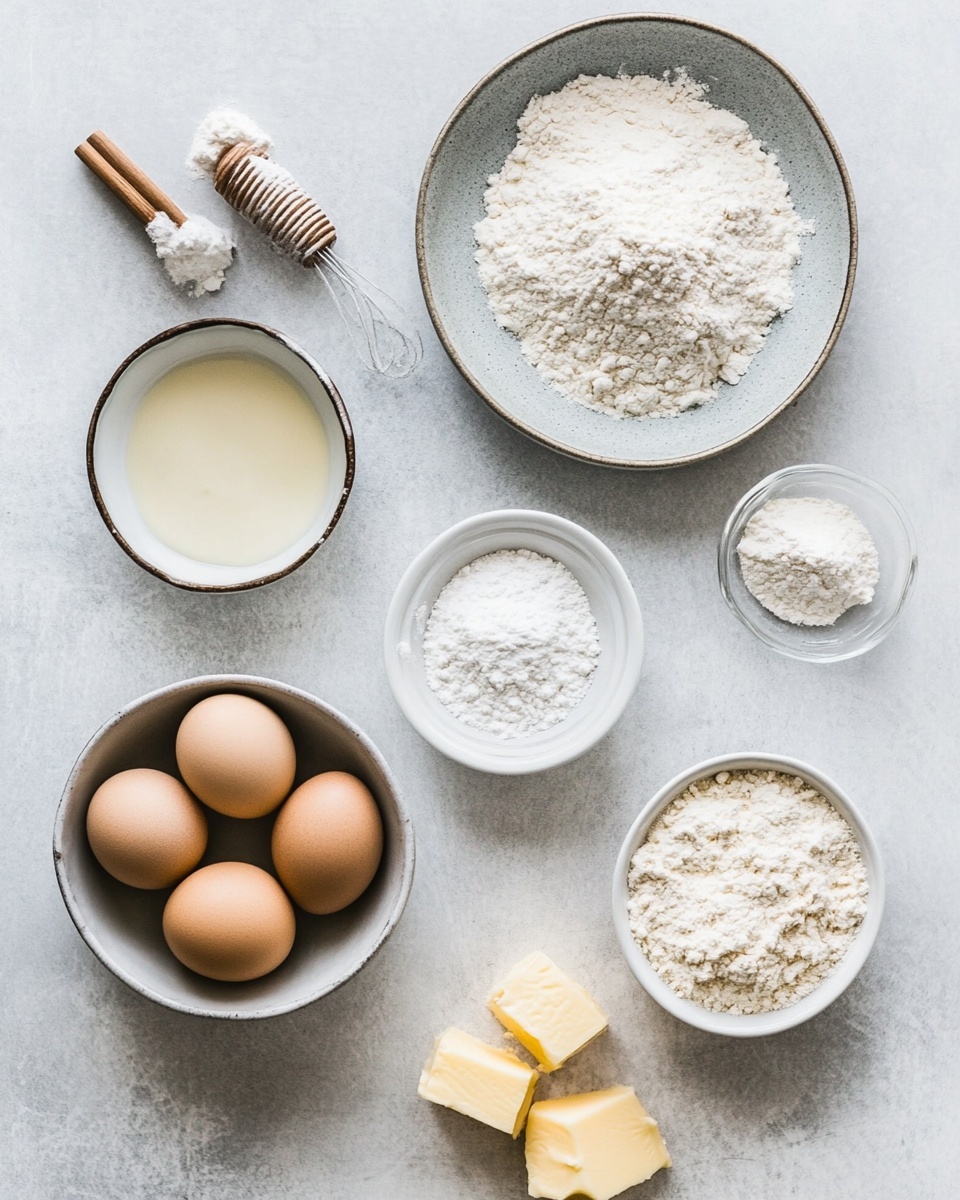
Ingredients You’ll Need
All the ingredients in this Easter Sugar Cookies with Royal Icing Recipe work perfectly together to create a cookie that’s soft but holds its shape nicely, which is crucial for decorating. Here’s a quick rundown of why each one matters and a few tips for picking the best quality.
- Plain, all purpose flour: This is the backbone of the cookie dough, giving it structure. Measure it carefully and avoid scooping directly with the cup to keep the dough from turning dry or tough.
- Baking powder: Just a touch helps the cookies rise slightly so they aren’t too dense—don’t skip it!
- Salt: Balances sweetness and enhances flavor. I always use fine sea salt here for the best subtle kick.
- Unsalted butter: Softened but not melted, butter adds tenderness and flavor. Using unsalted butter lets you control the salt precisely.
- Caster or granulated sugar: Caster sugar dissolves easily and makes the texture silky—perfect for these cookies.
- Large egg: Adds richness and helps bind everything together.
- Vanilla extract: Don’t skimp here! Real vanilla gives the cookies a lovely warm aroma.
- Royal icing sugar (for icing): Super fine and sifted, this is what makes the icing smooth and easy to pipe. If unavailable, powdered sugar mixed with meringue powder works too.
- Room temperature water (for icing): Crucial for getting the icing’s consistency just right. Add slowly, it’s easier to thin than thicken up icing.
Variations
I often mix this Easter Sugar Cookies with Royal Icing Recipe up a bit depending on who I’m baking for and what vibe I want. It’s fantastic to tweak, so feel free to experiment and make it your own!
- Gluten-Free Version: I’ve had good luck swapping in a gluten-free all-purpose flour blend that measures cup-for-cup for regular flour. Just keep an eye on the texture of the dough—it might need a little extra chilling.
- Flavored Icing: Sometimes I add a drop of almond or lemon extract to the royal icing. It gives a fun twist that guests often don’t expect.
- Natural Coloring: For a healthier take, I’ve used beetroot powder or matcha mixed with water instead of artificial gel colors, and the results are surprisingly vibrant!
- Simple Sugar Cookie: If you’re short on time, skip the rolling and cutting and just make round drop cookies. They still taste amazing even if they aren’t so fancy.
How to Make Easter Sugar Cookies with Royal Icing Recipe
Step 1: Mix Your Dry Ingredients
Start by whisking together the flour, baking powder, and salt in a medium bowl and set it aside. This helps evenly distribute everything and avoids pesky pockets of baking powder or salt in the finished cookies.
Step 2: Cream the Butter and Sugar
Using your mixer, beat the softened butter on medium-high until it’s pale and fluffy—about two minutes. Then add sugar and keep beating for another couple of minutes. This step is key because it traps air in the mixture, making your cookies light and tender.
Step 3: Add the Egg and Vanilla
Add your egg and vanilla extract to the butter mixture and beat on high speed until everything’s fully combined. Be sure to scrape down the sides and the bottom of the bowl so no dry flour or sugar hides away.
Step 4: Combine Wet and Dry Ingredients
Turn your mixer to low and gradually add the flour mixture. Mix just until combined—overmixing here can make the cookies tough. Once the dough forms, split it into two halves and prepare for rolling.
Step 5: Roll and Chill Your Dough
Roll each half of dough between two sheets of baking paper or silicone mats to about 5mm thick. This prevents sticking and makes transferring easier. Pop the rolled dough into the fridge for at least one to two hours—chilling is crucial for that perfect texture and helps your cookies hold their shape during baking.
Step 6: Cut, Bake, and Cool
Preheat the oven to 180°C (160°C fan). Using your favorite cookie cutters, cut out shapes from the chilled dough and place them on lined baking trays. Bake for about 10 minutes until the edges just start turning golden. Avoid overbaking so they stay soft inside. Then, transfer to a wire rack to cool completely before icing.
Step 7: Mix the Royal Icing
In a mixer with a whisk attachment, combine the sifted royal icing sugar and room temperature water. Whisk for about 2 minutes until the icing drizzles down smoothly and levels out in about 10 to 12 seconds. Adjust water or icing sugar by teaspoons until you get this perfect flood consistency.
Step 8: Color and Pipe Your Icing
Divide your icing into bowls and stir in gel food coloring a drop at a time until you get your desired hues. Fill piping bags, snip tiny tips, and start by outlining the cookies. Let the edges dry a few minutes, then flood the inside, filling any gaps with a toothpick. Gently tap to spread the icing evenly and leave the cookies to dry completely before adding more layers or decorations.
How to Serve Easter Sugar Cookies with Royal Icing Recipe
Garnishes
When it comes to garnishes, I love using sprinkles sparingly to add a little sparkle and texture—just a light dusting on the freshly piped icing. Edible glitter, miniature sugar pearls, or even a dust of colored sanding sugar really help level up the look without overwhelming the delicate icing.
Side Dishes
These cookies pair wonderfully with a fresh cup of tea, but I also love serving them alongside a bright fruit salad or a creamy vanilla yogurt dip. For brunch, they’re a sweet finish after savory dishes like quiche or smoked salmon.
Creative Ways to Present
I’ve had a lot of fun arranging these cookies on pastel-colored plates or tiered stands, especially when hosting Easter gatherings. Wrapping a few in clear cellophane tied with a ribbon makes an adorable gift. For the kiddos, setting up a decorate-your-own cookie station with different icing colors is always a hit and sparks tons of creativity.
Make Ahead and Storage
Storing Leftovers
I keep leftover cookies in an airtight container at room temperature, and they usually stay fresh and soft for up to a week. When stacking decorated cookies, I place parchment paper between the layers to avoid smudging the icing—this little trick saves so much hassle.
Freezing
Freezing both plain and decorated cookies works really well for me, especially when I want to prep early for Easter. I layer them between baking paper inside a freezer-safe container, and they keep for up to three months. Just thaw them at room temperature before serving to get that perfect soft bite back.
Reheating
Since these cookies are best enjoyed at room temperature, I usually just let them sit out for about 20 minutes after thawing. Occasionally, if they’re feeling a little firm, a quick 5-second zap in the microwave softens them without melting the icing. Just keep an eye on them to avoid overdoing it.
FAQs
-
Can I make the dough ahead of time for this Easter Sugar Cookies with Royal Icing Recipe?
Absolutely! You can prepare the dough in advance, freeze it for up to three months, and thaw it in the fridge overnight. Just bring it to room temperature before rolling it out, and don’t forget to chill the rolled dough again before cutting and baking for the best results.
-
What’s the best way to get smooth royal icing for decorating Easter Sugar Cookies?
The key is to mix the royal icing sugar and water until you get a dripping consistency that smooths out within 10-12 seconds. Using sifted icing sugar and adding water very gradually helps avoid lumps. Drying the cookie edges a bit before flooding the center also prevents colors from bleeding.
-
Can I use regular powdered sugar instead of royal icing sugar?
You can substitute with powdered sugar mixed with a bit of meringue powder to mimic royal icing sugar’s texture. Be sure to sift well and adjust the liquid in the icing accordingly to reach correct consistency.
-
How long do the decorated Easter Sugar Cookies with Royal Icing last?
Stored in an airtight container at room temperature, these cookies stay fresh up to 7 days. Proper drying of the royal icing is essential to prevent smudging and keeps them looking great during that time.
-
Is this Easter Sugar Cookies with Royal Icing Recipe kid-friendly for decorating?
Definitely! The decorating process is fun for kids, especially when you use vibrant colors and simple piping techniques. Just be prepared for a little mess and lots of creativity flowing!
Final Thoughts
Honestly, this Easter Sugar Cookies with Royal Icing Recipe holds a special place in my heart because it brings people together in such a sweet, joyful way. Whether you’re new to baking or a seasoned cookie decorator, it’s simple enough to make enjoyable and rewarding. I hope you’ll give it a try soon—you might just find it becomes a beloved tradition for your family too!
Print
Easter Sugar Cookies with Royal Icing Recipe
- Prep Time: 1 hour
- Cook Time: 10 minutes
- Total Time: 4 hours 10 minutes
- Yield: 30 cookies 1x
- Category: Dessert
- Method: Baking
- Cuisine: American
Description
This classic Easter Sugar Cookies recipe features tender, buttery sugar cookies decorated with smooth, colorful royal icing. Perfect for holiday gatherings or festive celebrations, these cookies combine a simple homemade dough with a beautiful finishing touch of vibrant icing that you can customize with your favorite colors and designs.
Ingredients
For the Sugar Cookies:
- 280 g plain, all purpose flour
- ½ teaspoon baking powder
- ¼ teaspoon salt
- 170 g unsalted butter, softened
- 150 g caster or granulated sugar
- 1 large egg
- 1 teaspoon vanilla extract
For the Icing:
- 500 g royal icing sugar, sifted
- 9–10 tablespoons room temperature water
Instructions
- Mix Dry Ingredients: In a medium bowl, combine the flour, baking powder, and salt. Set this mixture aside while you prepare the wet ingredients.
- Cream Butter and Sugar: Using an electric mixer on medium-high speed, beat the softened butter until it becomes pale and fluffy, about 2 minutes. Add the sugar and continue to cream together for an additional 2 minutes.
- Add Egg and Vanilla: Add the egg and vanilla extract to the butter and sugar mixture and beat on high speed until fully combined. Make sure to scrape down the sides and bottom of the bowl as needed to incorporate all ingredients evenly.
- Combine Dry and Wet Mixtures: Gradually add the flour mixture to the butter mixture while mixing on low speed until just combined, avoiding overmixing to keep the cookies tender.
- Roll and Chill Dough: Divide the dough into two equal parts. On a flat surface, place a sheet of baking paper or silicone mat lightly dusted with flour. Place one half of the dough on the paper, cover with another sheet, and roll out to about 5mm thickness. Transfer the rolled dough to the fridge, repeating with the second piece if stacking, cover the top piece to prevent drying. Chill for at least 1-2 hours or ideally overnight.
- Preheat Oven and Prepare Trays: Preheat your oven to 180°C (160°C fan). Line baking trays with baking paper.
- Cut Cookies: Remove one rolled dough piece from the fridge. Use your favorite cookie cutters to cut shapes, rerolling scraps to use all dough. Repeat with the second dough piece.
- Bake Cookies: Place cut cookies on baking trays and bake on the middle oven shelf for about 10 minutes, rotating the trays halfway through. Cookies are done when edges turn lightly brown. Remove from oven and cool for 5 minutes on the tray before transferring to a wire rack to cool completely.
- Prepare Royal Icing: In a mixer bowl fitted with a whisk attachment, combine the sifted royal icing sugar and water. Beat for about 2 minutes until well combined. The icing should drizzle smoothly and solidify within 10-12 seconds when drizzled from the whisk.
- Adjust Icing Consistency: If the icing is too thick, add water a teaspoon at a time. If too thin, add more sifted royal icing sugar until the desired consistency is reached.
- Color the Icing: Divide the icing into separate bowls and add gel food coloring drops to each. Stir with a toothpick or skewer to mix colors thoroughly. Transfer colored icing to piping bags and snip the tips.
- Decorate Cookies: Pipe border lines around each cookie and allow to dry for a few minutes. Then, flood the interior of each cookie with icing using a top-to-bottom or edge-to-center motion. Use a toothpick to fill any gaps and tap cookies gently to spread icing evenly. Allow the icing to dry completely before adding additional layers or decorations.
Notes
- Storing: Store plain or decorated cookies in an airtight container at room temperature for up to 7 days.
- Freezing Cookies: Freeze plain or decorated cookies layered between baking paper in freezer-friendly containers for up to 3 months.
- Freezing Cookie Dough: Divide dough into two disks and wrap in double clingfilm layers; freeze up to 3 months. Thaw in fridge, then bring to room temperature for 45 minutes before rolling and chilling again for 1 hour prior to baking.
- Making Royal Icing Ahead: Prepare 2-3 days in advance, store covered in fridge, whisk before use.
- Freezing Royal Icing: Store in a zip-lock bag with air squeezed out; freeze up to 3 months. Thaw at room temperature or in fridge before using.
- Royal Icing Alternatives: See notes for possible substitutions if royal icing sugar is unavailable.
Keywords: Easter sugar cookies, holiday cookies, royal icing cookies, decorated sugar cookies, festive cookies