Easy Cheese Cake Cups Recipe
If you’re on the lookout for a dessert that’s both impressive and fuss-free, this Easy Cheese Cake Cups Recipe is definitely going to win your heart. Honestly, I love how these individual cheesecakes offer all the creamy, tangy goodness without the stress of a big springform pan or complicated baking. They come together quickly and look adorable on any dessert table, making them perfect for last-minute get-togethers or casual family dinners.
What makes this recipe stand out for me is just how versatile and straightforward it is. No baking skills required, no complicated ingredients, and the best part — they’re served in cute little cups that everyone loves! Plus, these Easy Cheese Cake Cups Recipe can be tailored with your favorite toppings, letting you get creative or keep it simple as you like. I’m excited to share all my tips to help you nail this dessert easily!
Ingredients You’ll Need
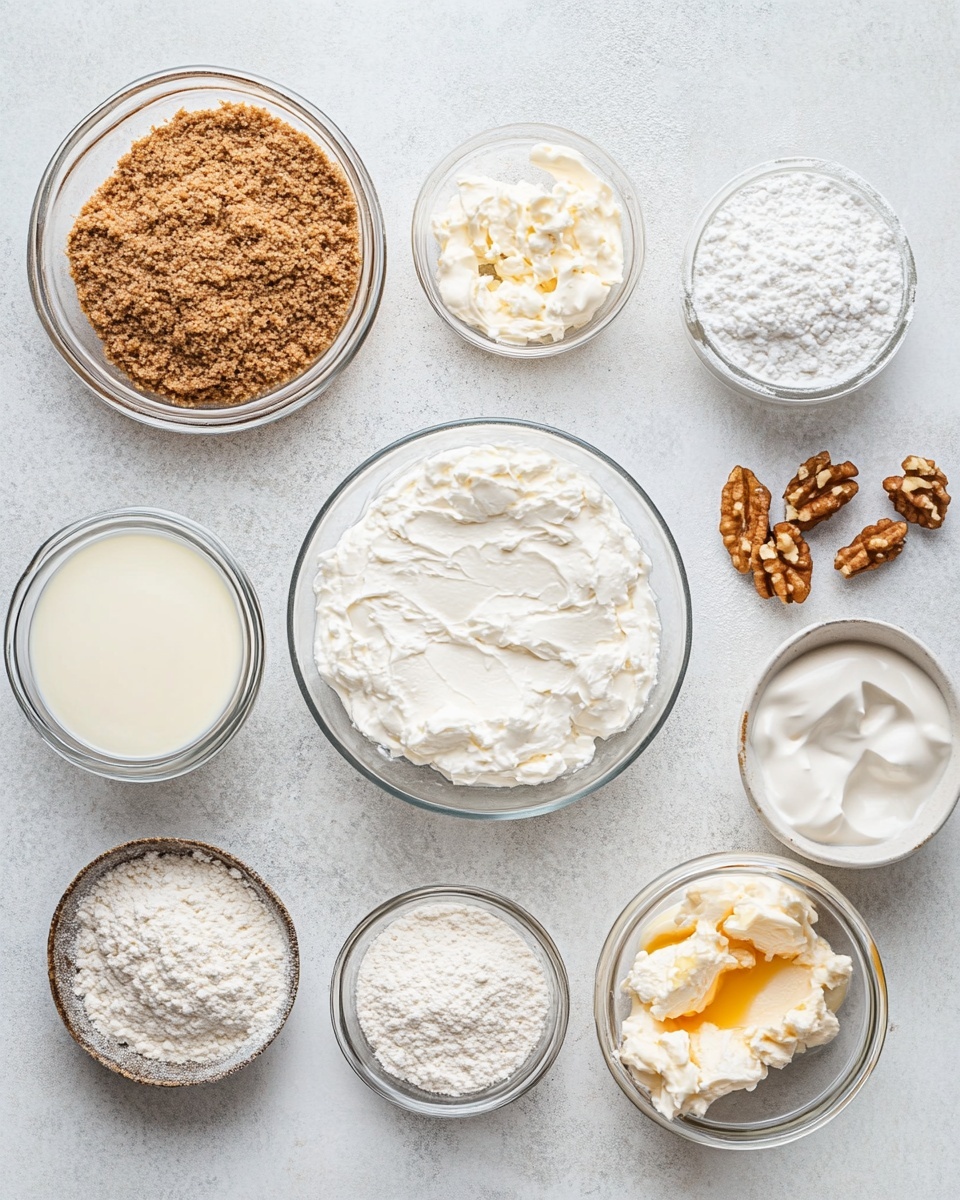
The ingredients for this recipe are simple but work together beautifully to create a smooth, creamy texture with just the right sweetness and zing. It’s great because you probably already have most of these in your pantry or fridge, which means you can whip these up anytime!
- Graham cracker crumbs: This gives the perfect crunchy base with a bit of buttery flavor. If you want to mix it up, crushed oreos or gingersnaps work well too.
- Cream cheese: Full fat and at room temperature is key for that silky smooth cheesecake filling.
- Heavy whipping cream: Chilled cream whips up beautifully for that light, fluffy texture.
- Powdered sugar: Divided to sweeten both the cream cheese and whipped cream perfectly.
- Fresh lemon juice: Just a splash adds a bright tang that cuts through the richness beautifully.
- Vanilla extract: Brings all the flavors together with gentle warmth and sweetness.
Variations
I love making this Easy Cheese Cake Cups Recipe my own by switching up crusts and toppings depending on the season or my mood. It’s so fun to personalize — and you’ll probably find your own favorite combo too once you try it out!
- Crust swaps: I’ve replaced graham cracker crumbs with crushed Oreos or even whole Nilla wafers for an easy no-bake crust alternative that tastes amazing.
- Topping ideas: My go-to is fresh mixed berries in summer, but I’ve also loved using caramelized apples or chocolate ganache for a decadent twist.
- Dietary tweaks: You can make these gluten-free easily by using gluten-free cookie crumbs for the crust, and they still turn out delicious.
How to Make Easy Cheese Cake Cups Recipe
Step 1: Prep the Cup Crust
Start by deciding what size cups you’ll use because that will determine how much graham cracker crumbs to put at the bottom. When I use 9 oz cups, I scoop about 2 tablespoons of crumbs in each. For smaller cups, around 4-6 oz, 1 tablespoon per cup does the trick. This crust is simple but adds that perfect crunch, so don’t skip this step! If you want, gently press the crumbs down to help them stick better.
Step 2: Soften the Cream Cheese and Beat with Sugar
Make sure your cream cheese is at room temperature so it blends smoothly. Beat it together with 1 cup of powdered sugar until creamy and no lumps remain — about 1-2 minutes with an electric mixer. This is the base flavor, so taste it and adjust sweetness if you prefer slightly sweeter or tangier filling.
Step 3: Whip the Cream with Lemon and Vanilla
Place a clean metal or glass mixing bowl in your freezer for about 15 minutes before whipping the cream — chilled equipment makes such a difference! Add your heavy cream, the remaining ½ cup powdered sugar, lemon juice, and vanilla extract, then whip on medium-high until stiff peaks form. It usually takes around 4-5 minutes. Keep an eye so you don’t go too far or it’ll become grainy.
Step 4: Combine the Cream Cheese Mixture with Whipped Cream
Now for the fun part — gently fold the cream cheese mixture into the whipped cream on a low speed. You want them to incorporate without deflating all that lovely whipped texture. Mix just until you can’t see separate layers and the filling looks smooth and fluffy.
Step 5: Pipe or Spoon into Cups and Chill
Transfer the cheesecake filling into a piping bag or a ziplock bag with a hole cut in the corner — trust me, it makes filling each cup so much cleaner and prettier! Fill about ¾ full, refrigerate for 1-2 hours to set properly, or cover and chill overnight if you prefer. This resting time helps the flavors meld and the texture firm up nicely, so don’t rush it if you can help it.
How to Serve Easy Cheese Cake Cups Recipe
Garnishes
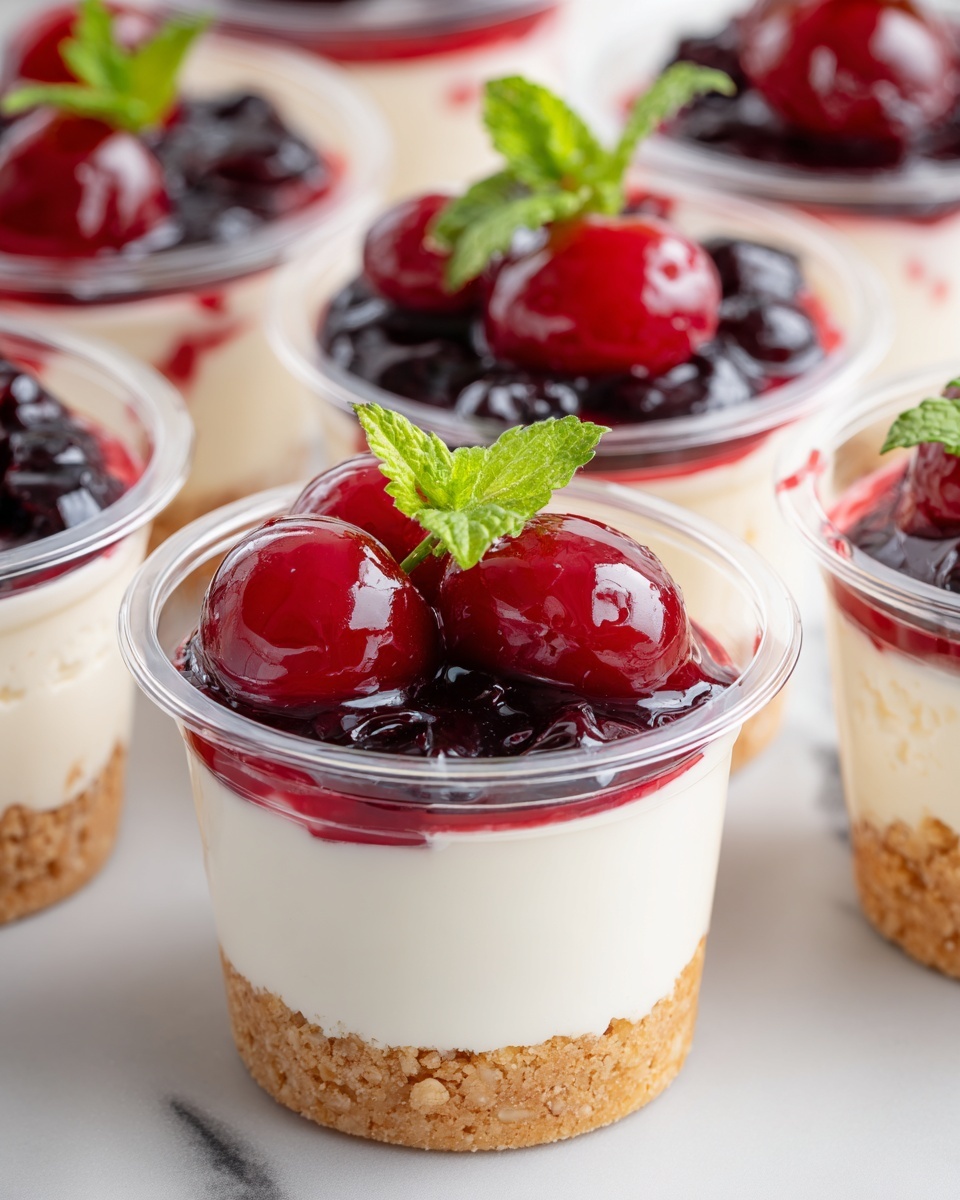
I love topping my cheesecake cups with fresh seasonal fruit — strawberries or blueberries are my favorite. When I’m feeling fancy, a spoonful of cherry pie filling or a drizzle of homemade chocolate ganache really takes it up a notch. Sprinkle some crushed candies or cookie crumbs for extra texture and eye appeal.
Side Dishes
These cups are perfect on their own as a sweet treat, but I enjoy pairing them with a light cup of coffee or a fresh fruit salad for a refreshing balance. They’re also great alongside a scoop of vanilla ice cream or a simple mint garnish to brighten things up.
Creative Ways to Present
For special occasions, I’ve arranged these Easy Cheese Cake Cups Recipe on a tiered dessert tray — looks elegant and invites guests to grab a perfect portion. You could also garnish with edible flowers or add tiny chocolate curls on top for a fancy touch. Serving them in clear cups lets the layers shine, showing off the contrast between crumb crust and creamy filling.
Make Ahead and Storage
Storing Leftovers
Leftover cheesecake cups keep beautifully in the fridge for up to 3 days. I always cover them tightly with plastic wrap to prevent drying out or picking up fridge odors. When you’re ready to enjoy, they’re just as delicious and creamy as freshly made!
Freezing
I have frozen these cheesecake cups occasionally by wrapping each one in plastic and placing them in a freezer bag. When thawed slowly in the fridge overnight, they hold up surprisingly well. Just note that the texture may soften a bit, but they still make a fantastic quick dessert backup.
Reheating
Because these are no-bake and best served chilled, there’s no need to reheat. If you like them a bit softer, allowing them to sit at room temperature for 15 minutes before serving works beautifully.
FAQs
-
Can I make this Easy Cheese Cake Cups Recipe ahead of time?
Absolutely! These cheesecake cups can be made a day in advance and stored in the fridge. In fact, chilling them overnight can help deepen the flavors and improve the texture, making them even more delightful when served.
-
What can I use instead of graham cracker crumbs for the crust?
If you’re out of graham cracker crumbs or want a twist, crushed Oreos, gingersnap cookies, or even Nilla wafers work wonderfully. Each option gives a slightly different flavor and texture, so feel free to experiment.
-
Is it necessary to chill the mixing bowl before whipping the cream?
Chilling the mixing bowl and beaters helps the heavy cream whip faster and achieve stiffer peaks, which means a lighter, fluffier cheesecake filling. It’s a simple trick I always do for the best results.
-
Can I substitute the heavy cream with whipped topping?
While you can use whipped topping as a shortcut, it won’t have quite the same creamy texture or richness as freshly whipped heavy cream. For best results and texture, I recommend sticking to heavy cream.
-
How do I prevent the cheesecake cups from cracking?
Because this is a no-bake cheesecake, cracking isn’t typically an issue. Just be gentle when mixing and don’t over-beat the cream cheese or whipped cream—you want smooth, light filling rather than dense or overworked.
Final Thoughts
This Easy Cheese Cake Cups Recipe has become a go-to in my kitchen whenever I want something delicious and elegant but fuss-free. It’s a perfect little treat that feels special without taking up your whole afternoon. I really hope you try it out and find it as delightful and straightforward as I do — sometimes the simplest recipes bring the most joy. Happy baking (or rather, no-baking)!
Print
Easy Cheese Cake Cups Recipe
- Prep Time: 15 minutes
- Cook Time: 0 minutes
- Total Time: 1 hour 15 minutes
- Yield: 8 servings 1x
- Category: Dessert
- Method: No-Cook
- Cuisine: American
- Diet: Vegetarian
Description
These Easy Cheese Cake Cups are a delightful no-bake dessert featuring a creamy full-fat cream cheese filling atop a crunchy graham cracker crust. Perfectly portioned for individual servings, they offer versatility with customizable toppings and a quick preparation time, making them ideal for any occasion.
Ingredients
Crust
- Graham cracker crumbs (2 tablespoons per 9 oz cup or 1 tablespoon per 4-6 oz cup)
Cheesecake Filling
- 16 oz full fat cream cheese (2 packages of 8 oz), room temperature
- 2 cups (473 ml) heavy whipping cream (1 pint)
- 1½ cups (169 g) powdered sugar, divided (1 cup and 1/2 cup)
- 1 Tbsp fresh lemon juice
- 2 tsp vanilla extract
Instructions
- Prepare the Cups: Choose your cup size which will determine the amount of graham cracker crumb to use and the number of servings. For large 9 oz cups, plan to make 8 servings.
- Add Crust: Place 2 tablespoons of graham cracker crumbs at the bottom of each 9 oz cup. For smaller cups (4-6 oz), add 1 tablespoon of crumbs per cup to make 12-16 servings.
- Chill Mixing Bowl: Place a metal or glass mixing bowl in the freezer for 15 minutes to prepare it for whipping cream later.
- Mix Cream Cheese: In a separate bowl, beat the cream cheese together with 1 cup powdered sugar using an electric mixer until smooth and creamy, about 1-2 minutes. Set aside.
- Whip Cream: Remove the chilled bowl from the freezer. Add heavy whipping cream, ½ cup powdered sugar, fresh lemon juice, and vanilla extract. Beat with an electric mixer on medium speed until stiff peaks form, approximately 4-5 minutes.
- Combine Mixtures: Gently fold the cream cheese mixture into the whipped cream on low speed for 1-2 minutes, blending until no visible cream cheese remains.
- Fill Cups: Transfer the cheesecake filling into a piping bag or a ziplock bag with a cut corner. Pipe the mixture into the prepared cups, filling each about three-quarters full.
- Chill: Refrigerate the cheesecake cups for 1-2 hours. For longer storage, cover the cups with plastic wrap and refrigerate overnight.
- Add Toppings: Before serving, top with your choice of cherry pie filling, blueberry pie filling, homemade strawberry sauce, chocolate ganache, Oreo crumbs, chopped candies, or any desired topping.
Notes
- Crust variations can include using a whole Nilla wafer, Oreo, or gingersnap cookie, or crushed versions of these cookies as the base instead of graham cracker crumbs.
- Topping ideas are versatile; fresh fruit, raspberry puree, lemon curd, sautéed apples, chocolate shavings, crushed candy bars, or mint chips all work wonderfully.
Keywords: cheesecake cups, no-bake cheesecake, easy dessert, individual cheesecakes, graham cracker crust, cream cheese dessert