Easy Chocolate Easter Cake Recipe
I’m super excited to share this Easy Chocolate Easter Cake Recipe with you because it’s hands-down one of my favorite festive treats to bake—it’s rich, chocolatey, and perfect for Easter celebrations or any time you want to impress without stress. What makes this cake special is how simple it is to pull together, yet it delivers such a decadent taste and texture that always gets a ton of compliments.
Whether you’re baking with the kids or just want something that looks beautiful and tastes amazing, this Easy Chocolate Easter Cake Recipe hits the sweet spot. Plus, the decorative mini eggs and creme eggs add that whimsical Easter touch that really makes it feel like a centerpiece for your holiday table.
Ingredients You’ll Need
I love how the ingredients in this Easy Chocolate Easter Cake Recipe work together to create a fluffy, moist cake with a rich cocoa flavor. You don’t need fancy or hard-to-find items—just everyday staples that deliver maximum flavor and texture.
- Butter or margarine: Softened butter gives the cake a tender crumb and buttery richness. Make sure it’s room temperature for easy mixing.
- Caster sugar: Fine sugar blends well into the batter, keeping everything smooth and sweet.
- Large eggs: They’re key for structure and moisture, added one at a time for better texture.
- Self-raising flour: This does double duty by adding the right amount of lift without extra hassle.
- Baking powder: Boosts the cake’s rise, ensuring it stays soft and airy.
- Cocoa powder: Unsweetened cocoa gives that intense chocolate hit—don’t skip the sieving step! It prevents lumps in your batter and buttercream.
- Milk: Just a splash to loosen the batter so it spreads easily and bakes evenly.
- Icing sugar: For the buttercream, sieved to keep that smooth, silky texture we all want.
- Cadbury’s Mini Eggs and Creme Eggs: The fun part—the perfect Easter decorations that add color and a bit of crunch or gooey surprise.
Variations
One of the best parts about this Easy Chocolate Easter Cake Recipe is how easy it is to make your own. I’ve tried a few twists depending on the occasion or what I have in the pantry, and it all turns out delicious.
- Gluten-Free Variation: I swapped self-raising flour for a gluten-free blend once, and it worked beautifully. Just make sure your baking powder is gluten-free too!
- Dairy-Free Option: Using dairy-free margarine and a plant-based milk like oat or almond milk keeps the taste close to the original and perfect for anyone avoiding dairy.
- Extra Chocolatey: For a fudgier feel, I like to add a handful of chocolate chips into the batter before baking or a thin layer of melted chocolate between the layers.
- Different Decorating Styles: Instead of mini eggs, you could use chopped nuts, fresh berries, or even edible flowers to make it extra special.
How to Make Easy Chocolate Easter Cake Recipe
Step 1: Prepare Your Pans and Oven
Set your oven to 180°C (or 160°C fan) / 350°F / Gas mark 4. Grease your two 7-inch round cake tins with butter or margarine, then place a circle of baking paper at the bottom of each tin and grease that, too. This little step helps the cake come out cleanly without sticking but don’t bother fully lining the tins—it’s quicker and works just as well!
Step 2: Cream Butter and Sugar
Beat your softened butter and caster sugar together until the mixture is light and fluffy—this usually takes about 3 to 5 minutes. This step is crucial because it traps air which helps give the cake its lovely rise. I usually use an electric mixer here, but you can whisk it by hand if you’re up for a little arm workout.
Step 3: Add Eggs Slowly
Now, add your eggs one at a time, beating well after each addition to make sure everything combines smoothly. Adding slowly prevents the mixture from curdling and ensures a consistent batter. If it looks like it might split, a spoonful of the flour can help bind it back together.
Step 4: Combine Dry Ingredients and Milk
Gently fold in half the self-raising flour, then stir in the baking powder and cocoa powder. The folding technique helps keep the air in the batter, so take your time here. Once combined, fold in the rest of the flour, then stir in the milk to loosen the batter so it spreads evenly. Your cake batter should be thick but pourable.
Step 5: Bake the Cake
Divide the batter evenly between your prepared tins, smoothing the tops with a spatula. Pop the tins in the oven and bake for 20-25 minutes. You’ll know your cakes are ready when they start to pull away slightly from the edges. Test with a skewer; if it comes out clean, you’re good—if not, back in for a few more minutes.
Step 6: Cool and Decorate
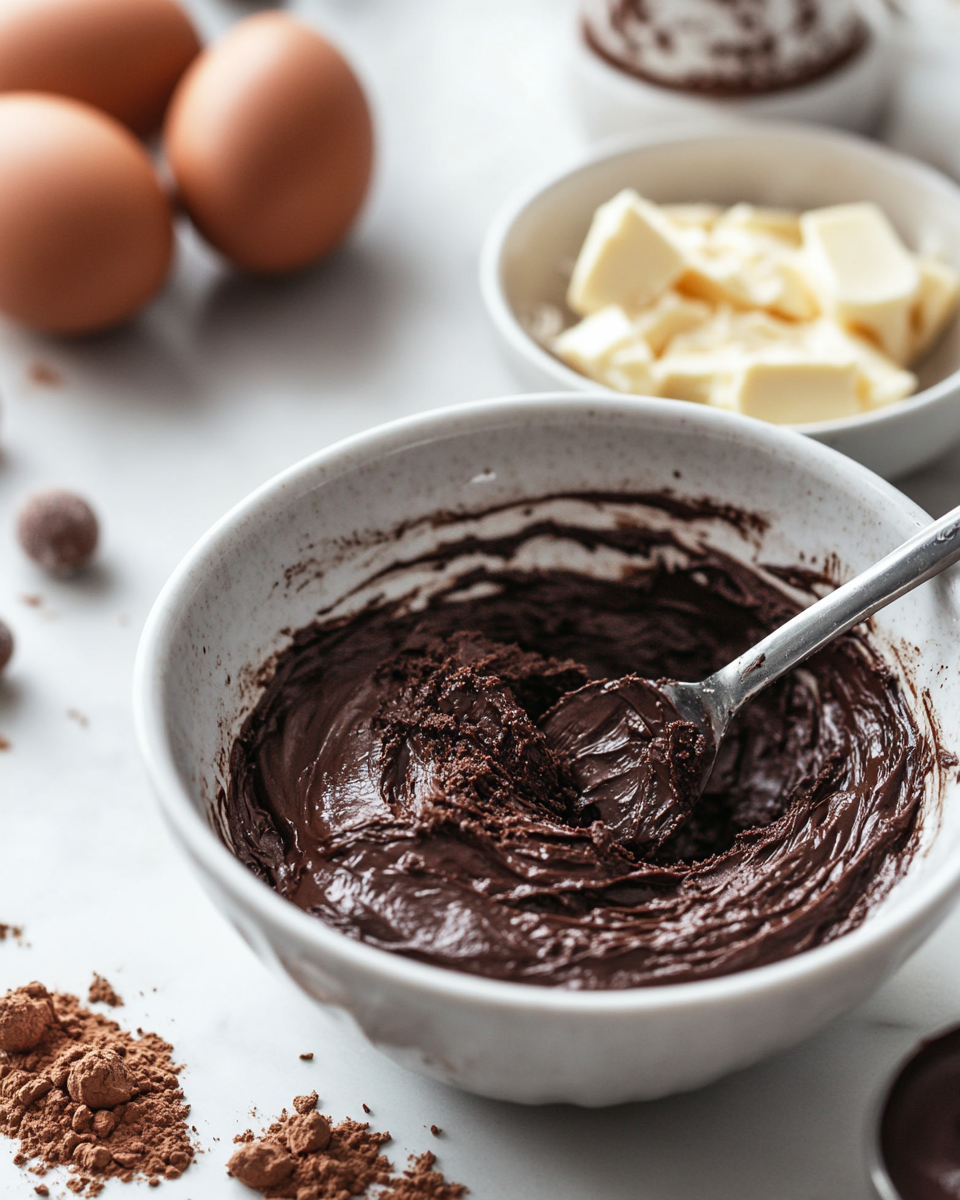
Once out of the oven, let the cakes cool in their tins for about 10 minutes, then carefully turn them out onto a cooling rack. You want them completely cool before decorating, so be patient—it usually takes about an hour. Meanwhile, whip up the cocoa buttercream by mixing softened butter, sieved icing sugar, and sieved cocoa powder until smooth and fluffy. I usually do this by hand; it’s quick and keeps things cozy in the kitchen.
Step 7: Assemble and Decorate Your Easter Cake
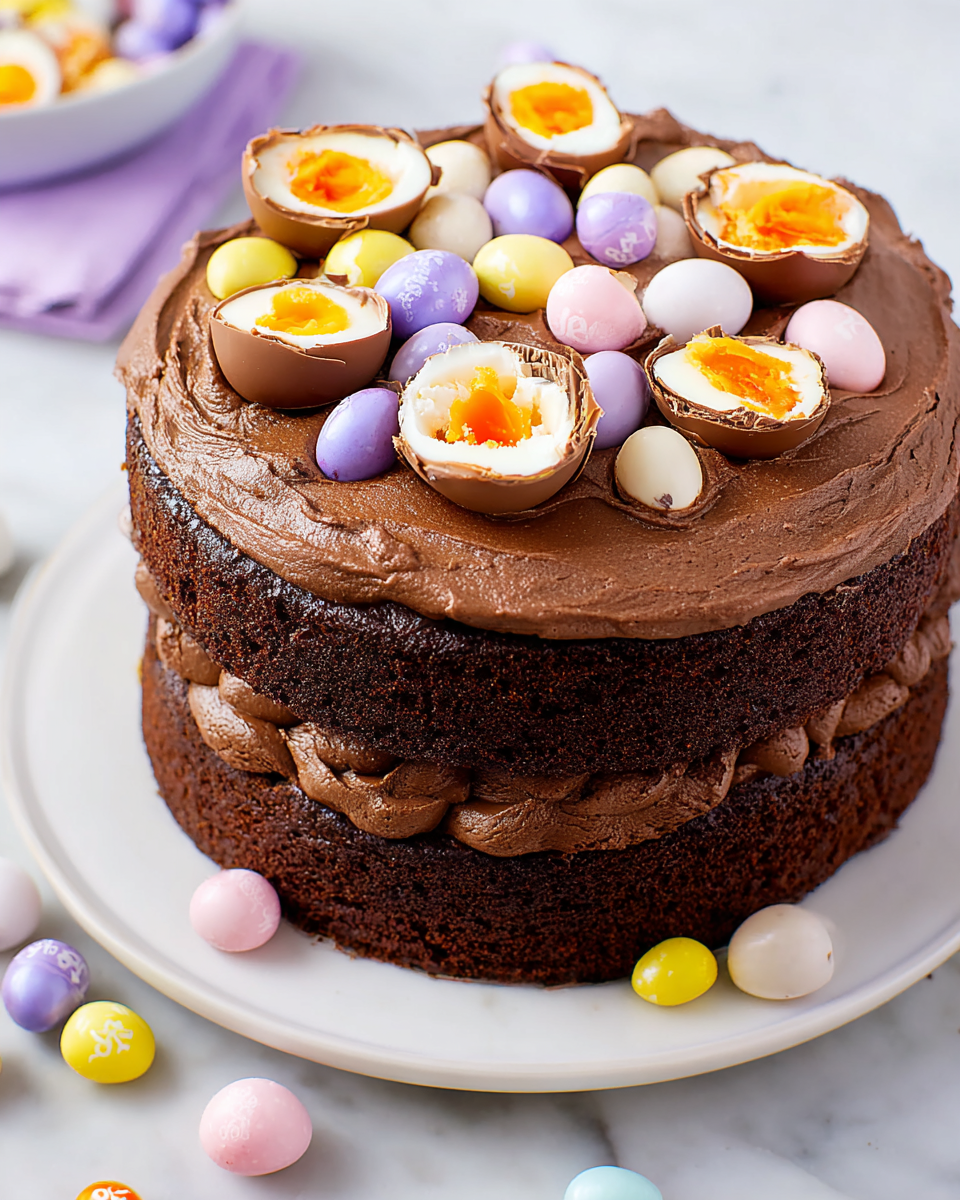
Trim the flatter of your two cakes to make sure it’s level—yes, you lose a little, but trust me, it’s worth it for neat slices later! Spread half the buttercream on this flat cake, then carefully place the other cake on top. Cover the top with the remaining buttercream, and finally, get creative with your Easter decorations—mini eggs, creme eggs, or even your favorite candies. This step is my favorite because that colorful, festive topping just makes the cake pop.
How to Serve Easy Chocolate Easter Cake Recipe
Garnishes
I love using Cadbury’s Mini Eggs and Creme Eggs because they add a playful, colorful Easter vibe and a mix of textures—those creamy centers are just unbeatable. If you want, sprinkle a little crushed candy or edible glitter for an extra festive look. Fresh mint leaves or strawberries can be lovely too for a fresh balance to the richness.
Side Dishes
When serving this cake, I often bring out a simple vanilla ice cream or whipped cream on the side to complement the intense chocolate flavor. Fresh berries like raspberries or strawberries add a nice tart contrast that balances the sweetness beautifully. A warm cup of tea or coffee is always my go-to pairing while enjoying the cake.
Creative Ways to Present
For a special Easter brunch, I’ve layered smaller versions of this cake in individual glass jars with whipped cream and berries—everyone loved the personal touch! Another fun idea is to pipe little buttercream nests on top and place a few mini eggs inside each nest for a truly festive centerpiece. Wrapping the cake stand with pastel ribbons or placing daffodils nearby really amps up the springtime charm.
Make Ahead and Storage
Storing Leftovers
I usually keep leftover cake covered in an airtight container at room temperature if I’ll eat it within a day or two—it keeps the buttercream soft and the cake moist. If your kitchen feels warm, storing it in the fridge is fine but just know the buttercream might firm up a bit and the cake can dry out faster, so bring it to room temp before serving.
Freezing
If you want to freeze the cake, I recommend freezing the layers unfrosted wrapped tightly in cling film and then aluminum foil. When you’re ready to enjoy, thaw them overnight in the fridge and add the buttercream fresh. I’ve done this a few times with great results—it’s perfect for prepping ahead of time.
Reheating
Cake is best served at room temperature, so I take it out of the fridge about 30 minutes before serving. If you want a freshly baked vibe, a few seconds in the microwave (about 10-15) can revive that soft crumb without melting the buttercream too much. Just keep a close eye so it doesn’t get hot.
FAQs
-
Can I make this Easy Chocolate Easter Cake Recipe vegan?
Yes! To make it vegan, swap the butter for a plant-based margarine, use a flax egg or another egg replacement for the eggs, and choose a non-dairy milk. Just be sure your baking powder doesn’t contain animal products.
-
What’s the secret to a moist chocolate cake in this recipe?
The combination of creaming butter and sugar until fluffy, carefully folding the flour, and adding milk to loosen the batter ensures the cake stays moist and tender. Avoid overbaking and check doneness with a skewer for best results.
-
Why is sieving the cocoa powder and icing sugar important?
Sieving removes lumps, which helps the batter and buttercream stay smooth and prevents grainy or clumpy textures in your finished cake. It’s a small step that makes a big difference.
-
Can I use this recipe for cupcakes?
Absolutely! Just reduce the baking time to around 15-18 minutes and check with a skewer. The batter works beautifully in cupcake liners and is perfect for bite-size Easter treats.
Final Thoughts
This Easy Chocolate Easter Cake Recipe truly holds a special place in my kitchen because it brings so much joy with minimal fuss. It’s a reliable go-to when I want to celebrate with something homemade but don’t have hours to spend baking. I can’t wait for you to try it out—you’ll enjoy how chocolatey, moist, and festive it feels all wrapped in one. Trust me, your family and friends will be asking for this recipe every Easter from now on!
Print
Easy Chocolate Easter Cake Recipe
- Prep Time: 20 minutes
- Cook Time: 20-25 minutes
- Total Time: 45-50 minutes
- Yield: 12 servings 1x
- Category: Baking
- Method: Baking
- Cuisine: British
Description
This Easy Chocolate Easter Cake recipe is a delightful and festive dessert perfect for celebrating the holiday. It features a rich, moist chocolate cake layered with smooth cocoa buttercream and decorated with colorful Cadbury’s Mini Eggs and Creme Eggs, making it both visually appealing and deliciously indulgent. The recipe is straightforward, ideal for bakers of all levels, and yields a beautiful two-layer chocolate cake with vibrant Easter-themed decorations.
Ingredients
Cake:
- 225 g butter or margarine, softened
- 225 g caster sugar
- 4 large eggs
- 225 g self-raising flour
- 1 teaspoon baking powder
- 50 g cocoa powder
- 4 tablespoons milk
Buttercream:
- 200 g butter or margarine, softened
- 400 g icing (confectioner’s) sugar, sieved
- 50 g cocoa powder, sieved
Decoration:
- 100 g Cadbury’s Mini Eggs
- 2 large Cadbury’s Creme Eggs
- 3 mini Cadbury’s Creme Eggs
- Or any other decoration you like
Instructions
- Preheat and Prepare Pans: Preheat your oven to 180°C / 160°C fan / gas mark 4 / 350°F. Grease two 7-inch (18cm) round cake tins with butter or margarine. Place a circle of baking paper at the bottom of each tin and grease the paper. There is no need to fully line the tins.
- Beat Butter and Sugar: Beat the softened butter and caster sugar together until the mixture becomes light and fluffy. This helps to incorporate air for a lighter cake texture.
- Add Eggs: Add one egg at a time to the butter and sugar mixture, beating thoroughly after each addition to ensure they are fully combined.
- Fold in Flour (First Half): Add half of the self-raising flour to the mixture and fold it in gently to keep the batter airy.
- Add Baking Powder and Cocoa: Stir in the baking powder and cocoa powder evenly into the batter for consistent flavor and rise.
- Fold in Flour (Second Half): Add the remaining flour and fold it gently into the mixture to maintain the batter’s lightness.
- Add Milk: Stir in the 4 tablespoons of milk to loosen the batter slightly, ensuring a smooth consistency.
- Divide Batter into Tins: Pour half of the batter into each prepared cake tin, spreading it evenly and leveling the surface with a spoon or spatula for even cooking.
- Bake the Cakes: Bake the tins in the preheated oven for 20-25 minutes. The cakes are done when they start to pull away from the sides, and a skewer inserted into the center comes out clean.
- Cool the Cakes: Remove the cakes from the oven and leave them in their tins for 10 minutes to cool enough to handle. Then turn them out onto a cooling rack or grill rack. Allow the cakes to cool completely, approximately 1 hour, before decorating.
- Make Buttercream: Prepare the buttercream by mixing the softened butter, sieved icing sugar, and sieved cocoa powder together until smooth. This can be done by hand or with an electric beater.
- Trim Cake Base: Identify the flattest cake layer and carefully trim the top to make it completely flat for stable stacking.
- Assemble the Cake: Spread half of the buttercream evenly over the flat cake layer. Place the second cake layer on top. Cover the top cake with the remaining buttercream.
- Decorate: Decorate the top of the cake generously with Cadbury’s Mini Eggs, large and mini Cadbury’s Creme Eggs, or any other decorations of your choice to create a festive Easter look.
Notes
- Use softened butter or margarine for the best texture in both cake and buttercream.
- Sieving the icing sugar and cocoa powder for the buttercream is crucial to avoid lumps and achieve a smooth consistency.
- The cake tins are only lined at the base with baking paper and greased, which prevents sticking without fully lining the sides.
- Allow cakes to cool completely before icing to prevent the buttercream from melting.
- Trimming the cake to make a flat layer helps create a more professional and stable iced cake.
Keywords: Easter cake, chocolate cake, chocolate buttercream, Cadbury Mini Eggs, Creme Eggs, holiday cake, easy chocolate cake