Easy Garlic Pita Bread from Scratch Recipe
I can’t tell you how many times I’ve whipped up this Easy Garlic Pita Bread from Scratch Recipe just because I wanted warm, fluffy bread with a garlicky kick fresh out of the oven. It’s one of those recipes that feels fancy but is surprisingly simple, which makes it perfect for a cozy weeknight dinner or impressing guests without too much fuss. Plus, the aroma of garlic butter wafting through the house during baking? Absolutely unbeatable.
What makes this Easy Garlic Pita Bread from Scratch Recipe so special is the balance of flavors and textures—it’s soft and pillowy with just the right amount of chew, and the garlic butter glaze adds a layer of richness that’s impossible to resist. Trust me, once you make it, you’ll want to serve it with everything from dips to salads, or just enjoy it on its own while it’s still warm.
Ingredients You’ll Need
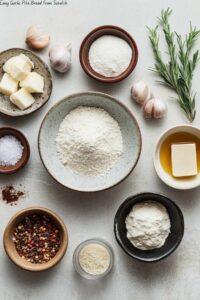
The ingredients for this recipe come together beautifully to create a pita that’s light yet flavorful. A quick note—using fresh, quality ingredients really makes a difference when it comes to bread, especially for the garlic butter glaze.
- Water: Use warm water around 90º-95ºF to activate the yeast properly without killing it.
- Instant yeast: I keep instant yeast in my pantry because it mixes straight with flour—no proofing needed.
- Granulated sugar: Just a little to help jump-start the yeast fermentation.
- All-purpose flour: Divided between mixing and kneading; you’ll use about 2 ½ to 3 cups depending on dough texture.
- Salt: Enhances flavor—don’t skip it or the bread will taste flat.
- Garlic powder (optional): Adding this to the dough is a game-changer for subtle garlic flavor inside.
- Extra virgin olive oil: Adds moisture and tenderness to the dough, plus you’ll need some to oil the bowl for rising.
- Unsalted butter (for garlic butter): Fresh and creamy for melting with the garlic powder.
- Garlic powder (for garlic butter): Boosts that savory, garlicky punch in the finishing touch.
- Kosher salt (for garlic butter): Balances the richness without overwhelming.
- Dried parsley: Adds color and a mild herbal note to the garlic butter.
- Shredded parmesan cheese (optional): For topping—if you want to make it extra special and cheesy.
Variations
I love mixing this Easy Garlic Pita Bread from Scratch Recipe up depending on what mood I’m in or the season. You can totally personalize it, which is part of the fun!
- Herb variation: I sometimes add fresh rosemary or thyme to the dough for an extra fragrant twist that pairs amazingly with the garlic butter.
- Spicy kick: Mixing a pinch of crushed red pepper flakes into the garlic butter gives a lovely warmth without overpowering.
- Gluten-free version: I’ve experimented using a blend of gluten-free flours and xanthan gum for a friend’s dietary needs; it’s definitely doable with a bit of extra kneading and patience.
- Cheesy pita: Fold shredded mozzarella inside before baking—melty cheese pockets are a real crowd-pleaser.
How to Make Easy Garlic Pita Bread from Scratch Recipe
Step 1: Activate and Mix Your Dough
Start by warming your water to about 90º-95ºF—that’s the sweet spot to encourage the yeast to wake up, but not so hot it kills it. In a large bowl, sprinkle the instant yeast and sugar into the warmed water, then stir lightly to combine. Let it sit for about 5 minutes until it starts to look frothy. This little foam bubble means your yeast is alive and ready to work its magic.
Step 2: Make the Dough and Let It Rise
Add about 2 ½ cups of the all-purpose flour, salt, garlic powder (if using), and olive oil into your yeast mixture. Stir until the dough just starts to come together. Then, turn it out onto a lightly floured surface and knead for around 8 to 10 minutes—adding extra flour as needed—until it’s smooth and elastic, but still slightly tacky. Don’t over-flour it; you want the dough to be soft. Form the dough into a ball, lightly oil a clean bowl, place the dough inside, cover it with a damp towel or plastic wrap, and let it rise in a warm spot for about 1 to 1 ½ hours, or until doubled in size.
Step 3: Shape and Bake Your Pitas
Once your dough has doubled, gently punch it down and divide it into 6 or 8 equal portions, depending on how big you want your pitas. Roll each piece into a ball, then flatten it into a circle roughly ¼ inch thick. I find that using a rolling pin dusted lightly with flour makes this step easier. Heat your oven to 475ºF and place a baking stone or heavy baking sheet inside to get scorching hot. Transfer the pita rounds onto parchment paper or a lightly floured surface, then bake them directly on the hot stone or sheet for 3 to 4 minutes. You’ll see them puff up with air pockets—that’s your sign that you nailed it!
Step 4: Make the Garlic Butter and Brush Warm Pitas
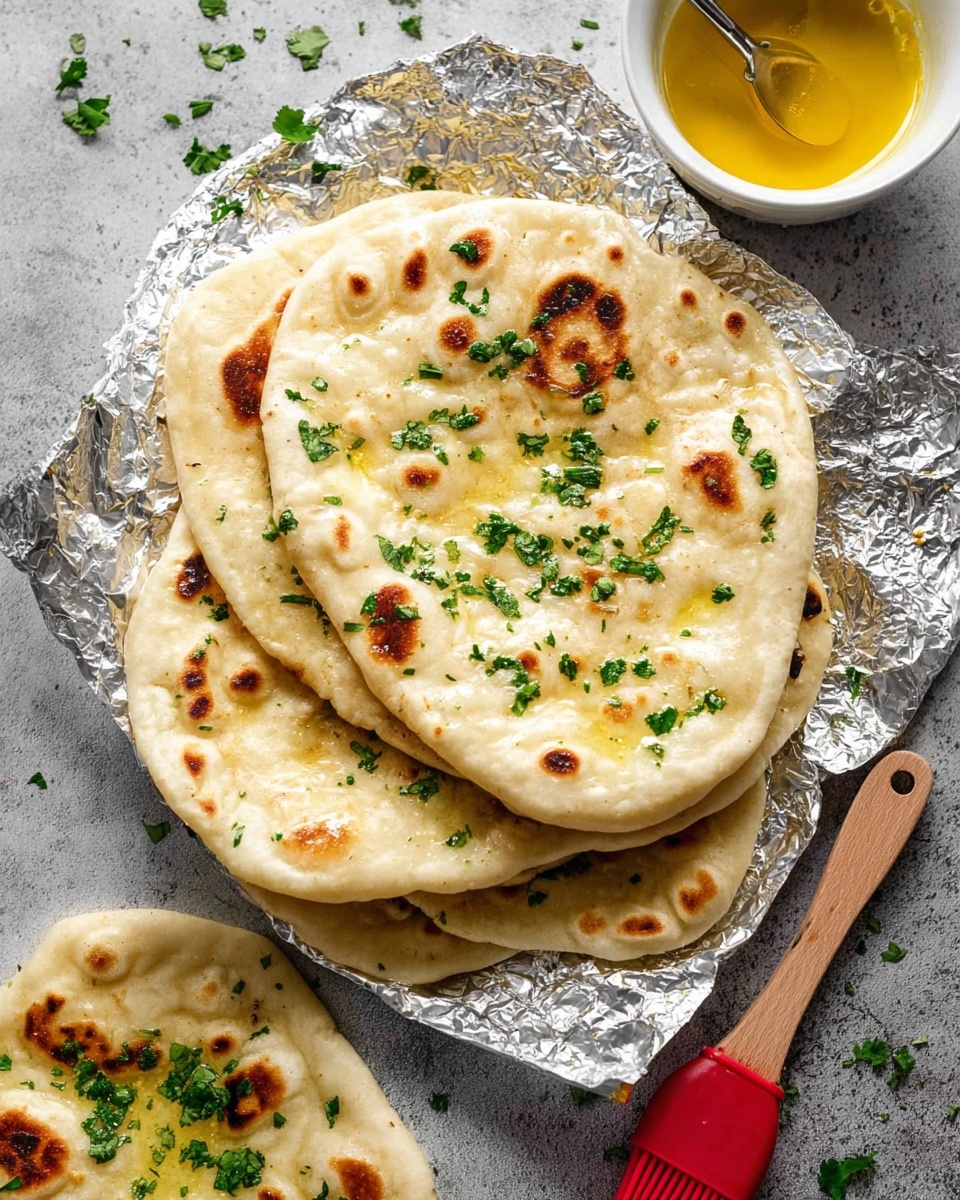
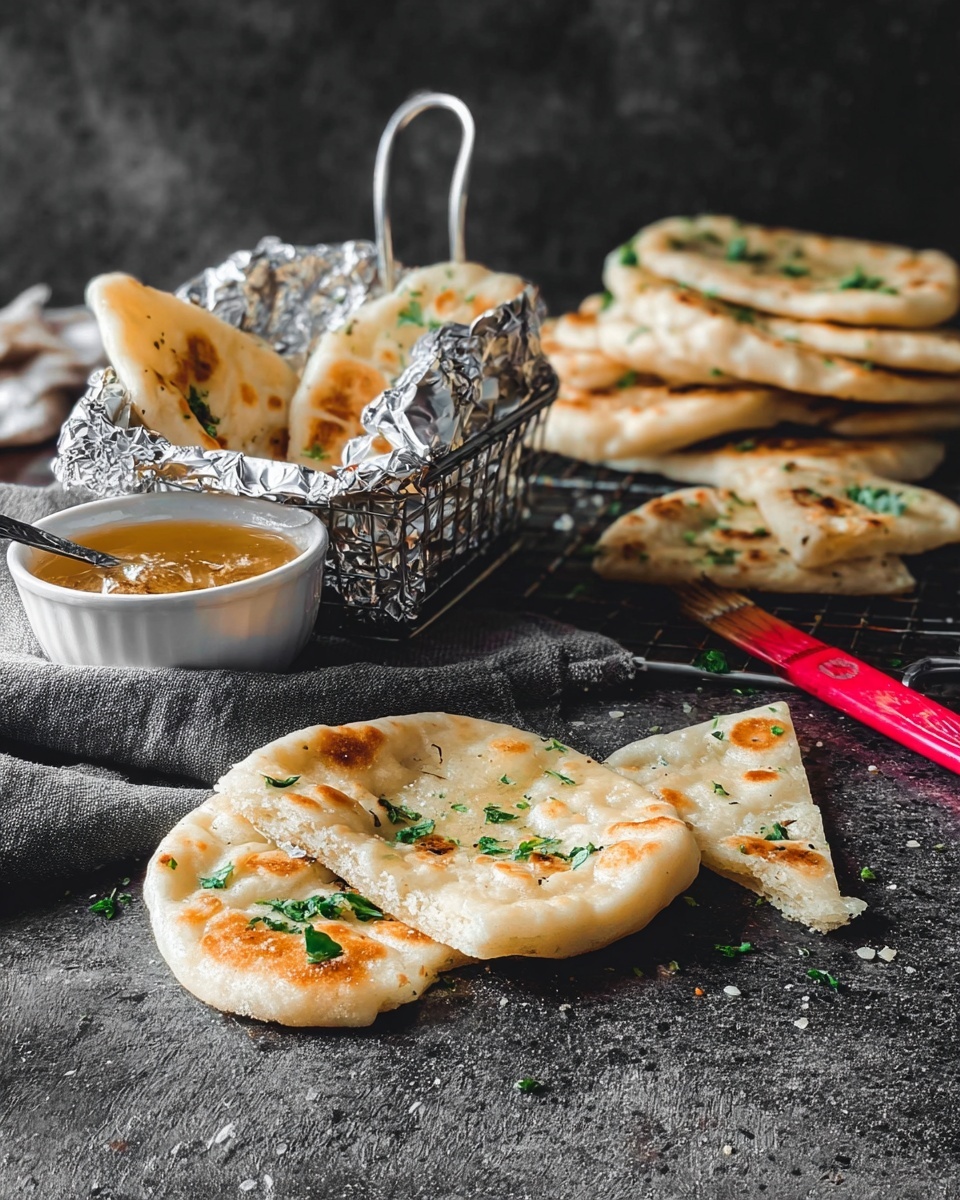
While your pitas bake, melt the unsalted butter in a small saucepan or microwave safe bowl. Stir in the garlic powder, kosher salt, and dried parsley until everything is blended. As soon as your pitas come hot out of the oven, brush generously with this garlic butter to soak them in flavor. If you love cheesy bread like I do, sprinkle shredded parmesan on top immediately while the butter is still warm.
How to Serve Easy Garlic Pita Bread from Scratch Recipe
Garnishes
I often sprinkle extra fresh parsley or chopped chives over the garlic buttered pitas for a pop of color and fresh taste. Sometimes a light dusting of smoked paprika on top gives a lovely smoky depth, especially if I’m serving the pita alongside grilled foods.
Side Dishes
This pita bread pairs perfectly with all sorts of Mediterranean classics—think creamy hummus, tangy tzatziki, or even a fresh Greek salad. I’ve also used it alongside grilled meats or roasted vegetables, making it a versatile addition to any meal.
Creative Ways to Present
For special occasions, I like to cut the pita into wedges and serve it as a warm breadbasket centerpiece with an array of dips in small bowls. You can even stuff these pitas with falafel or grilled veggies and cut them into sliders for a fun finger food option that always gets complimented.
Make Ahead and Storage
Storing Leftovers
I store leftover pita bread wrapped tightly in a clean kitchen towel inside an airtight container or zip-top bag to keep them soft. They typically stay fresh for up to 2 days at room temperature. Reheating them later is super easy (and I’ll share how next!) without losing that lovely softness.
Freezing
If you make a big batch, freezing pita bread is a lifesaver. I stack parchment paper between each pita to prevent sticking, then store the stack in a freezer-safe bag. You can keep them frozen for up to 3 months. When you want some, just thaw at room temp or overnight in the fridge.
Reheating
To bring your pita bread back to life, I like to warm them wrapped in foil in a 350ºF oven for about 10 minutes or pop them in a hot dry skillet for a few seconds on each side. This crisps slightly on the outside but keeps them soft and pillowy inside—perfect for dipping or stuffing.
FAQs
-
Can I make this Easy Garlic Pita Bread from Scratch Recipe without garlic powder?
Absolutely! Garlic powder adds a subtle flavor to both the dough and the butter, but if you don’t have it on hand, you can use freshly minced garlic in the butter or leave it out entirely. The bread will still be delicious and can be brushed simply with olive oil or plain melted butter.
-
How do I know when my pita bread is done baking?
Look for the pitas puffing up in the oven—that’s a sign the steam inside is creating the classic pocket. They should have light golden spots and feel firm but still soft when you tap the surface. Overbaking can make them dry, so stick to about 3-4 minutes at high heat.
-
Can I use active dry yeast instead of instant yeast in this recipe?
Yes, but you’ll need to proof the active dry yeast in warm water with sugar for about 5-10 minutes until foamy before mixing it into the flour. Instant yeast skips this step and can be mixed directly with dry ingredients, which saves time.
-
What’s the best way to serve leftover pita bread?
Reheat leftover pita lightly and serve with your favorite dips like hummus, baba ganoush, or labneh. You can also slice and toast them to make delicious pita chips seasoned with herbs and salt.
-
Is garlic powder essential in the garlic butter for this recipe?
Not essential, but it really helps intensify and evenly distribute the garlic flavor without chunks. If you prefer fresh garlic, you can mince it finely and sauté briefly in the butter to mellow the bite before brushing on the pitas.
Final Thoughts
Making the Easy Garlic Pita Bread from Scratch Recipe is one of my favorite kitchen adventures because it fills the house with such an inviting aroma and yields bread that feels both comforting and special. Whether you’re new to bread baking or a seasoned pro, this recipe is approachable yet delicious enough to become a staple in your home. I really hope you give it a try, and I’m sure once you do, you’ll come back to it again and again just like I do.
Print
Easy Garlic Pita Bread from Scratch Recipe
- Prep Time: 20 minutes
- Cook Time: 5 minutes per batch
- Total Time: 1 hour 30 minutes
- Yield: 6–8 pita breads 1x
- Category: Bread
- Method: Baking
- Cuisine: Mediterranean
Description
This Easy Garlic Pita Bread from Scratch recipe offers a simple and delicious way to make homemade pita bread infused with aromatic garlic. The dough is soft and fluffy, enhanced with garlic powder and olive oil for flavor and texture. After baking, the pita is brushed with a rich garlic butter and can be optionally topped with shredded parmesan for an extra cheesy touch. Perfect for sandwiches, dipping, or as a side to your favorite dishes.
Ingredients
Pita Dough
- 1 cup water (90º-95ºF)
- 2 teaspoons instant yeast
- ½ teaspoon granulated sugar
- 2 ½ – 3 cups all-purpose flour, divided
- 1 ½ teaspoons salt
- 1 teaspoon garlic powder (optional)
- 2 tablespoons extra virgin olive oil, plus more for the bowl
Garlic Butter
- ½ cup unsalted butter
- 1 ½ teaspoons garlic powder
- ½ teaspoon kosher salt
- ½ teaspoon dried parsley
- Shredded parmesan cheese (optional, for topping)
Instructions
- Activate the yeast: In a mixing bowl, combine the warm water (90º-95ºF), instant yeast, and granulated sugar. Stir gently to dissolve and let the mixture sit for about 5 minutes until it becomes frothy, indicating the yeast is active.
- Prepare the dough: To the yeast mixture, add 2 ½ cups of all-purpose flour, salt, garlic powder (if using), and 2 tablespoons of extra virgin olive oil. Stir to combine into a rough dough. Gradually add up to ½ cup more flour as needed to achieve a soft, slightly sticky but manageable dough.
- Knead the dough: Turn the dough onto a floured surface and knead for about 8-10 minutes until smooth and elastic. Alternatively, use a stand mixer fitted with a dough hook to knead the dough for about 6-7 minutes on medium speed.
- First rise: Lightly oil a clean bowl with olive oil, place the dough inside, and cover the bowl with plastic wrap or a damp cloth. Let it rise in a warm place for about 1 to 1 ½ hours until it doubles in size.
- Preheat the oven: Approximately 30 minutes before baking, preheat your oven to 475ºF (245ºC) and place a baking stone or inverted baking sheet inside to heat.
- Shape the pita breads: Punch down the risen dough and turn it out onto a lightly floured surface. Divide the dough into 6-8 equal pieces and shape each into a ball. Using a rolling pin, roll each ball into a circle about ¼ inch thick and roughly 6 inches in diameter.
- Bake the pita breads: Carefully transfer the rolled dough circles onto the preheated baking surface. Bake for 3-5 minutes or until the pitas puff up and develop light golden spots. Avoid opening the oven door during baking to help them puff.
- Prepare garlic butter: While the pitas bake, melt the unsalted butter in a small saucepan or microwave. Stir in the garlic powder, kosher salt, and dried parsley until well combined.
- Brush and serve: Remove the baked pitas from the oven and immediately brush both sides generously with the warm garlic butter. If desired, sprinkle with shredded parmesan cheese while the butter is still warm for a flavorful finish. Serve warm for best taste and texture.
Notes
- Use warm water between 90º-95ºF to properly activate the yeast without killing it.
- Garlic powder in the dough is optional but enhances the garlic flavor subtly.
- Letting the dough rise in a warm place helps it double in size faster and results in a fluffy pita.
- Preheating the baking surface is crucial for puffed pockets in pita breads.
- Store leftover pitas in an airtight container for up to 2 days and reheat before serving.
- Parmesan cheese topping is optional but adds a savory richness.
Keywords: garlic pita bread, homemade pita, easy pita recipe, garlic bread, Mediterranean bread