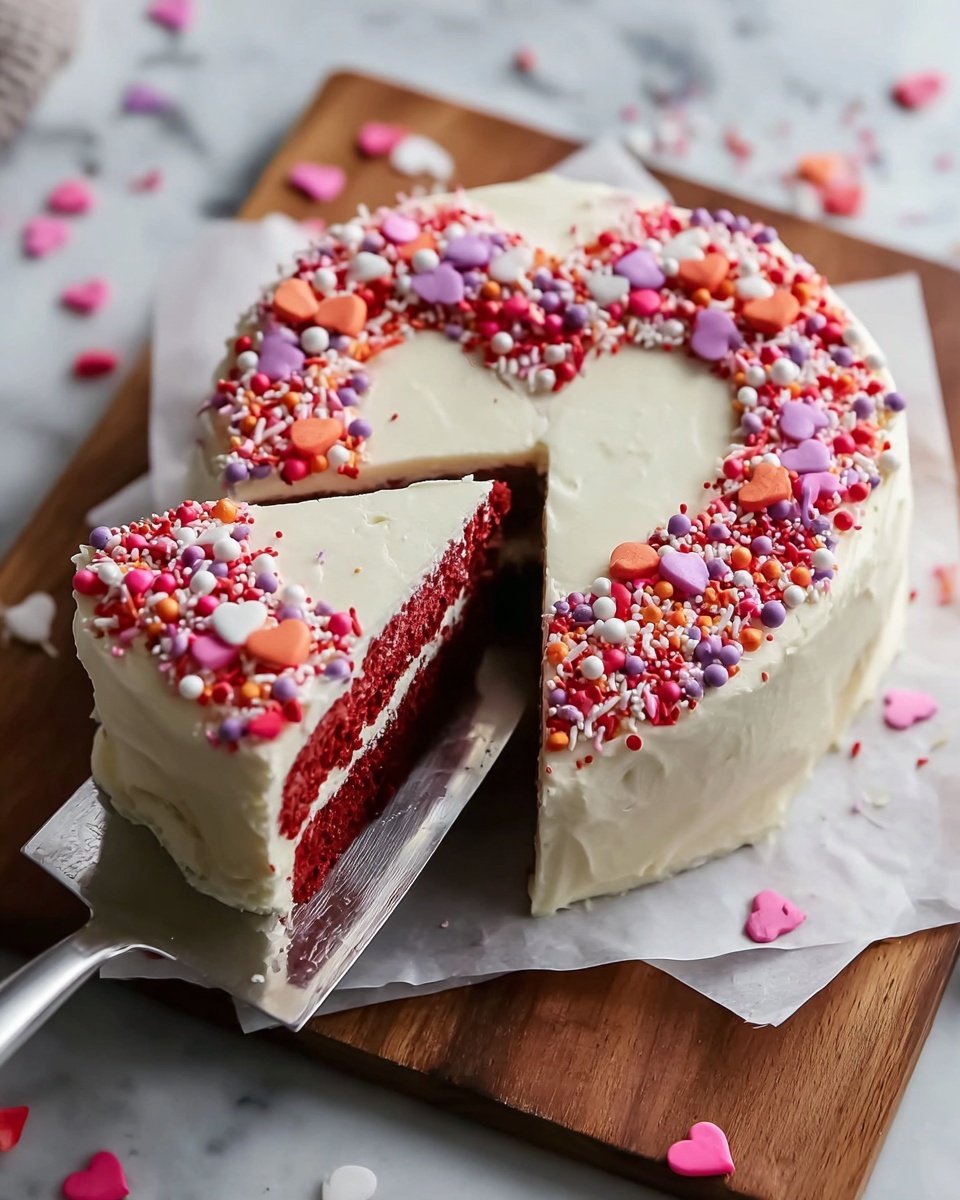
Heart Shaped Cocoa Cake with Cream Cheese Frosting Recipe
If you’re looking to wow someone special with a dessert that’s as charming as it is delicious, this Heart Shaped Cocoa Cake with Cream Cheese Frosting Recipe is the one to try. I remember making this for a close friend’s birthday, and the moment they saw it, their eyes lit up! It’s not only decadent and moist but also has that love-infused shape that makes any occasion feel extra sweet.
What makes this Heart Shaped Cocoa Cake with Cream Cheese Frosting Recipe stand out is how approachable it is despite looking fancy. Whether you want to surprise your partner on Valentine’s Day, celebrate an anniversary, or just bring a smile to someone’s face, this cake hits all the right notes. Plus, the creamy, tangy frosting paired with rich cocoa—it’s pure magic in every bite.
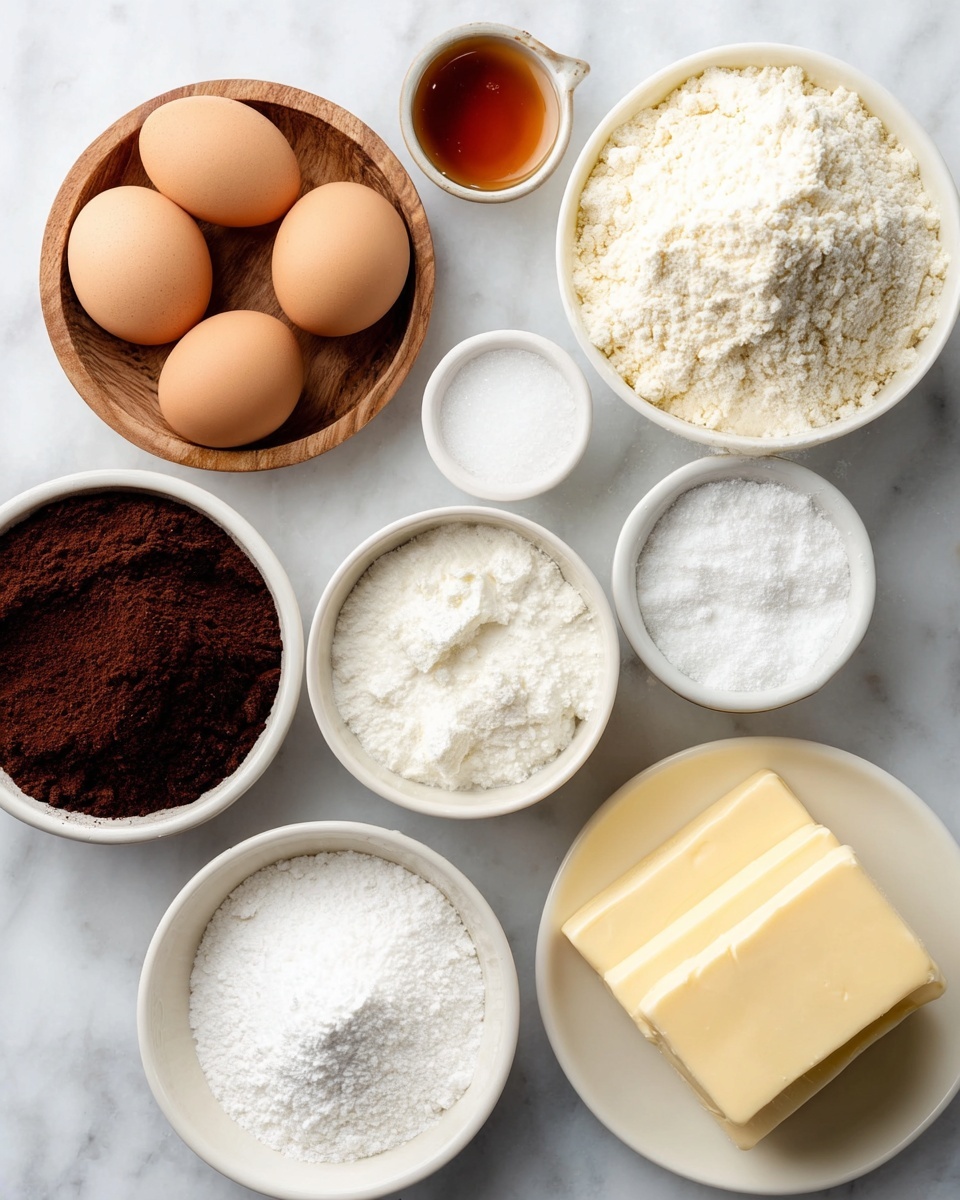
Ingredients You’ll Need
Each ingredient in this recipe has a role in creating that perfectly tender, flavorful cake and silky frosting. Shopping for quality and having your ingredients at room temperature can make a big difference in how smooth your batter and frosting turn out.
- All-purpose flour: The sturdy base for the cake that balances tenderness and structure.
- Cocoa powder: Use a good unsweetened cocoa for a deep chocolate flavor without bitterness.
- Baking soda & baking powder: Leavening agents that help your cake rise and become beautifully fluffy.
- Granulated sugar: Sweetness and moisture that keep the cake tender.
- Salt: Just a pinch to enhance all the flavors without overpowering.
- Buttermilk: Adds tang and keeps the crumb soft; bring it to room temp before mixing for best results.
- Vegetable oil: Provides moistness without affecting flavor; don’t swap it with butter here.
- Eggs: Room temperature eggs bind everything together for structure and richness.
- White vinegar: Helps react with the baking soda for a light crumb—trust me, it works wonders.
- Vanilla extract: A subtle, warm flavor that rounds out the chocolate goodness.
- Liquid red food coloring: Adds that romantic blush to the cocoa cake, making the heart shape pop visually.
- Cream cheese: For the frosting’s luscious tang and creamy texture—make sure it’s softened to avoid lumps.
- Unsalted butter: Balances the cream cheese and helps create that smooth, spreadable frosting.
- Powdered sugar: Sweetens and thickens the frosting to the perfect consistency.
Variations
I love customizing this Heart Shaped Cocoa Cake with Cream Cheese Frosting Recipe depending on the mood or occasion. It’s a versatile base that you can tweak to suit your preferences or dietary needs without losing its charm.
- Gluten-Free: I’ve swapped in a gluten-free flour blend with great results; just make sure it includes xanthan gum for structure.
- Lower Sugar: When I want something a bit lighter, I reduce the granulated sugar slightly and add a touch of honey to keep it moist.
- Chocolate Lovers: Adding chocolate chips to the batter before baking is a fun twist I enjoy for extra melty goodness.
- Fruity Finish: Try topping the frosted cake with fresh raspberries or sliced strawberries to add brightness and a pop of color.
How to Make Heart Shaped Cocoa Cake with Cream Cheese Frosting Recipe
Step 1: Get Everything Ready and Preheat
Start by preheating your oven to 350°F. Spray an 8-inch round pan and an 8-inch square pan with non-stick spray, then line them with parchment paper and spray the parchment. These little tricks ensure your cakes will pop out easily without sticking, which saves you from a heartbreak later!
Step 2: Combine the Dry Ingredients
In a medium bowl, sift together all-purpose flour, cocoa powder, baking soda, and baking powder. Then whisk in the granulated sugar and salt. Sifting is key here—it helps avoid lumps and ensures even distribution of leavening, which means a smooth, evenly risen cake.
Step 3: Mix the Wet Ingredients
Grab a large bowl and whisk together buttermilk, vegetable oil, eggs, white vinegar, vanilla extract, and liquid red food coloring until everything is smooth and well combined. Don’t skip bringing your eggs and buttermilk to room temperature—it really helps the batter mix uniformly and bake evenly.
Step 4: Bring It All Together
Gradually add the dry ingredients into the wet mixture, whisking gently until you have a smooth batter. Be careful not to overmix—overworking can make the cake dense. I find stopping when there’s no more visible flour gives the best texture.
Step 5: Bake Your Cakes
Divide the batter evenly between your prepared pans and bake for 30-35 minutes. To check if they’re done, poke a toothpick in the center; if it comes out clean or with just a few crumbs, you’re golden. Also, notice if the cakes spring back when gently pressed—that’s a great sign they’re ready to come out.
Step 6: Cool and Prepare the Frosting
Once baked, let the cakes cool in their pans for about 10-15 minutes. This prevents them from breaking when you transfer them. Then pop them onto a rack to cool fully. While the cakes rest, beat together your cream cheese and unsalted butter until silky smooth, then blend in vanilla and powdered sugar gradually until fluffy and luscious.
Step 7: Shape Your Heart and Frost
Cut the round cake in half to make two semi-circles. Place the square cake on your serving plate and position the halves on adjacent sides to form a heart shape. Spread a thin crumb coat of frosting over the whole cake to trap pesky crumbs; chilling briefly helps set this layer. Then finish with an even layer of frosting and decorate as you like.
How to Serve Heart Shaped Cocoa Cake with Cream Cheese Frosting Recipe
Garnishes
I’m a sucker for simplicity, so I often stick with a sprinkle of mini chocolate chips or some edible glitter. Fresh raspberries or delicate rose petals make it feel extra special when I’m celebrating something romantic or fancy. A dusting of cocoa powder adds an elegant, rustic touch too.
Side Dishes
This cake pairs beautifully with a scoop of vanilla bean ice cream or a dollop of lightly whipped cream if you want to elevate it into a full dessert experience. For a cozy afternoon, a cup of freshly brewed coffee or herbal tea is all you need alongside it.
Creative Ways to Present
My favorite presentation trick is to serve the cake on a vintage cake stand surrounded by rose petals or scattered berries for a romantic vibe. For kids, I sometimes sprinkle colorful nonpareils or add some themed cake toppers. Wrapping the cake plate with a ribbon before serving also adds a thoughtful touch.
Make Ahead and Storage
Storing Leftovers
I usually keep the cake covered with a cake dome or tightly wrapped with plastic wrap in the fridge. It stays fresh and moist for up to 3 days. Just remember to bring it to room temperature before serving for the best texture and flavor.
Freezing
Freezing the cake works well if you want to prep in advance. I wrap the frosted cake tightly in plastic wrap and then a layer of aluminum foil to prevent freezer burn. When you’re ready, thaw it overnight in the fridge, then let it come to room temp before slicing.
Reheating
Since this is a cake and not something you warm up traditionally, reheating isn’t usually necessary. If you want to soften the frosting a bit, just let the cake sit at room temperature for about 20-30 minutes before serving to bring out the best flavor and texture.
FAQs
-
Can I make the Heart Shaped Cocoa Cake with Cream Cheese Frosting Recipe without buttermilk?
Absolutely! If you don’t have buttermilk on hand, you can make a quick substitute by adding 1 ½ tablespoons of lemon juice or white vinegar to 1 ½ cups of milk. Let it sit for about 5 minutes before using it in your batter. This mimics the acidity and consistency of buttermilk and helps keep the cake tender.
-
What’s the best way to get the perfect heart shape with this cake?
The trick is using one round cake and one square cake, then cutting the round cake in half to create the curved top of the heart. Position those halves alongside the square cake carefully on your serving plate. Taking your time with this assembly helps avoid uneven edges and makes the shape look crisp and clear.
-
Can I make the cream cheese frosting ahead of time?
Yes, the cream cheese frosting can be made a day in advance and stored in an airtight container in the fridge. Before frosting the cake, bring it to room temperature and give it a quick whip with a mixer to restore its creamy texture.
- Is the red food coloring necessary?
The red food coloring adds a lovely color contrast that makes the heart shape visually pop, especially since it’s a cocoa-based cake that’s naturally brown. However, if you prefer a more traditional chocolate look, you can skip it or reduce the amount. The taste remains delicious either way!
- How do I avoid cracks in the cake?
To prevent cracks, make sure to mix the batter until just combined and don’t overbake. Also, baking at the right temperature (350°F) consistently helps keep the cake moist and even. Let your cake cool gradually in the pans for 10-15 minutes before removing it to avoid sudden temperature changes that cause cracking.
Final Thoughts
Honestly, this Heart Shaped Cocoa Cake with Cream Cheese Frosting Recipe has become one of my go-tos when I want to create something memorable without feeling overwhelmed. It’s the perfect mix of simple ingredients, straightforward steps, and that little wow factor when you assemble it into a heart. I hope you enjoy baking and sharing it as much as I do—it’s such a lovely way to say “I care” without words.
Print
Heart Shaped Cocoa Cake with Cream Cheese Frosting Recipe
- Prep Time: 40 minutes
- Cook Time: 35 minutes
- Total Time: 1 hour 45 minutes
- Yield: 12 servings 1x
- Category: Dessert
- Method: Baking
- Cuisine: American
Description
This delightful Heart Shaped Cocoa Cake with Cream Cheese Frosting is a perfect treat for special occasions. Moist and tender cocoa-flavored layers are combined with a rich and creamy vanilla-infused cream cheese frosting. The unique heart shape, created by combining a round and square cake, adds an elegant touch. Ideal for celebrations or as a charming homemade dessert.
Ingredients
Dry Ingredients
- 2 ½ Cups all-purpose flour
- ¼ cup cocoa powder
- 1 ½ teaspoons baking soda
- 1 teaspoon baking powder
- 1 ½ cups granulated sugar
- ½ teaspoon salt
Wet Ingredients
- 1 ½ cups buttermilk, room temperature
- 1 cup vegetable oil
- 2 large eggs, room temperature
- 1 teaspoon white vinegar
- 2 teaspoons vanilla extract
- 2 tablespoons liquid red food coloring
Cream Cheese Frosting
- 1 pound cream cheese, room temperature
- 8 ounces unsalted butter, room temperature
- 1 teaspoon vanilla extract
- 1 ½ cups powdered sugar
Instructions
- Prepare pans: Preheat the oven to 350°F. Spray one 8-inch round pan and one 8-inch square pan with pan spray and line each with parchment paper. Spray the parchment as well and set pans aside.
- Mix dry ingredients: In a medium bowl, sift together the flour, cocoa powder, baking soda, and baking powder. Add the granulated sugar and salt, whisk to combine and set the mixture aside.
- Combine wet ingredients: In a large bowl, whisk together the buttermilk, vegetable oil, eggs, white vinegar, vanilla extract, and red food coloring until smooth and homogeneous.
- Mix batter: Gradually add the dry flour mixture to the wet ingredients, whisking carefully until fully combined and smooth, being cautious not to overmix.
- Bake cakes: Evenly divide the batter between the prepared pans. Bake in the preheated oven for 30-35 minutes or until a toothpick inserted into the center comes out clean or the cakes spring back when gently pressed.
- Cool cakes: Allow cakes to cool in the pans for 10-15 minutes, then remove from pans and transfer to a cooling rack to cool completely.
- Make frosting: In a large mixing bowl or using a stand mixer, beat the cream cheese and unsalted butter together until creamy and smooth, scraping the sides as needed.
- Add flavor and sugar: Mix in vanilla extract, then gradually add powdered sugar while mixing on low speed until incorporated. Increase speed and beat until the frosting is fluffy.
- Shape cake: Once cakes have cooled, cut the round cake in half horizontally to form two half circles. Place the square cake on your serving plate and position the two half circles on adjacent sides to form a heart shape.
- Crumb coat: Spread a thin layer of frosting over the entire assembled cake to trap any loose crumbs, smoothing it out. Chill briefly if desired for easier frosting.
- Frost cake: Spread the remaining frosting evenly over the cake. Decorate with sprinkles or any preferred decorations.
- Chill and serve: Refrigerate the decorated cake for at least 30 minutes to allow the frosting to set before slicing and serving.
Notes
- Ensure all wet ingredients are at room temperature for best batter consistency.
- Do not overmix the batter to keep the cake tender and moist.
- Chilling the crumb-coated cake before final frosting helps achieve a smooth finish.
- You can substitute red food coloring with natural alternatives like beet juice if preferred.
- Let the cake come to room temperature before serving for the best flavor and texture.
Keywords: heart shaped cake, cocoa cake, cream cheese frosting, red velvet style cake, chocolate cake, special occasion cake, homemade cake