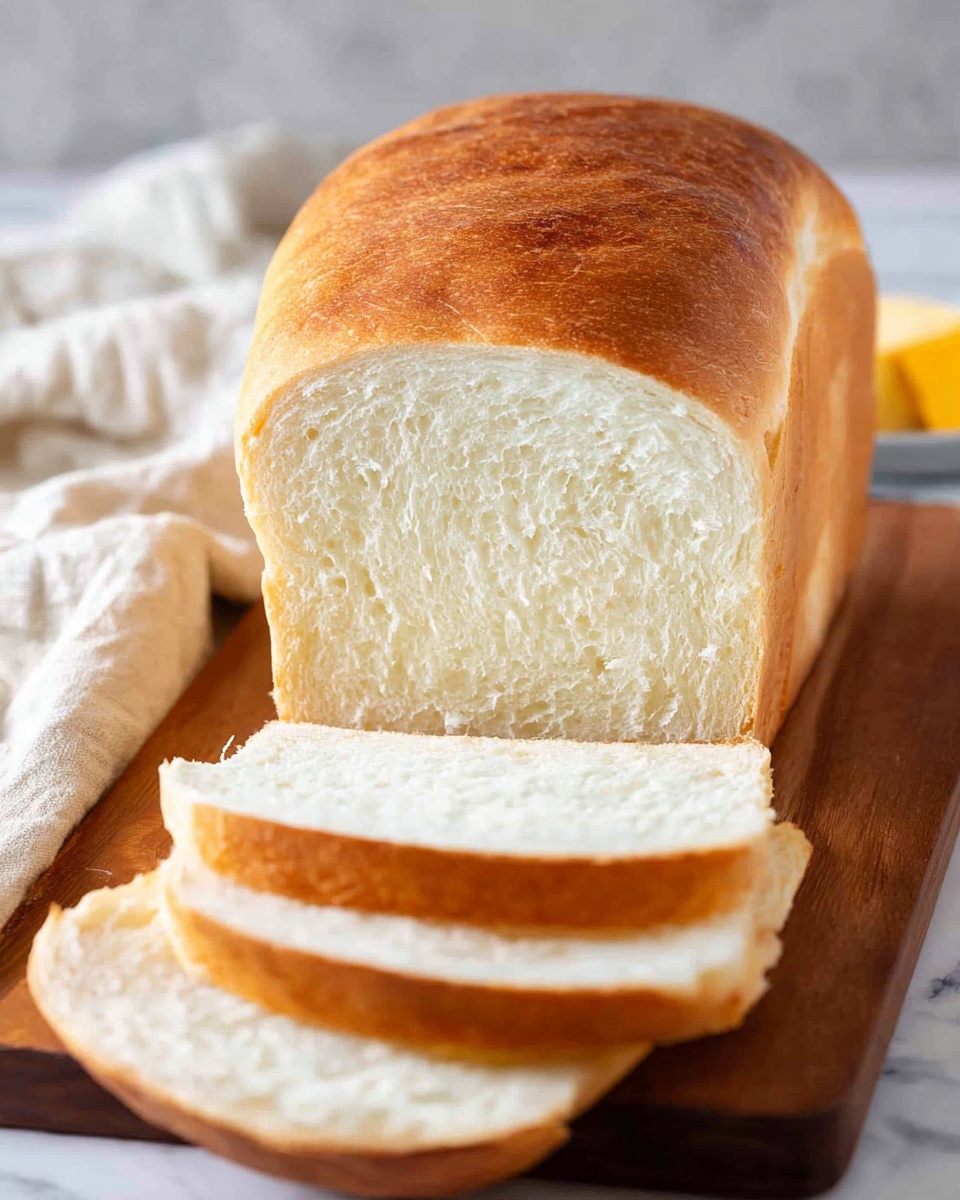
Homemade Bread Recipe
I can’t tell you how comforting it feels when I pull a warm loaf of bread fresh from the oven—that smell alone makes the whole kitchen feel like home. This homemade bread recipe is one of my absolute favorites because it’s straightforward, forgiving for beginners, and yields a soft, golden crust with a tender inside every single time. Whether you’re baking to impress guests or just want that fresh-baked goodness for your family meals, this recipe really shines.
What makes this homemade bread recipe special is its simplicity and versatility. The ingredients are pantry staples, and you don’t need any fancy equipment. Plus, once you get the hang of it, there’s something incredibly satisfying about kneading dough and watching it rise. If you’ve ever hesitated trying bread because it seems complicated, trust me, this one’s different—you’ll love how it fills your kitchen with warmth and your table with delicious homemade goodness.
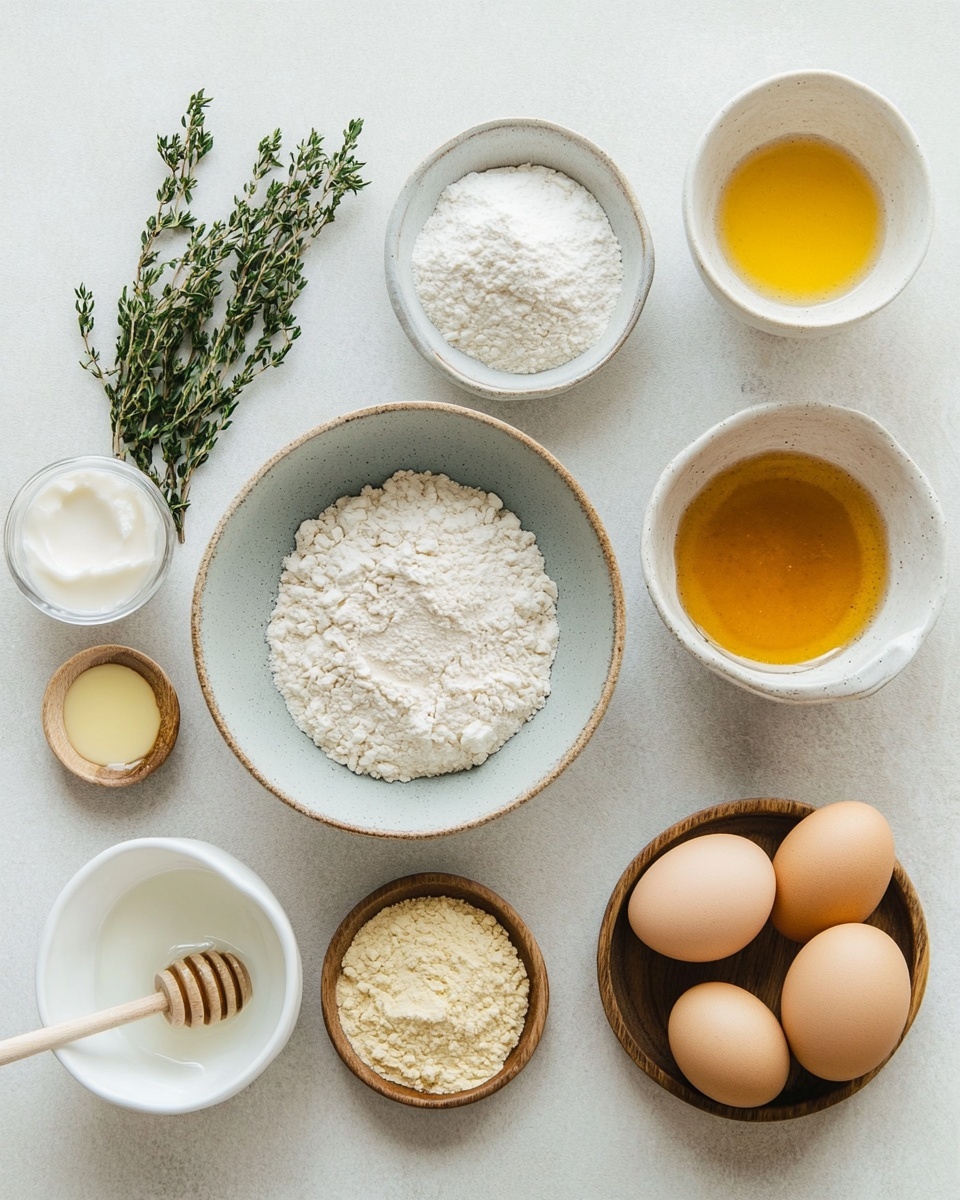
Ingredients You’ll Need
Each ingredient plays a key role in balancing flavor, texture, and rise. I suggest using good-quality active dry yeast and fresh honey or sugar for the best taste and rise. The oil keeps the crumb tender, and the perfect amount of flour gives structure without making the bread tough.
- Warm Water: Essential for activating the yeast—too hot will kill it, too cold won’t get it going. Aim for about 105-115°F.
- Active Dry Yeast: Use fresh yeast for the best rise; expired or old yeast won’t bubble properly, so always check the date.
- Honey or Sugar: Adds a subtle sweetness that enriches flavor and feeds the yeast for a good rise; honey also adds a lovely moistness.
- Salt: Balances sweetness and enhances flavor but don’t skip it—it controls yeast activity too.
- Vegetable or Canola Oil: Keeps the crumb tender and extends shelf life, plus it adds just a touch of richness.
- All-Purpose or Bread Flour: Bread flour gives a chewier texture and better rise, while all-purpose flour works great for softer bread—you can experiment with the ratios.
Variations
One of the things I love about this homemade bread recipe is how easy it is to tweak for your taste or dietary needs. I often like to add herbs or seeds, but you can also make it gluten-free or whole wheat with some adjustments. Don’t hesitate to play around and make this recipe yours.
- Herb-Infused Bread: Adding fresh rosemary or thyme to the dough is a game changer—I love this variation with a drizzle of olive oil on top before baking.
- Whole Wheat Mix: Substitute half the flour with whole wheat for a heartier loaf. It changes the texture and flavor, but still keeps it soft enough for sandwiches.
- Seeded Bread: Toss in sunflower, flax, or chia seeds for a nutritional boost and crunch—I sprinkle some on top of the loaf for a rustic look too.
- Gluten-Free Version: I’ve experimented with gluten-free flour blends replacing the wheat flour, though it needs a bit more oil and a shorter rise to stay moist.
How to Make Homemade Bread Recipe
Step 1: Wake Up the Yeast
Start by mixing your warm water with honey (or sugar) and the active dry yeast. Give it a gentle stir and let it sit for about 5-10 minutes until it becomes frothy and bubbly—this signals your yeast is alive and ready to get to work. If it doesn’t foam up, it’s best to start over with fresh yeast.
Step 2: Mix the Magic Ingredients
In a large bowl, combine the salt and oil with your yeast mixture, then slowly add the flour, one cup at a time. You’ll want to stir with a wooden spoon or your hands until the dough begins to pull away from the sides of the bowl but is still a bit sticky. This balance is key—too dry and your bread will be dense!
Step 3: Knead with Love
Turn the dough out onto a lightly floured surface and knead for about 8-10 minutes. You’re aiming for a smooth, elastic dough that springs back when poked. I find this is the point where patience really pays off—the more you knead, the better the gluten develops, which gives you that perfect chew.
Step 4: First Rise and Rest
Pop your dough into a greased bowl, cover it loosely with a clean kitchen towel or plastic wrap, and let it rise in a warm spot until doubled in size—usually about 1 to 1.5 hours. I like to use my oven with just the light on to create a cozy environment. Don’t rush this step, it really helps develop flavor and texture.
Step 5: Shape and Second Rise
Gently punch down the dough to release excess air, shape it into a loaf, and place it in a greased loaf pan or on a baking sheet. Cover again and let it rise for another 30-45 minutes until it puffs up nicely. This second rise gives you that soft inside and the right crumb structure.
Step 6: Bake to Golden Perfection
Bake your bread in a preheated oven at 375°F (190°C) for about 30-35 minutes. The crust should be golden brown, and the loaf sounds hollow when tapped on the bottom. If you’re unsure, you can use a kitchen thermometer—bread is done when it reaches 190-200°F internally.
How to Serve Homemade Bread Recipe
Garnishes
I usually brush the top of the warm bread with a little melted butter right after it comes out of the oven—it adds shine and keeps the crust tender. Sometimes, I sprinkle coarse sea salt or sesame seeds before baking for a subtle flavor boost that guests always notice and love.
Side Dishes
This homemade bread pairs beautifully with nearly everything, but I especially love it alongside hearty soups, fresh garden salads, or classic butter and jam for breakfast. It’s perfect for mopping up stews or just slathered with good-quality olive oil and balsamic vinegar.
Creative Ways to Present
For special occasions, I like to slice the bread thick and serve it in a rustic bread basket with an assortment of gourmet butters and homemade spreads. Another fun idea is turning slices into crostini, toasted with garlic and topped with fresh tomatoes—always a crowd-pleaser that’s simple to put together.
Make Ahead and Storage
Storing Leftovers
I wrap leftover bread tightly in plastic wrap or store it in an airtight container to keep it soft for a few days at room temperature. Avoid refrigerating bread as it tends to dry out faster. A trick I’ve learned is to keep a small piece of apple or a damp paper towel in the container to maintain moisture—works wonders!
Freezing
If I bake more than we can eat in a couple of days, I slice the bread and freeze it in zip-top bags. This way, I can pull out just what I need, and the bread thaws quickly. Frozen bread keeps great for up to 3 months and still tastes fresh after reheating.
Reheating
To revive the bread’s soft crumb and crisp crust, I like to heat slices in a toaster oven or warm the whole loaf in a 350°F oven for about 10 minutes wrapped loosely in foil. This gives you that just-baked feel and keeps every crumb warm and inviting.
FAQs
-
Can I use instant yeast instead of active dry yeast in this homemade bread recipe?
Absolutely! Instant yeast can be used in place of active dry yeast and even has the advantage of not needing to be proofed in water first. Just mix it directly into the dry ingredients. However, keep in mind that instant yeast usually acts faster, so you might want to shorten your rising times slightly to avoid over-proofing.
-
What if my bread doesn’t rise properly?
Several things could cause this: your yeast might be old or the water too hot or cold, which can kill or slow the yeast. Make sure your water temperature is between 105-115°F when activating. Also, give your dough enough time to rise in a warm environment—checking it after an hour and giving it more time if needed usually does the trick.
-
How do I make this homemade bread recipe gluten-free?
Substituting gluten-free flour blends is possible but requires adjustments. You’ll want to use a blend that includes xanthan gum or add it separately to help bind the dough. Also, gluten-free doughs are often wetter and need less kneading and shorter rising times. It takes a couple of tries, but it’s definitely doable!
-
Can I make this bread in a bread machine?
Yes! This homemade bread recipe adapts well to bread machines. Add the ingredients in the order your machine recommends, usually liquids first, then dry, and yeast last. Use the basic or white bread setting, and you’ll have a fresh loaf without all the manual kneading and rising work.
-
What’s the best flour for this homemade bread recipe?
I prefer bread flour because of its higher protein content, which helps create that chewy texture and good structure. But all-purpose flour works great if that’s what you have—your bread will be softer and a bit less chewy, which some people really enjoy. Feel free to experiment and see what you like best!
Final Thoughts
Baking this homemade bread recipe has been one of my most rewarding kitchen adventures, and I hope it becomes one of yours too. It’s not just bread; it’s a little act of love that fills your home with warmth, wonderful smells, and delicious memories. So grab your mixing bowl, roll up your sleeves, and give it a go—you’ll be amazed at how rewarding homemade bread can be.
Print
Homemade Bread Recipe
- Prep Time: 20 minutes
- Cook Time: 30-35 minutes
- Total Time: 2 hours 45 minutes
- Yield: 1 loaf (about 12 slices) 1x
- Category: Bread
- Method: Baking
- Cuisine: American
Description
This homemade bread recipe yields a soft, fluffy loaf with a golden crust, achieved through simple ingredients and straightforward preparation. Perfect for beginners and bread enthusiasts alike, it combines warm water and yeast for a perfect rise, sweetened lightly with honey or sugar, and enriched with oil for a tender crumb.
Ingredients
Wet Ingredients
- 2 cups warm water (105–115 degrees) (474g)
- 1 tablespoon active dry yeast
- 1/4 cup honey or sugar (85g honey or 50g sugar)
- 2 tablespoons oil (canola or vegetable) (30 ml)
Dry Ingredients
- 2 teaspoons salt
- 4 – 5 1/2 cups all-purpose or bread flour (500g-688g)
Instructions
- Activate Yeast: In a large mixing bowl, combine the warm water and active dry yeast. Stir gently and let it sit for about 5-10 minutes, or until the mixture becomes frothy. This confirms the yeast is active and ready to use.
- Add Sweetener and Oil: Stir in the honey or sugar and the oil into the yeast mixture until fully combined. These ingredients will enrich the dough and aid in browning the crust.
- Mix Dry Ingredients: In a separate bowl, whisk together the salt and 4 cups of flour. Gradually add this flour mixture to the wet ingredients, stirring to incorporate.
- Knead the Dough: Turn the dough out onto a floured surface. Knead for about 8-10 minutes, gradually adding more flour (up to 5 1/2 cups total) as needed to form a smooth, elastic, and slightly tacky dough.
- First Rise: Place the dough in a lightly oiled bowl, cover it with a damp cloth or plastic wrap, and let it rise in a warm location until it doubles in size, about 1 to 1 1/2 hours.
- Shape the Loaf: Punch down the risen dough to release air bubbles, then shape it into a loaf. Place the shaped dough into a greased bread pan or onto a baking sheet.
- Second Rise: Cover the loaf again and let it rise for an additional 30-45 minutes, until doubled in size.
- Bake: Preheat your oven to 375°F (190°C). Bake the bread for 30-35 minutes or until the crust is golden brown and the loaf sounds hollow when tapped on the bottom.
- Cool: Remove the bread from the oven and allow it to cool on a wire rack before slicing. Cooling helps set the crumb and prevents the bread from becoming gummy.
Notes
- Ensure water temperature is between 105-115°F to properly activate yeast without killing it.
- Adjust flour amounts based on humidity and flour absorption; dough should be soft but not sticky.
- Use bread flour for a chewier texture or all-purpose flour for a softer crumb.
- Honey adds natural sweetness and moisture, sugar works well too if preferred.
- Letting the bread cool completely before slicing prevents crumbling.
Keywords: homemade bread, easy bread recipe, no bread machine, soft bread loaf, baking bread at home