Homemade Chicken Chimichangas That Crunch Perfectly Recipe
There’s something irresistibly satisfying about biting into crispy, golden chimichangas with that perfect crunch and a warm, flavorful chicken filling. This Homemade Chicken Chimichangas That Crunch Perfectly Recipe hits all those notes, bringing together the rich cheeses, spices, and tender shredded chicken wrapped in burrito-sized tortillas. I often whip these up on weeknights when I want something decadent but easy, and believe me, this recipe never disappoints.
What makes these chimichangas truly special is the way the filling balances creamy refried beans and salsa with vibrant spices, creating layers of flavor that burst in every bite. Plus, frying them just right gives you that coveted crunch without feeling greasy. Trust me, once you try this Homemade Chicken Chimichangas That Crunch Perfectly Recipe, it’ll become a favorite go-to whenever you crave a little crispy comfort food magic.
Ingredients You’ll Need
The ingredients here come together to create that ideal combo of creamy, spicy, cheesy, and crunchy goodness we all want. I always use fresh shredded cheeses and rotisserie chicken to keep things simple without sacrificing flavor.
- Salsa: I prefer a medium heat salsa like Mateo’s brand — it adds zest without overwhelming the other flavors.
- Sour Cream: Adds creaminess that helps balance the spices and beans inside.
- Refried Beans: This gives your filling body and richness—go for traditional for best texture.
- Mild Chopped Green Chiles: A subtle kick that brightens the filling without too much heat.
- Chili Powder: Essential for that classic southwestern flavor — I recommend fresh for the best aroma.
- Ground Cumin: This adds warm earthiness and pairs beautifully with the other spices.
- Garlic Powder: An easy way to enhance depth without overpowering the dish.
- Onion Powder: Balances the garlic and adds subtle sweetness.
- Smoked Paprika: A personal favorite — it gives a subtle smoky note that makes these chimichangas stand out.
- Dried Oregano: Adds a touch of herbaceous complexity.
- Salt: Helps bring all the flavors together.
- Shredded Cooked Chicken: Rotisserie chicken is a lifesaver here — tender, juicy, and ready to go.
- Monterrey Jack Cheese: Melts beautifully and adds a mild, creamy contrast.
- Sharp Cheddar Cheese: Adds bite and richness—using both cheeses balances mellow and sharp flavors perfectly.
- Burrito-Size Flour Tortillas: Big enough to hold all that filling but still easy to manage when folding.
- Vegetable Oil: For frying — pick a neutral oil with a high smoke point to get that golden crunch.
Variations
I love making this recipe my own depending on what’s in my fridge or dietary needs. Feel free to mix and match fillings or cooking methods to suit your taste or lifestyle.
- Variation: Swap shredded chicken for ground beef or sautéed veggies for a vegetarian twist—I’ve tried both, and each gives a lovely spin on this classic.
- Spice Level: I sometimes add diced jalapeños or use hot salsa to turn up the heat; just make sure to balance it with extra sour cream.
- Baking Option: If you want to skip frying, baking the chimichangas at 425°F gives you a crispy finish with less mess—pro tip: brush the tortillas with oil before baking.
- Cheese Mix: Experiment with pepper jack for a bit of spice or even add queso fresco for a fresh twist.
- Gluten-Free: Use gluten-free tortillas and double-check your refried beans and spices for hidden gluten.
How to Make Homemade Chicken Chimichangas That Crunch Perfectly Recipe
Step 1: Prepare the Flavorful Filling
Start by mixing your salsa, sour cream, and refried beans in a large bowl. Then stir in those vibrant spices—chili powder, cumin, garlic and onion powders, smoked paprika, oregano, and salt—until everything smells amazing. Finally, fold in your shredded chicken, chopped green chiles, and cheeses. I always taste a little bit to adjust salt or spices here—it’s the best way to make sure every bite will be spot-on.
Step 2: Assemble the Chimichangas
Lay out a tortilla flat and add about ¾ cup of filling in the center. Don’t overstuff—it’s tempting but makes wrapping tricky. Fold the sides inward, then roll tightly from the bottom to the top, sealing the filling inside. If needed, wet the edge of the tortilla a bit to help it stick shut. This folding step takes practice but is worth it to keep all that goodness inside while cooking.
Step 3: Fry to Golden Perfection
Heat about two inches of vegetable oil in a deep skillet or Dutch oven to 350°F (175°C). Carefully add 2-3 chimichangas at a time, turning occasionally, until they’re golden brown all over—usually around 3-4 minutes. Don’t crowd the pan or the oil temperature will drop, and you’ll lose that crunch. Drain the fried chimichangas on paper towels to remove excess oil before serving.
How to Serve Homemade Chicken Chimichangas That Crunch Perfectly Recipe
Garnishes
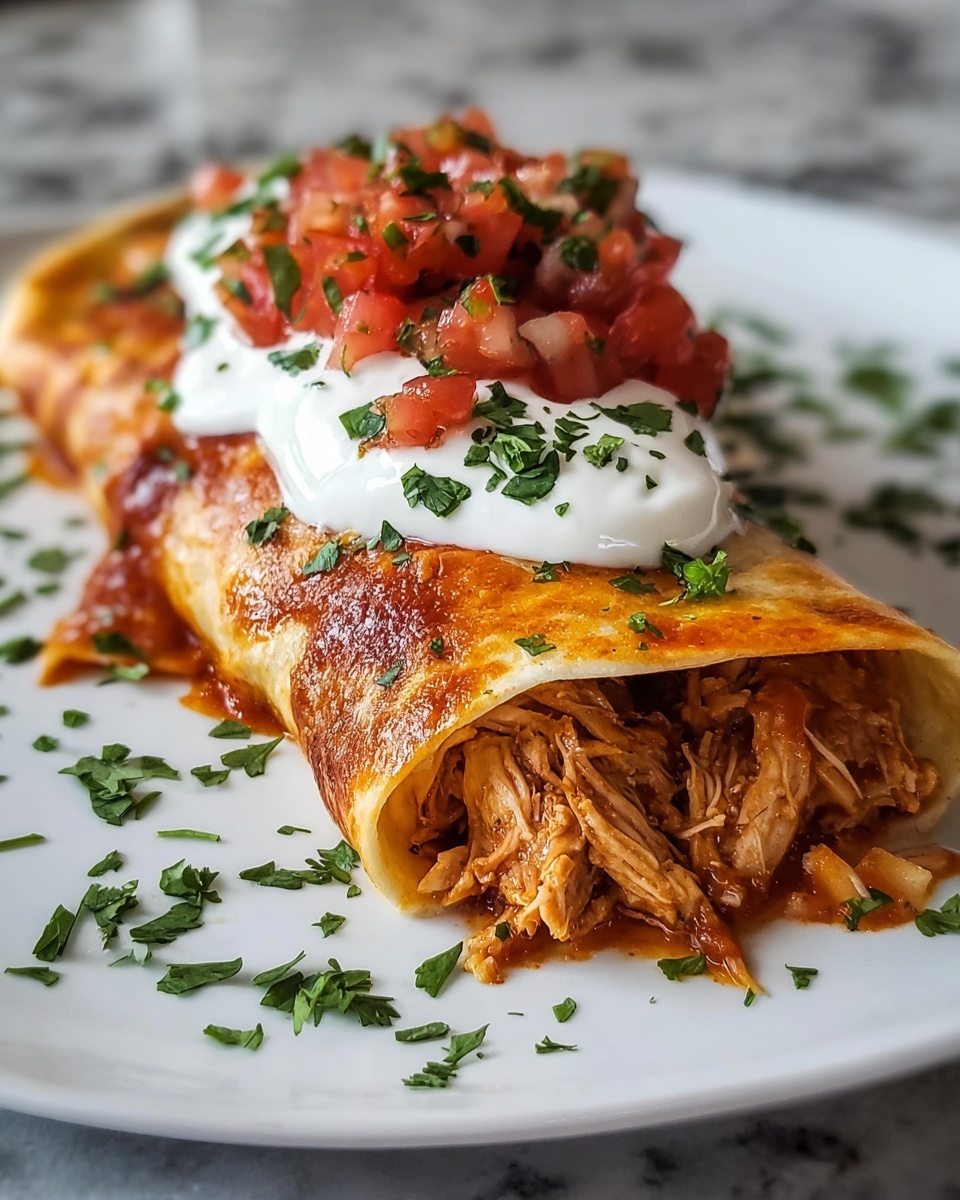
I always top mine with a dollop of sour cream, fresh cilantro, and a squeeze of lime—it adds brightness and creaminess that complement the crispy chimichanga really well. Sometimes I throw on diced avocado or sliced jalapeños for extra flair.
Side Dishes
To make it a full meal, I like serving with Mexican rice and a zesty black bean salad. A simple shredded lettuce and tomato salad on the side balances the richness perfectly, too. For parties, chips and guacamole never go amiss.
Creative Ways to Present
For a fun weekend dinner, try cutting the chimichangas in half diagonally and stacking them with a drizzle of cheese sauce on top. I’ve also wrapped mini chimichangas for bite-sized appetizers at gatherings — they’re always a hit and look super festive when served with colorful salsas.
Make Ahead and Storage
Storing Leftovers
After cooling to room temperature, I store leftover chimichangas in an airtight container in the fridge for up to 3 days. This recipe reheats wonderfully, so it’s perfect for lunches or quick dinners later in the week.
Freezing
I often freeze un-fried assembled chimichangas individually on a baking sheet, then transfer them to freezer bags. When you’re ready, just fry or bake straight from frozen—add a couple extra minutes to cooking time and you’re set. It’s a huge time saver.
Reheating
To reheat and keep that crunch, I warm leftover chimichangas in a 375°F oven for about 10-12 minutes. Avoid microwaving unless you plan to finish in the oven because it tends to make the tortilla soggy. A quick re-fry for a minute or two also brings crispy joy back to life.
FAQs
-
Can I bake chimichangas instead of frying them?
Absolutely! Baking is a great alternative if you want to cut back on oil. Just brush each chimichanga lightly with oil or melted butter, place on a baking sheet, and bake at 425°F for 15-20 minutes, flipping halfway. You’ll get a crispy exterior, though frying usually delivers a bit more crunch.
-
What’s the best way to avoid soggy chimichangas?
Make sure your filling isn’t too wet—drain any excess liquid from salsa or beans before mixing. Also, don’t overfill the tortillas, and fry at the right oil temperature (around 350°F) to quickly seal and crisp the exterior. Let drain well on paper towels before serving.
-
Can I use corn tortillas for this recipe?
I recommend flour tortillas for chimichangas since they’re more pliable and seal better, especially when frying. Corn tortillas are more prone to cracking and won’t give the same crunchy texture when fried.
-
How spicy is this Homemade Chicken Chimichangas That Crunch Perfectly Recipe?
The recipe is moderately spiced using medium salsa and mild green chiles. You can adjust the heat by choosing hotter salsa, adding jalapeños, or increasing chili powder. I love customizing it to my mood!
-
Can I make the filling ahead of time?
Yes! The filling can be made a day in advance and stored in the fridge. This actually helps the flavors meld together even better—just give it a quick stir before assembling your chimichangas.
Final Thoughts
These Homemade Chicken Chimichangas That Crunch Perfectly Recipe have become a comforting favorite in my kitchen for so many reasons. They’re easy enough for a weeknight treat yet impressive enough to serve guests. Plus, the crispy exterior and rich filling are just downright addictive. I hope you’ll give this recipe a try and enjoy the same cozy satisfaction every time you bite into one—because sharing food like this always brings a little extra joy to the table.
Print
Homemade Chicken Chimichangas That Crunch Perfectly Recipe
- Prep Time: 15 minutes
- Cook Time: 15 minutes
- Total Time: 30 minutes
- Yield: 6 chimichangas 1x
- Category: Main Course
- Method: Frying
- Cuisine: Mexican
Description
Homemade Chicken Chimichangas that are perfectly crunchy and flavorful, filled with a savory mixture of shredded chicken, cheeses, spices, and beans, then fried to golden perfection. These chimichangas combine a zesty salsa and creamy sour cream with a blend of Mexican-inspired spices for a delicious and satisfying meal.
Ingredients
Filling:
- 3 cups shredded cooked chicken (rotisserie chicken works well)
- ½ cup refried beans
- 4 oz. can mild chopped green chiles
- 1 cup freshly shredded Monterrey Jack cheese
- 1 cup freshly shredded sharp cheddar cheese
- ½ cup salsa (medium heat, like Mateo’s brand)
- ½ cup sour cream
Spices:
- 2 teaspoons chili powder
- 1 teaspoon ground cumin
- 1 teaspoon garlic powder
- ½ teaspoon onion powder
- ½ teaspoon smoked paprika
- ½ teaspoon dried oregano
- ½ teaspoon salt
Other:
- 6 burrito-size flour tortillas
- Vegetable oil (for frying)
Instructions
- Prepare the filling: In a large bowl, combine the shredded chicken, refried beans, chopped green chiles, chili powder, ground cumin, garlic powder, onion powder, smoked paprika, dried oregano, and salt. Mix well to blend all the spices evenly throughout the mixture.
- Add cheeses: Fold in the shredded Monterrey Jack and sharp cheddar cheeses into the seasoned chicken mixture until everything is evenly incorporated.
- Warm the tortillas: To make them pliable and easy to roll, warm each flour tortilla briefly in a dry skillet or microwave for about 15 seconds.
- Assemble the chimichangas: Lay a warm tortilla flat on a clean surface, spoon approximately ⅙th of the filling mixture into the center, then fold the sides tightly over the filling and roll it up completely to form a secure burrito shape.
- Heat the oil: Pour vegetable oil into a deep skillet or frying pan to about 1 to 2 inches deep, and heat over medium-high heat until it reaches 350°F (175°C) or until a small piece of tortilla sizzles immediately upon contact.
- Fry the chimichangas: Carefully place 2 or 3 chimichangas in the hot oil without overcrowding the pan. Fry for about 3 to 4 minutes per side or until golden brown and crispy. Use tongs to turn them gently to get an even fry on all sides.
- Drain and serve: Remove the fried chimichangas from the oil and drain on paper towels to remove excess oil. Serve hot with salsa and sour cream on the side for dipping or topping.
Notes
- Using rotisserie chicken significantly saves time and adds flavor.
- Ensure the oil temperature stays consistent to avoid greasy chimichangas.
- You can bake the chimichangas at 425°F for 20-25 minutes as a lighter alternative to frying.
- Use medium heat salsa for a balanced spice level, but adjust to taste.
- Make sure tortillas are warm before assembling to prevent cracking while rolling.
Keywords: chicken chimichangas, crispy chimichangas, fried chimichangas, Mexican chicken recipe, homemade chimichangas