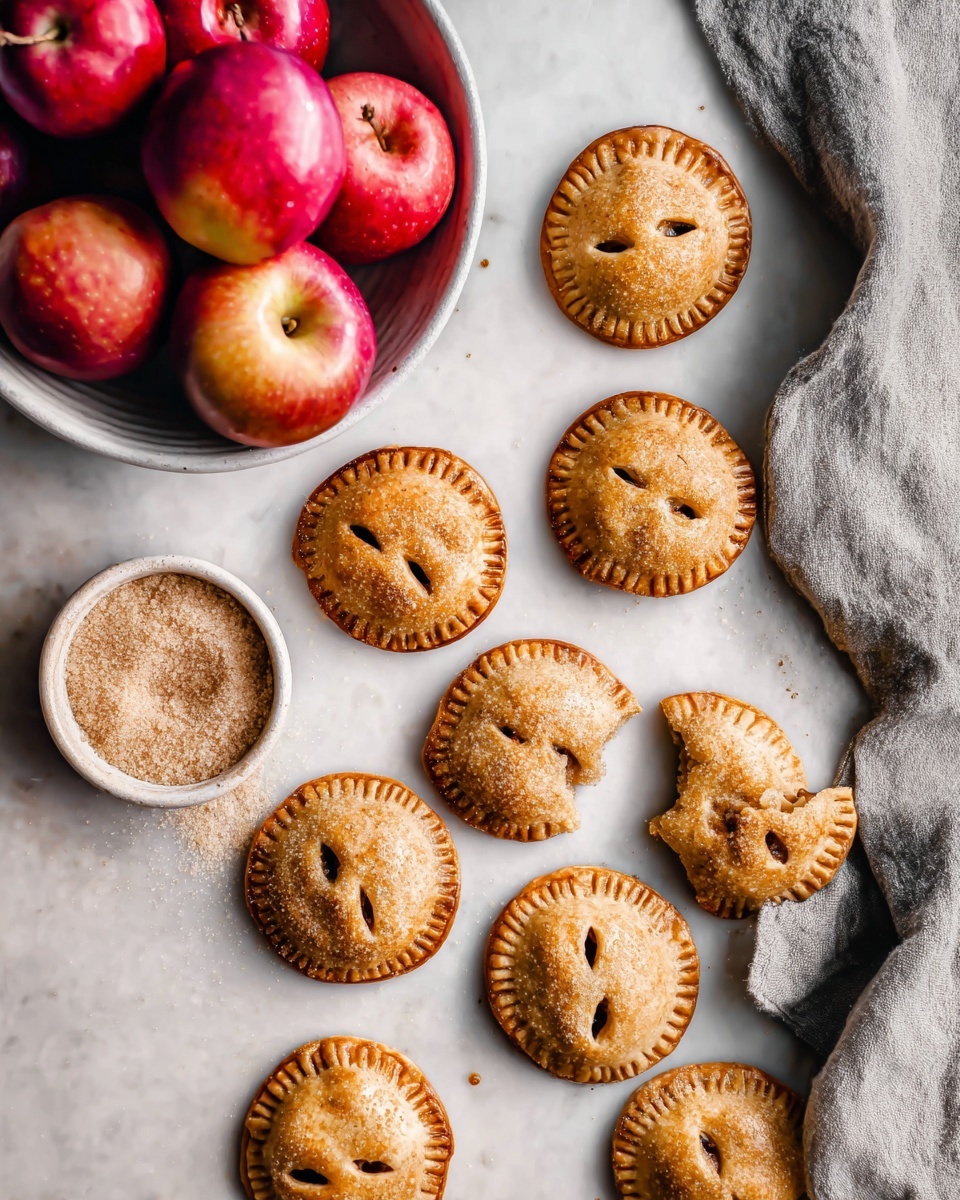
Mini Apple Pies (Apple Hand Pies) Recipe
Oh, I can’t wait to share this Mini Apple Pies (Apple Hand Pies) Recipe with you! These little pockets of warm, cinnamon-spiced apple filling enveloped in flaky buttery dough are simply irresistible. Whether you’re looking for a cozy fall treat, a fun bake for a weekend afternoon, or a portable dessert for a picnic, these mini pies hit the spot every time.
What makes this Mini Apple Pies (Apple Hand Pies) Recipe truly special is how easy it is to make ahead and customize. Plus, they’re perfect for serving one-handed, which means more time enjoying with friends and family and less fuss at the table. Trust me, once you make these, they’ll become one of your go-to apple desserts!
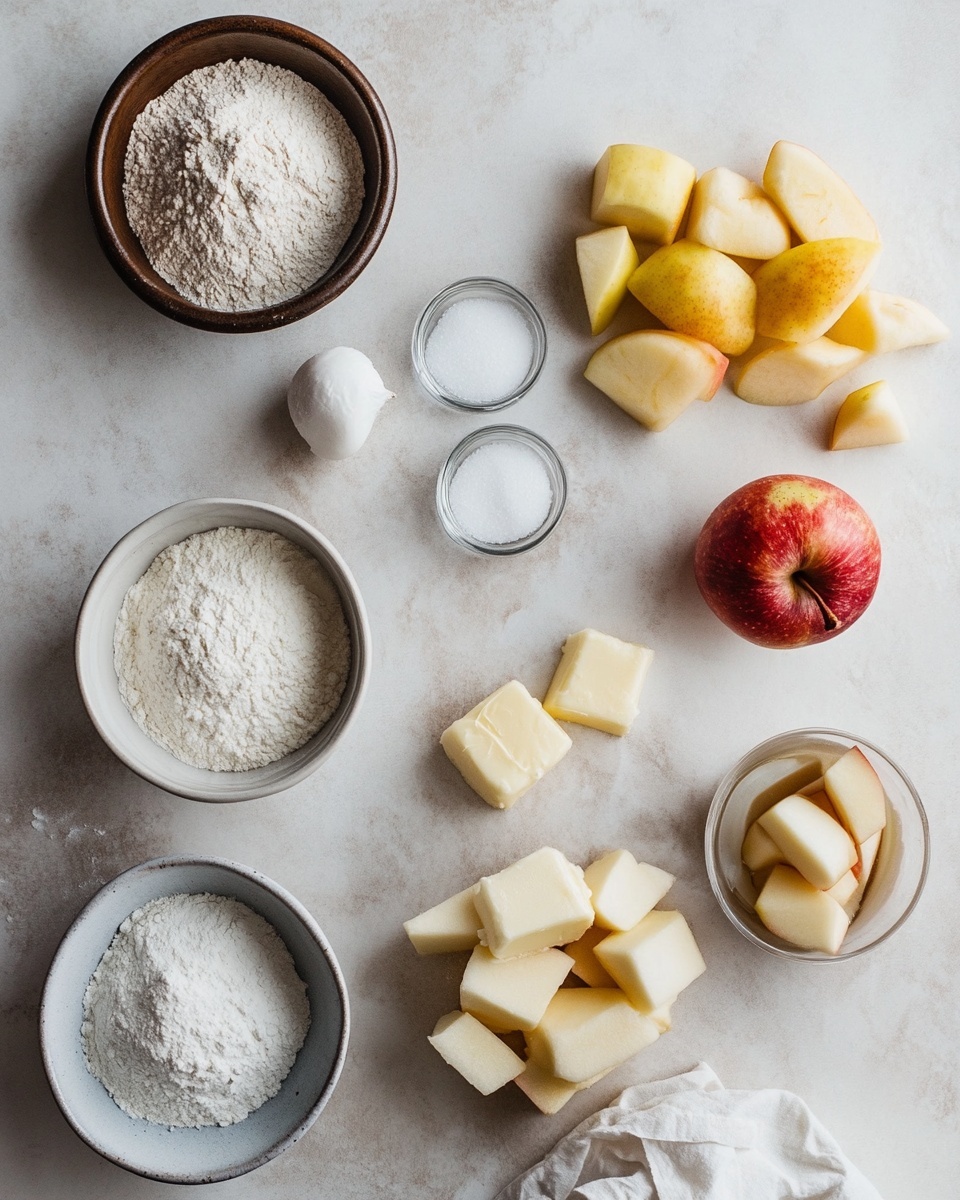
Ingredients You’ll Need
Each ingredient in this recipe works together to create the perfect balance of flaky crust and flavorful filling. I recommend choosing good quality butter and fresh apples for the best results, and I’ve included tips below to help you shop wisely.
- All-purpose flour: This gives the dough the right structure without being too tough.
- Granulated sugar: Just enough to add subtle sweetness to the dough.
- Salt: Enhances the overall flavors in the crust and filling.
- Unsalted butter: Cold and cubed — this is key for that flaky texture you want in the dough.
- Water: Ice-cold water helps bind the dough without melting the butter.
- Apples: For the filling, I like Pink Lady, Fuji, or Royal Gala — they hold their shape and have a perfect balance of sweet and tart.
- Brown sugar: Adds a rich, caramel note to the filling.
- Ground cinnamon: That warm spice everyone loves with apples.
- Cornstarch: Helps thicken the filling so it’s not runny but still juicy.
- Egg: For painting the pies to get that gorgeous golden color.
Variations
I love tweaking this Mini Apple Pies (Apple Hand Pies) Recipe depending on the season and my mood. Feel free to experiment — that’s how you make a recipe truly yours!
- Spiced Up: Adding a pinch of nutmeg or ground cloves gives the filling a deeper flavor; perfect for holiday vibes.
- Cheesy Delight: A bit of sharp cheddar cheese grated on top before baking adds an unexpected and delightful savory contrast.
- Vegan Version: Swap the butter with cold coconut oil or vegan butter and use a flax egg (1 tbsp ground flaxseed mixed with 3 tbsp water) for painting.
- Different Fruits: Mix in some diced pears or berries with the apples to create unique flavor combos.
- Mini Tartlets: Use a tartlet pan instead of hand pies if you want a more structured presentation but similar flavors.
How to Make Mini Apple Pies (Apple Hand Pies) Recipe
Step 1: Whip Up that Flaky Dough
Start by mixing your flour, sugar, and salt in a large bowl. Then, add your cold, cubed butter — this is where the magic for flakiness begins. Instead of fully blending the butter into the flour, pinch it roughly so that some butter lumps remain. These pockets of butter melt during baking, giving you layers of tender, flaky crust. Add cold water gradually and knead just enough for the dough to come together — don’t overwork it! Wrap the dough in cling film and chuck it in the fridge for at least 30 minutes; this helps the butter firm back up and makes rolling the dough a breeze.
Step 2: Cook Down the Apple Filling
While the dough chills, peel and dice your apples into small cubes—about 4-5 mm. Toss them in a pot with the butter, brown sugar, cinnamon, cornstarch, salt, and water. Cook over medium heat and watch as the apples release their juices, the mixture bubbles, and thickens to a jam-like consistency. This step is so satisfying—you can smell all those lovely aromas filling your kitchen!
Once thickened, let the filling cool completely in the fridge. Cooling is crucial because it firms up the butter and sugar inside, preventing the filling from oozing out when you assemble your pies.
Step 3: Assemble and Seal Your Mini Apple Pies
Roll your chilled dough on a lightly floured surface until it’s about 2mm thick—thin enough to be delicate but sturdy enough to hold the filling. Use a 9-10 cm cookie cutter for perfect pie circles. Place about 2 tablespoons of the chilled filling in the center. I find lightly brushing water around the edge of the dough circle before sealing helps it stick better, especially if you dusted a lot of flour during rolling.
Now, pinch the top dough circle gently to stretch it just a bit, then place it on top of the filling. Press the edges with a fork to seal them tightly. For a neat finish, re-cut the edges with your cookie cutter. Don’t forget to cut three small slits on top to let out steam while baking—this keeps your pies from getting soggy inside.
Step 4: The Golden Touch — Painting and Baking
Whisk an egg with a bit of water and brush the tops of your pies. Sprinkle with brown sugar for that extra sparkle and crunch. Bake at 180℃ (350℉) for 20-30 minutes or until golden and irresistible. Keep an eye on them; ovens vary, and you’ll want to pull them out as soon as they have a deep golden glow.
How to Serve Mini Apple Pies (Apple Hand Pies) Recipe
Garnishes
I usually just dust my mini apple pies with a little powdered sugar once they’ve cooled slightly; it gives them a delicate sweetness and looks beautiful. Sometimes, I’ll add a drizzle of warm caramel sauce or a dollop of fresh whipped cream to make the experience extra indulgent. If you want a fresh touch, a few mint leaves add a nice pop of color and aroma.
Side Dishes
These apple hand pies play well with a simple cup of hot tea or coffee for an afternoon snack. For a more festive dessert, I love serving them alongside vanilla ice cream or a scoop of cinnamon-spiced yogurt. On cool evenings, they’re delightful with a warm chai latte or mulled cider.
Creative Ways to Present
For parties or special occasions, I like to arrange mini apple pies on a rustic wooden board surrounded by cinnamon sticks and fresh apple slices—simple but pretty. You can also wrap each pie in a little parchment square tied with twine for charming individual servings. If you’re gifting these, pack them in cute boxes with a sprinkle of cinnamon powder inside for that extra homemade touch.
Make Ahead and Storage
Storing Leftovers
I keep any leftover mini apple pies in an airtight container in the fridge, where they stay fresh for up to 3 days. When I want to eat one later, I recommend reheating to revive that flaky crust and warm up the filling.
Freezing
These pies freeze beautifully! After assembling but before baking, I place them on a baking sheet to freeze until solid, then transfer them into a freezer bag. When you’re ready to bake, just pop them in the oven straight from the freezer—add a few extra minutes to the baking time, and you’re set.
Reheating
To reheat, I use a low oven (around 150℃/300℉) for about 10-15 minutes. This helps maintain that lovely crispness of the pastry without overcooking the filling. Microwaving is faster but tends to make the crust soft, so I only do that in a pinch.
FAQs
-
Can I use pre-made pie crust to make Mini Apple Pies (Apple Hand Pies)?
Absolutely! Pre-made pie crust can save time, and these mini pies will still turn out delicious. Just be gentle when rolling and cutting so the crust doesn’t tear. Keep in mind the homemade dough adds a slightly flakier, more buttery texture if you want to try it.
-
What kind of apples are best for this recipe?
I prefer firm apples like Pink Lady, Fuji, or Royal Gala because they hold their shape and balance sweetness with a bit of tartness. Avoid overly soft or mealy apples to keep the filling nice and textured.
-
Can I prepare the filling a day ahead?
Yes, in fact, chilling the filling overnight enhances the flavors and makes assembly easier since the filling firms up. Just store it in an airtight container in the fridge until you’re ready to bake.
-
How do I prevent the pies from leaking during baking?
Make sure to seal the edges well by pressing firmly with a fork and brushing the dough edges with water before folding the top piece over the filling. Also, don’t overfill the pies to avoid spillage.
-
Can I make these hand pies gluten-free?
Yes! Use a gluten-free all-purpose flour blend with xanthan gum for the dough. The texture may differ slightly, but the flavor will still be amazing.
Final Thoughts
This Mini Apple Pies (Apple Hand Pies) Recipe holds a special place in my kitchen because it strikes that perfect balance of comforting and fun. They’re my go-to when I want to impress guests without fuss, or simply indulge myself after a long day. I hope you enjoy making and sharing these delightful little pies as much as I do—they really bring that warm, cozy feeling to any day.
Print
Mini Apple Pies (Apple Hand Pies) Recipe
- Prep Time: 20 minutes
- Cook Time: 30 minutes
- Total Time: 50 minutes
- Yield: 15 mini apple pies 1x
- Category: Dessert
- Method: Baking
- Cuisine: American
Description
These Mini Apple Pies, also known as Apple Hand Pies, are a delightful treat featuring a flaky homemade dough filled with a sweet, cinnamon-spiced apple filling. Perfectly sized for individual servings, they are painted with an egg wash and sprinkled with brown sugar before baking to golden perfection. Ideal for a cozy dessert or a sweet snack.
Ingredients
For the dough:
- 300 g all-purpose flour
- 60 g granulated sugar
- 1 tsp salt
- 220 g unsalted butter, cold and cut into cubes
- 110 ml water
For the filling:
- 800 g apples (about 4 large apples, prefer Pink Lady, Fuji or Royal Gala)
- 60 g unsalted butter
- 150 g brown sugar
- 1 tsp ground cinnamon
- 1 tbsp cornstarch
- ¼ tsp salt
- 2 tbsp water
To paint:
- 1 egg
- 1 tbsp water
- 4 tbsp brown sugar
Instructions
- Prepare the dough: In a bowl, combine the flour, granulated sugar, and salt. Add the cold cubed butter and use your fingers to pinch and break the butter into the flour mixture, leaving some lumps for flakiness. Add water and knead gently just enough to bring the dough together, keeping butter bits intact. Wrap in cling film and chill in the refrigerator for at least 30 minutes or up to 2 days; dough can also be frozen for 2 months.
- Make the filling: Peel and dice the apples into very small pieces (4-5 mm). Place the apples, unsalted butter, brown sugar, ground cinnamon, cornstarch, salt, and water in a pot over medium heat. Cook until the mixture thickens, similar to a thin jam, as the apples soften and juices reduce. Remove from heat and refrigerate until completely cold to allow the butter to solidify and firm up the filling.
- Roll out the dough: On a lightly floured surface, roll the chilled dough to about 2 mm thickness. Use a 9-10 cm (3.5-4 inch) round cookie cutter to cut out circles.
- Assemble the pies: Place about 2 tablespoons of the cold apple filling in the center of each dough circle. If excess flour was used when rolling the dough, lightly brush edges with water. Take another circle to form the top and slightly stretch it by pinching the edges with your fingers. Cover the filling with this top circle and seal the edges by pressing with a fork. Use the cookie cutter again to trim the edges neatly. Cut 3 slits on top with a knife to allow steam to escape during baking. Repeat for all mini pies.
- Prepare for baking: Beat the egg with 1 tablespoon of water and brush this egg wash over the mini pies. Sprinkle evenly with brown sugar for a sweet, crunchy topping.
- Bake: Preheat the oven to 180°C (350°F). Bake the mini apple pies for 20-30 minutes or until they are golden brown and cooked through. Remove from oven and cool slightly before serving.
Notes
- You can refrigerate the dough for up to 2 days or freeze for up to 2 months for convenience.
- Choosing firm apple varieties like Pink Lady, Fuji, or Royal Gala provides the best texture and sweetness.
- Make sure the filling is completely cooled and slightly firm before filling to prevent soggy pies.
- Use a sharp knife to cut slits on the pies to allow steam to escape and avoid bursting during baking.
- If the dough is too sticky to roll, chill it further before continuing.
Keywords: mini apple pies, apple hand pies, homemade pie dough, cinnamon apple filling, fall dessert, baked apple pies