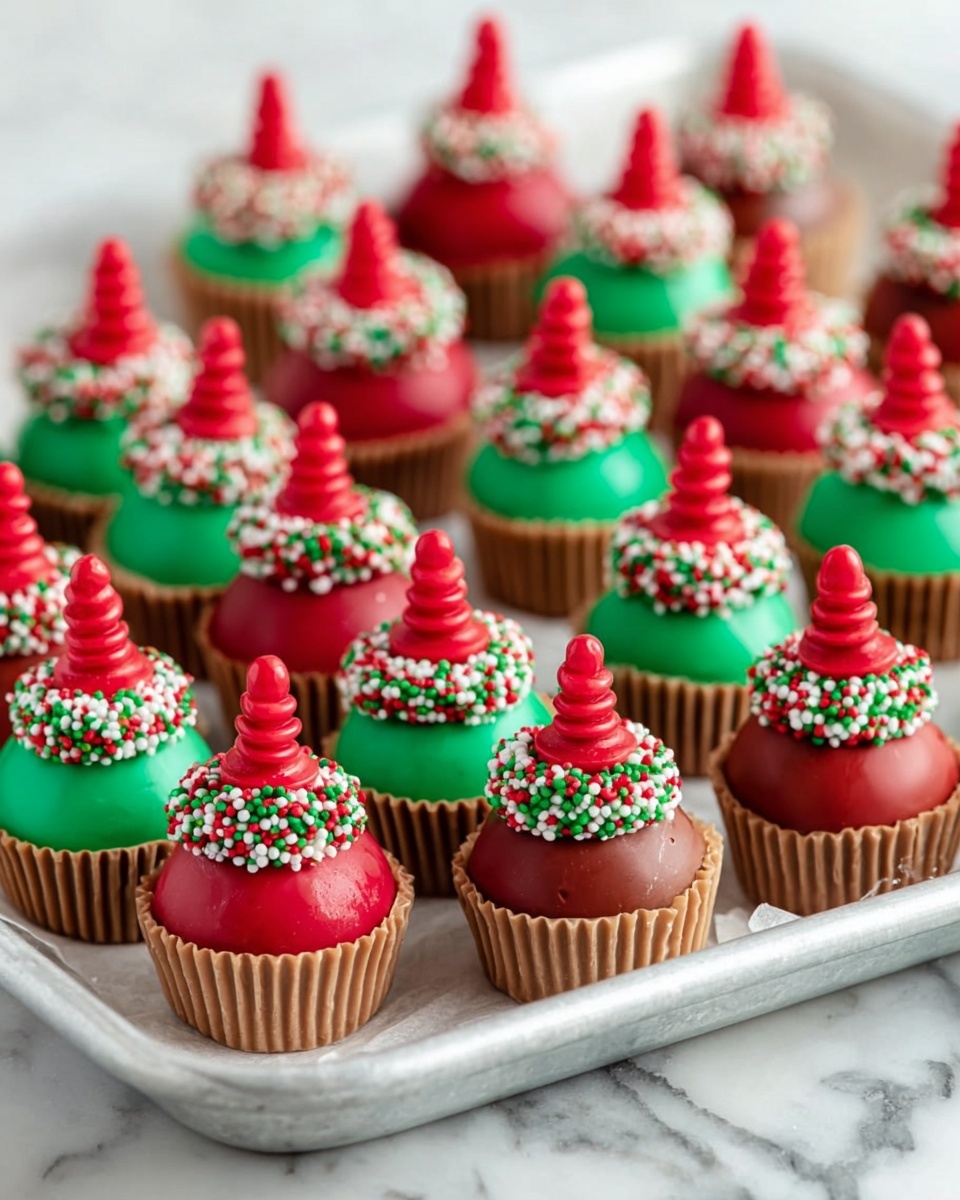
Oreo Truffles with Christmas Decorations Recipe
If you’re on the hunt for a festive treat that’s as fun to make as it is to eat, you’ve got to try this Oreo Truffles with Christmas Decorations Recipe. These little bites of joy blend the rich, creamy taste of Oreos and cream cheese with colorful Christmas-themed coatings that instantly brighten up any holiday spread. They’re so easy to whip up; I often find myself making a batch with friends or family, turning the kitchen into a jolly workshop full of laughter and tasty samples.
What makes this Oreo Truffles with Christmas Decorations Recipe truly stand out is how versatile and approachable it is. Whether it’s for a last-minute party, a gift swap, or just because you want something sweet with holiday cheer, these truffles never disappoint. Plus, decorating them with sprinkles, licorice pieces, and festive colors adds that magical touch that’s sure to impress your crowd—even the picky eaters!
Ingredients You’ll Need
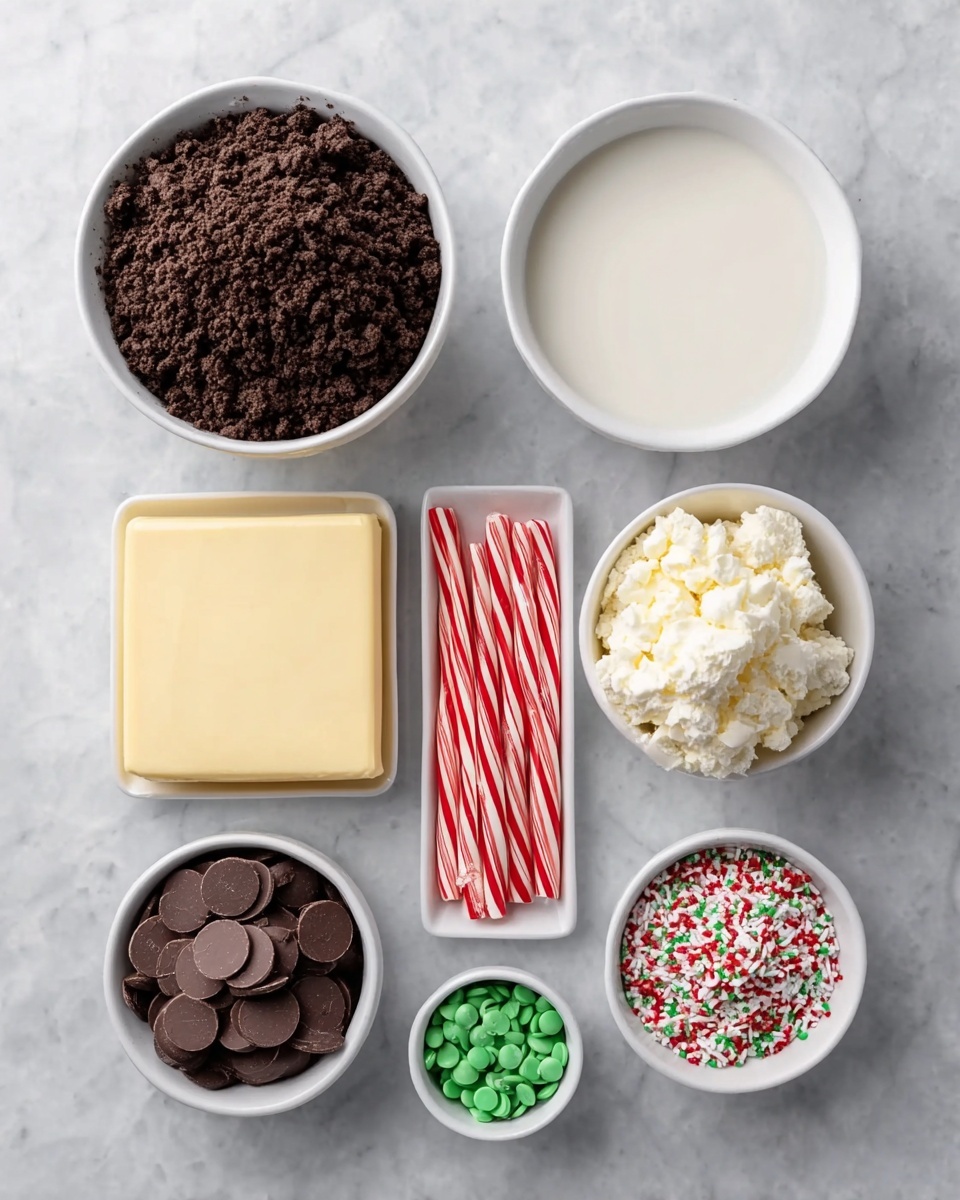
The ingredients in this Oreo Truffles with Christmas Decorations Recipe come together beautifully—simple but full of flavor and texture. Shopping for quality Oreos and cream cheese is key, while the colored melting wafers and fun decorations really bring out the festive vibe.
- Oreo cookies: I always go for the classic kind; their crunch and chocolatey flavor are the backbone here. Crushing them finely helps blend easily with the cream cheese.
- Cream cheese: You want it softened to room temperature so it mixes smoothly—cold cream cheese can make your truffle dough lumpy.
- Vanilla extract: Just a teaspoon adds a subtle warmth that lifts the flavor of the truffle base.
- Green and red melting wafers: These make dipping simple and give perfect, smooth coatings in festive colors. I find adding Crisco helps the melted wafers flow better and results in a glossy finish.
- Crisco: The secret ingredient for silky-smooth dipping! Without it, the melts can sometimes be thick or dry.
- Miniature Reese’s Cups: These are my husband’s favorite add-on—little surprises inside the truffles make them extra special.
- Christmas sprinkles: For that final festive flair! Choose colorful, themed sprinkles to really nail the holiday spirit.
- Licorice or red vine candy: Cut into small pieces, these add texture and a fun chewiness. Plus, they look adorable on top!
Variations
I love mixing things up with this Oreo Truffles with Christmas Decorations Recipe depending on my mood or who I’m treating. It’s flexible enough for you to personalize, so don’t be shy about trying your own twist!
- Peanut Butter Twist: Adding chopped peanut butter cups inside or mixing a spoonful of peanut butter into the cream cheese creates this nutty version. It’s been a big hit in my family holiday parties!
- Dairy-Free Option: Use vegan cream cheese and dairy-free wafers so friends with sensitivities can indulge too. I’ve tried it with almond-based cream cheese and was pleasantly surprised by how close it tastes to the original.
- Double Chocolate: Swap vanilla extract for peppermint or almond extract, or sprinkle crushed candy canes on top for a seasonal peppermint kick.
- Gluten-Free: There are gluten-free Oreo-like cookies now — just make sure to choose those to keep it safe if you’re baking for friends with gluten allergies.
How to Make Oreo Truffles with Christmas Decorations Recipe
Step 1: Crush the Oreos
Start by pulsing your Oreo cookies in a food processor until they’re finely crushed. If you don’t have a food processor, no worries—just pop them in a sealed plastic bag and use a rolling pin to crush them as small as possible. Fine crumbs help the truffle dough bind well and create that smooth, melt-in-your-mouth texture we want.
Step 2: Mix in Cream Cheese and Vanilla
Transfer the Oreo crumbs to a large mixing bowl. Add softened cream cheese and vanilla extract, then stir together until fully combined. I like to use my hands (washed, of course!) because it really helps get an even mixture. If your cream cheese is too cold, it might take some extra elbow grease!
Step 3: Chill the Mixture
Pop the mixture into the fridge for about 30 minutes so it firms up. This makes it much easier to roll into balls without it sticking to your fingers or feeling too soft.
Step 4: Shape the Truffles
Use a small cookie scoop or spoon to portion out the dough, then roll each portion into a smooth ball between your palms. This is a fun step to get kids involved! Once all are rolled, place them on a parchment-lined baking sheet and chill again for 15-20 minutes to set.
Step 5: Prepare Your Melting Chocolate
Combine your green and red melting wafers separately with tablespoon-sized amounts of Crisco to get a smooth and glossy coating when melted. Microwave in 30-second bursts, stirring between, until fully melted and smooth. This little tip keeps the coating from thickening or looking dull.
Step 6: Dip and Decorate
Using a fork or toothpick, dip each truffle into the colored melts, letting the excess drip off before placing it back on parchment paper. While the coating is still wet, add your Christmas sprinkles, a piece of licorice, or press a miniature Reese’s Cup on top. It’s all about making them festive and fun! If you want a bolder red or green, double dip after the first layer sets.
Step 7: Let Them Set and Serve
Allow the truffles to harden at room temperature or pop them in the fridge for 10-15 minutes for faster setting. Then they’re ready to enjoy or package as gifts!
How to Serve Oreo Truffles with Christmas Decorations Recipe
Garnishes
I love to use a mix of colorful Christmas sprinkles and tiny edible glitter stars because they catch the light and make these truffles really pop. If you like a little extra texture, the licorice pieces are perfect and give a nostalgic candy twist. Sometimes I toss on mini candy canes (crushed finely) for a surprising peppermint crunch.
Side Dishes
These truffles pair beautifully with a warm cup of hot cocoa or spiced coffee—a perfect holiday duo in my book. I’ve also served them alongside a cheese board of mild cheeses and fresh fruit, which balances out the sweetness and adds sophistication to the dessert table.
Creative Ways to Present
For parties, I like arranging these truffles on festive platters lined with holiday napkins or placing them in mini cupcake liners to make them feel extra special. Wrapping a few in clear cellophane bags tied with red or green ribbon makes charming homemade gifts. One year, I even shaped some into “ornaments” and hung them on a small Christmas tree centerpiece—total crowd-pleaser!
Make Ahead and Storage
Storing Leftovers
These truffles keep wonderfully in an airtight container in the fridge for up to two weeks. I’ve learned that if you leave them out too long, especially in warm weather, the cream cheese center softens, so refrigeration is best to maintain that perfect bite.
Freezing
If you want to prep early, freeze the truffles uncoated, rolled into balls, on a baking sheet until firm. Then transfer them to a freezer-safe container. When you’re ready, thaw and dip in melted wafers. This way, you avoid soggy coatings and still enjoy fresh-tasting truffles anytime.
Reheating
Since these are no-bake treats, reheating isn’t necessary, but if you want to take the chill off, let them sit at room temperature for about 10 minutes before serving to soften the cream cheese filling slightly.
FAQs
-
Can I use a different cookie instead of Oreos for this recipe?
Absolutely! While Oreos are classic and give that rich chocolate flavor, you can experiment with other chocolate sandwich cookies or even graham crackers for a different twist. Just be sure whatever cookie you choose can be finely crushed and mixed well with cream cheese.
-
How long do Oreo Truffles with Christmas Decorations last?
Stored properly in the refrigerator, these truffles last for up to two weeks. Just keep them in an airtight container to maintain freshness and prevent any fridge odors from sneaking in.
-
Can I make these truffles ahead of time for a holiday party?
Yes! In fact, making them a day or two ahead allows the flavors to meld beautifully. Keep them refrigerated and add sprinkles or delicate decorations right before serving for best presentation.
-
What if I don’t have colored melting wafers?
You can use white chocolate melts and add food coloring designed for candy melts. Alternatively, regular white chocolate works, but it’s a bit more delicate and harder to color evenly. Just be gentle while melting.
Final Thoughts
This Oreo Truffles with Christmas Decorations Recipe is one of my all-time favorite holiday treats because it’s quick, customizable, and always brings a smile. If you decide to make these, trust me, you’ll find that little sweet ritual of rolling dough, dipping in colorful chocolate, and adding sprinkles is pure joy. So grab your Oreos, cream cheese, and all the festive toppings you love—let’s make your holiday extra delicious!
Print
Oreo Truffles with Christmas Decorations Recipe
- Prep Time: 20 minutes
- Cook Time: 10 minutes (melting and coating)
- Total Time: 1 hour including chilling and setting
- Yield: 18–20 truffles 1x
- Category: Dessert
- Method: No-Cook
- Cuisine: American
- Diet: Vegetarian
Description
Celebrate the holidays with these festive Oreo Truffles decorated with Christmas-themed colors and candies. Combining crushed Oreo cookies and creamy cream cheese, these no-bake treats are dipped in colorful melting wafers and adorned with sprinkles, miniature Reese’s Cups, and licorice pieces for a fun and delicious holiday dessert.
Ingredients
Truffle Base
- 3 cups Oreo cookies, finely crushed
- 8 oz block cream cheese, softened to room temperature
- 1 teaspoon vanilla extract
Coating and Decoration
- 1½ cups green melting wafers
- 1½ cups red melting wafers
- 2 tablespoons Crisco
- 18–20 miniature Reese’s Cups
- Christmas sprinkles
- 2–3 sticks licorice or red vine candy, cut into ½ inch pieces
Instructions
- Prepare the Truffle Mixture: In a large mixing bowl, combine the finely crushed Oreo cookies with the softened cream cheese and vanilla extract. Stir thoroughly until the mixture becomes smooth, uniform, and can be easily shaped into balls.
- Shape the Truffles: Using your hands or a small cookie scoop, form the mixture into approximately 18–20 bite-sized balls. Place them on a baking sheet lined with parchment paper and chill them in the refrigerator for about 30 minutes to firm up.
- Melt the Wafers: In separate microwave-safe bowls, melt the green and red melting wafers with 1 tablespoon of Crisco each. Heat in 30-second intervals, stirring between, until smooth and fully melted.
- Coat the Truffles: Dip each chilled truffle ball into the melted green or red wafers to fully coat. Use a fork or dipping tool to remove excess coating and place the truffle back onto the parchment paper to set.
- Decorate: While the coating is still wet, decorate the truffles by placing a miniature Reese’s Cup on top or pressing a small piece of licorice candy into the coating. Sprinkle Christmas-themed sprinkles over some truffles for extra festive flair.
- Let Set: Allow the coated and decorated truffles to sit at room temperature or in the refrigerator until the coating is firm and completely set, about 15–20 minutes.
- Serve and Enjoy: Arrange the finished Oreo truffles on a festive platter and serve chilled or at room temperature for a delightful holiday treat.
Notes
- Make sure the cream cheese is softened to room temperature before mixing for smooth consistency.
- Use high-quality melting wafers for easy melting and smooth coating.
- Chill the truffles before dipping to help the coating adhere better.
- Store truffles in an airtight container in the refrigerator for up to 1 week.
- Feel free to customize decoration colors and candies to match different holiday themes.
Keywords: Oreo truffles, Christmas truffles, holiday desserts, no-bake desserts, festive treats, cream cheese truffles