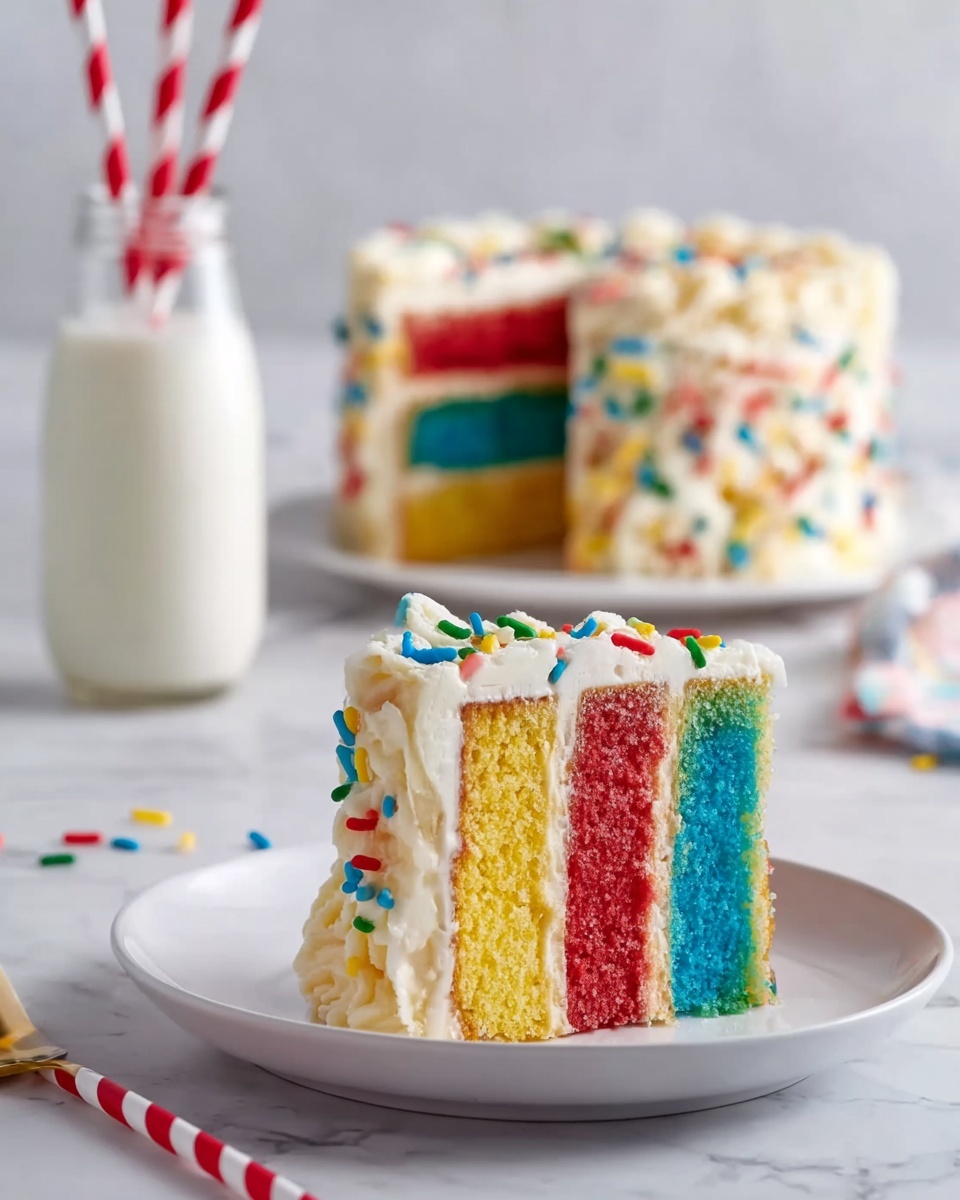
Rainbow Jello Cake Recipe
There’s something genuinely magical about a Rainbow Jello Cake Recipe that brings a bit of childhood wonder right into your kitchen. The way those vibrant, fruity jello layers stack up on a light, fluffy white cake always feels like a mini celebration. Plus, it’s a total crowd-pleaser, perfect for birthdays, summer parties, or anytime you want to impress without too much fuss.
I first made this Rainbow Jello Cake Recipe at a family gathering, and the reaction was priceless—kids and adults alike couldn’t stop reaching for seconds. It’s the perfect combination of soft cake and fun, gelatin layers that wiggle just right, all topped off with whipped cream and sprinkles. Trust me, once you try this, you’ll want to keep the recipe handy for every cheerful occasion.
Ingredients You’ll Need
Each ingredient in this Rainbow Jello Cake Recipe plays a special role, coming together to create a balance of flavors and textures that’s simply delightful. From the cake’s light crumb to the bright, colorful gelatin layers, you’ll find these ingredients easy to source and basic enough to keep the prep stress-free.
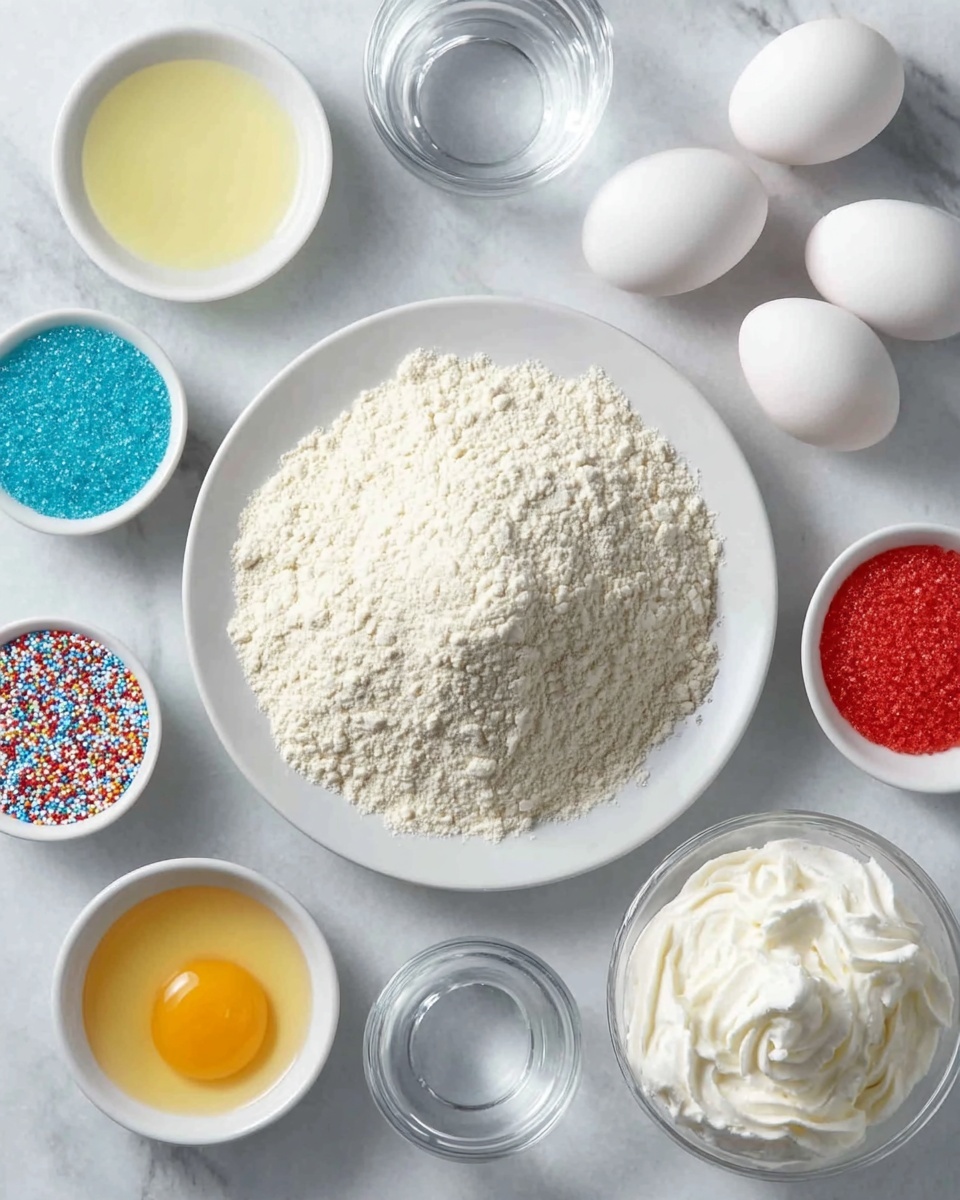
- White cake mix: I prefer the boxed kind for convenience; it gives a perfectly light and fluffy base without the hassle.
- Water: Essential for mixing with the cake mix and gelatin; make sure it’s pure for best taste.
- Vegetable oil: Adds moisture to the cake; you can’t skip this for the right texture.
- Egg whites: Using just whites keeps the cake tender and a bit lighter—easy to whip up room temperature ones.
- Strawberry gelatin mix: This kickstarts your layer of red hues, packing in that sweet berry flavor.
- Orange gelatin mix: Brings a zesty citrus note and vibrant orange color to the middle layers.
- Lemon gelatin mix: Offers a bright, refreshing punch that pairs perfectly with the other flavors.
- Lime gelatin mix: Adds a lovely tartness and beautiful green that brightens the cake visually.
- Berry blue gelatin mix: The striking blue layer that rounds out the rainbow and adds a subtle berry twist.
- Food color gels (red, orange, yellow, green, blue): Just 5-7 drops each can amplify the jello’s vibrancy if you want those true, eye-catching shades.
- Whipped topping: I use store-bought for convenience, but freshly whipped cream works wonderfully too for a fluffier finish.
- Rainbow sprinkles (optional): Because a party needs sprinkles, right? They add fun texture and extra pop on top.
Variations
I love that the Rainbow Jello Cake Recipe is so flexible—making it your own is part of the fun! Whether you want to swap flavors, adjust sweetness, or cater to dietary needs, there’s plenty of room for creativity without losing the magic.
- Use sugar-free gelatin: I’ve made this version for a friend watching sugar intake, and it still kept that colorful charm without extra carbs.
- Fresh fruit layers: Adding sliced strawberries or mandarin oranges between gelatin layers adds beautiful texture—plus a fresh twist I adore.
- Dairy-free option: Swapping the whipped topping for coconut whipped cream works beautifully if you’re avoiding dairy.
- Adults-only twist: Adding a splash of flavored liqueur to the gelatin can give your cake a grown-up vibe; just skip the kids’ party.
How to Make Rainbow Jello Cake Recipe
Step 1: Bake the Perfect Base Cake
Start by following the package directions for mixing your white cake base—combine the white cake mix, water, vegetable oil, and egg whites. Beat until smooth but don’t overdo it; you want airiness but not rubbery texture. Pour this batter into a greased 9×13 inch pan and bake until a toothpick comes out clean, about 25-30 minutes. Once baked, let it cool completely, because foundation matters for those jiggly layers to set nicely on top.
Step 2: Prepare and Pour the Gelatin Layers
This part is where your patience really pays off. Dissolve each gelatin box in ¾ cup boiling water (three cups total divided by five flavors) and add your food coloring gels to boost their brightness. Pour the first layer gently over the cooled cake and refrigerate for about 30 minutes until it’s just set but still slightly tacky—that helps the next layer stick well.
Repeat this process, working quickly to pour each colored layer on top, chilling between pours. It might take a couple of hours total, so plan ahead—you’ll be rewarded with those perfect, sharp rainbow stripes that look almost too pretty to eat.
Step 3: Final Whipped Topping and Garnish
Once all your gelatin layers are set, spread a generous layer of whipped topping over the entire cake. It adds lightness and balances the fruity jello with creamy softness. Don’t be shy about decorating with rainbow sprinkles—that’s my signature touch and adds a fun contrast in texture.
How to Serve Rainbow Jello Cake Recipe
Garnishes
I usually stick to classic rainbow sprinkles because they add a festive pop and a slight crunch. Sometimes I toss on a few fresh berries or a light dusting of edible glitter if it’s a special occasion—it’s that little bit of extra flair that you and your guests will appreciate!
Side Dishes
This cake gets to shine as the star, so I often keep sides light and simple—a crisp green salad or fresh fruit salad pairs nicely, especially for summer picnics or brunches. If you want to keep it sweet, vanilla ice cream or a light citrus sorbet can complement the jello’s fruity zing beautifully.
Creative Ways to Present
Over the years, I’ve served this Rainbow Jello Cake Recipe in individual clear cups to showcase the layers at kids’ birthday parties—it’s a total hit and cuts down on serving fuss. Another favorite, especially for holidays, is using themed sprinkles or edible flowers for a fresh take that makes the cake feel extra special on the table.
Make Ahead and Storage
Storing Leftovers
I always keep leftovers covered tightly with plastic wrap or foil in the fridge. The jello layers hold up well for up to 4 days, and I find the cake actually tastes better once chilled fully. Just make sure to protect it from absorbing any fridge odors by storing it in an airtight container or tightly wrapped.
Freezing
Freezing Rainbow Jello Cake Recipe isn’t my go-to because gelatin textures can get a little funky when thawed—some layers might become watery or lose their jiggle. But if you must freeze, wrap it well and thaw slowly in the fridge overnight. Just be prepared for a slightly different texture after thaw.
Reheating
This cake isn’t meant to be reheated—it’s best enjoyed cold and fresh. If you find leftovers, just pull them out of the fridge a few minutes before serving to take the chill off slightly, but definitely don’t try pouring hot coffee over it or heating in a microwave.
FAQs
-
Can I make this Rainbow Jello Cake Recipe without using boxed cake mix?
Absolutely! You can use your favorite homemade white cake recipe instead of the boxed mix. Just make sure it’s a light and fluffy cake that will hold up under the jello layers. A denser cake might not absorb the moisture well or could make the dessert too heavy.
-
How long should I wait before adding the next gelatin layer?
Patience is key here! You want to chill each gelatin layer until it’s just set—not fully hardened but firm enough to support the next layer without blending. Usually, about 30 minutes in the fridge does the trick, but keep an eye on consistency to get those crisp layers.
-
Can I prepare this Rainbow Jello Cake Recipe in advance?
Yes! This recipe actually benefits from some advance make time. You can bake the cake a day ahead and store it wrapped tightly in the fridge. Then prepare and layer the gelatin the day of your event for the freshest appearance and texture.
-
What if I don’t have food coloring gels? Can I skip them?
Food coloring gels just boost the vibrancy of each gelatin layer. If you’re okay with softer, more natural colors that come directly from the jello boxes, you can definitely skip them. I find the colors pop better with gels, especially if you want that true rainbow effect.
-
Is this cake kid-friendly?
Absolutely! In fact, kids adore the colorful layers and the fun texture contrasts. Just be cautious with the whipped topping if you have little ones with dairy allergies—you can always swap with coconut cream or another alternative.
Final Thoughts
I honestly keep coming back to this Rainbow Jello Cake Recipe whenever I want to brighten up my dessert table without spending hours fussing in the kitchen. It’s fun to make, visually impressive, and tastes just as good as it looks. Give it a whirl for your next celebration—I’m sure you’ll love how easy it is to bring a splash of color and joy to your gathering. Plus, it’s one of those recipes that feels like a warm hug on a plate.
Print
Rainbow Jello Cake Recipe
- Prep Time: 20 minutes
- Cook Time: 35 minutes
- Total Time: 6 hours (including chilling time for gelatin layers)
- Yield: 12 servings 1x
- Category: Dessert
- Method: Baking
- Cuisine: American
Description
This vibrant Rainbow Jello Cake is a delightful dessert layering colorful gelatin flavors atop a fluffy white cake base, topped with creamy whipped topping and optional rainbow sprinkles for a festive touch. Perfect for celebrations or anytime you want a visually stunning and delicious treat.
Ingredients
Cake Ingredients
- 15.25 ounces box of white cake mix
- 1 cup water
- ½ cup vegetable oil
- 4 egg whites, room temperature
Gelatin Layers
- 3 cups boiling water, divided
- 3 ounce box strawberry gelatin mix
- 3 ounce box orange gelatin mix
- 3 ounce box lemon gelatin mix
- 3 ounce box lime gelatin mix
- 3 ounce box berry blue gelatin mix
- Red, orange, yellow, green, and blue food color gel (5-7 drops each)
Topping and Garnish
- 8 ounce container whipped topping, thawed
- Rainbow sprinkles (optional garnish)
Instructions
- Prepare the White Cake Batter: In a large mixing bowl, combine the white cake mix, 1 cup water, ½ cup vegetable oil, and 4 egg whites at room temperature. Beat the mixture with an electric mixer for about 2 minutes until smooth and well blended.
- Bake the Cake: Pour the cake batter evenly into a greased 9×13 inch baking pan. Bake in a preheated oven at 350°F (175°C) for 30 to 35 minutes or until a toothpick inserted in the center comes out clean. Allow the cake to cool completely in the pan.
- Prepare the Gelatin Mixtures: While the cake cools, dissolve each 3-ounce box of gelatin (strawberry, orange, lemon, lime, and berry blue) separately in 3/4 cup of boiling water. Stir each mixture until completely dissolved. Add 5-7 drops of the corresponding food color gel to intensify the color and stir well.
- Layer the Gelatin Over the Cake: Once the cake is completely cooled, carefully pour the first gelatin color (red/strawberry) evenly over the cake. Refrigerate until firm, about 45 minutes to 1 hour. Repeat this process for each other gelatin color in order (orange, yellow/lemon, green/lime, blue/berry blue), allowing each layer to set fully before adding the next to create vibrant, distinct layers.
- Add the Whipped Topping: After the final gelatin layer is set, spread the thawed whipped topping evenly over the top of the cake for a creamy finish.
- Garnish and Serve: Optionally sprinkle rainbow sprinkles over the whipped topping to add a festive, colorful touch. Chill the cake until ready to serve for the best texture and flavor.
Notes
- Ensure the cake is completely cooled before pouring gelatin layers to prevent melting and blending of colors.
- Use gel food coloring as it provides more vibrant hues than liquid coloring.
- Allow each gelatin layer to fully set in the refrigerator to maintain distinct layers.
- You can substitute the white cake mix with homemade white cake batter if preferred.
- For easier cutting, run a knife under warm water and dry it before slicing the cake.
Keywords: rainbow jello cake, layered gelatin cake, white cake mix dessert, colorful jello cake, festive dessert, party cake