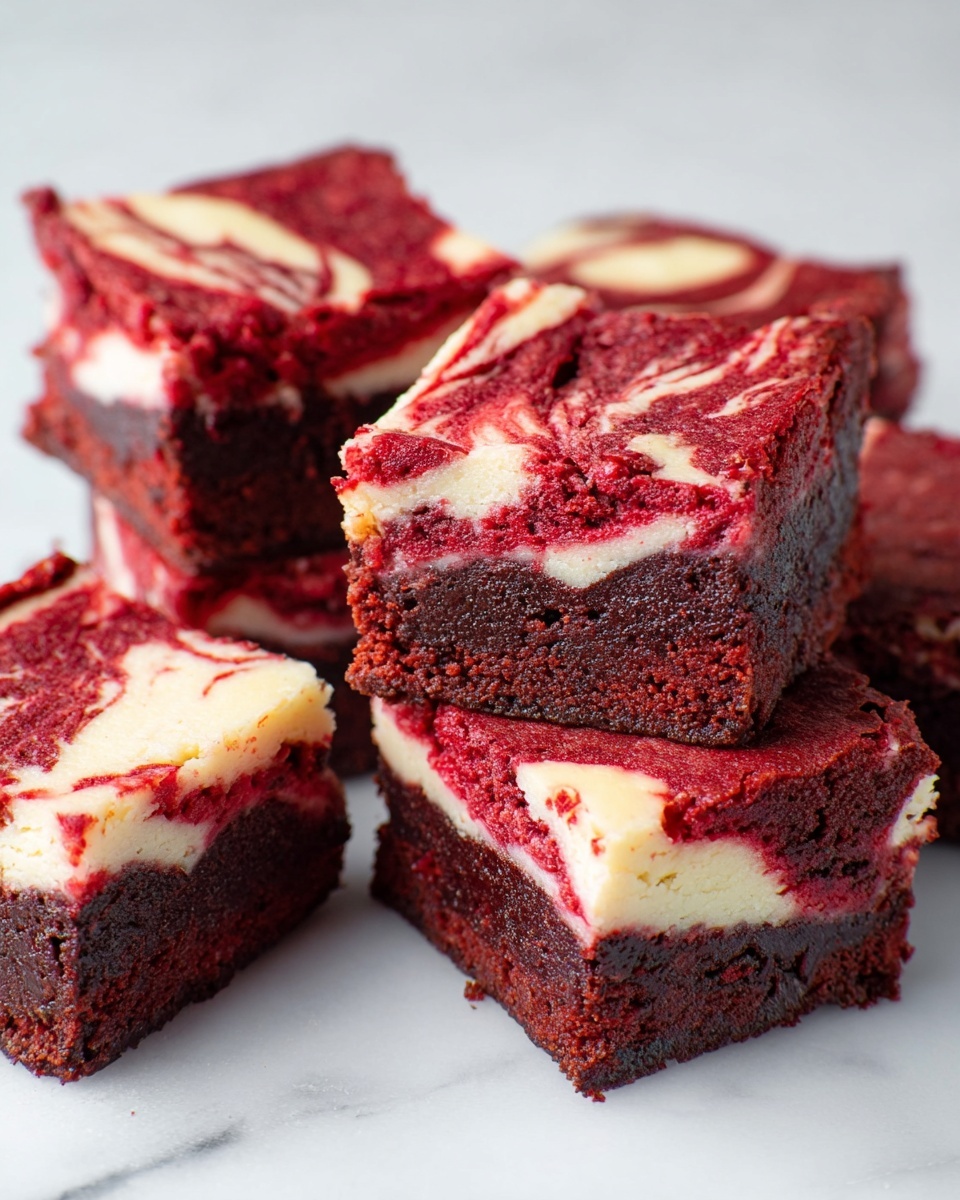
Red Velvet Brownies with Cream Cheese Layer Recipe
I’ve got a treat for you that balances rich chocolatey goodness with a tangy creamy twist — this Red Velvet Brownies with Cream Cheese Layer Recipe is a total showstopper. If you love the lushness of classic red velvet cake but crave the fudgy, dense texture of a brownie, well, this recipe hits that sweet spot perfectly. It’s one of those desserts that works just great for a cozy weekend bake or impressing friends at gatherings without too much fuss.
What I genuinely adore about this Red Velvet Brownies with Cream Cheese Layer Recipe is how the cream cheese layer adds that luscious, velvety contrast that keeps every bite interesting. Plus, the touch of cocoa in the batter gives it a subtle chocolate edge without overpowering the iconic red velvet flavor. Trust me, once you try these, you’ll want to make them again and again!
Ingredients You’ll Need
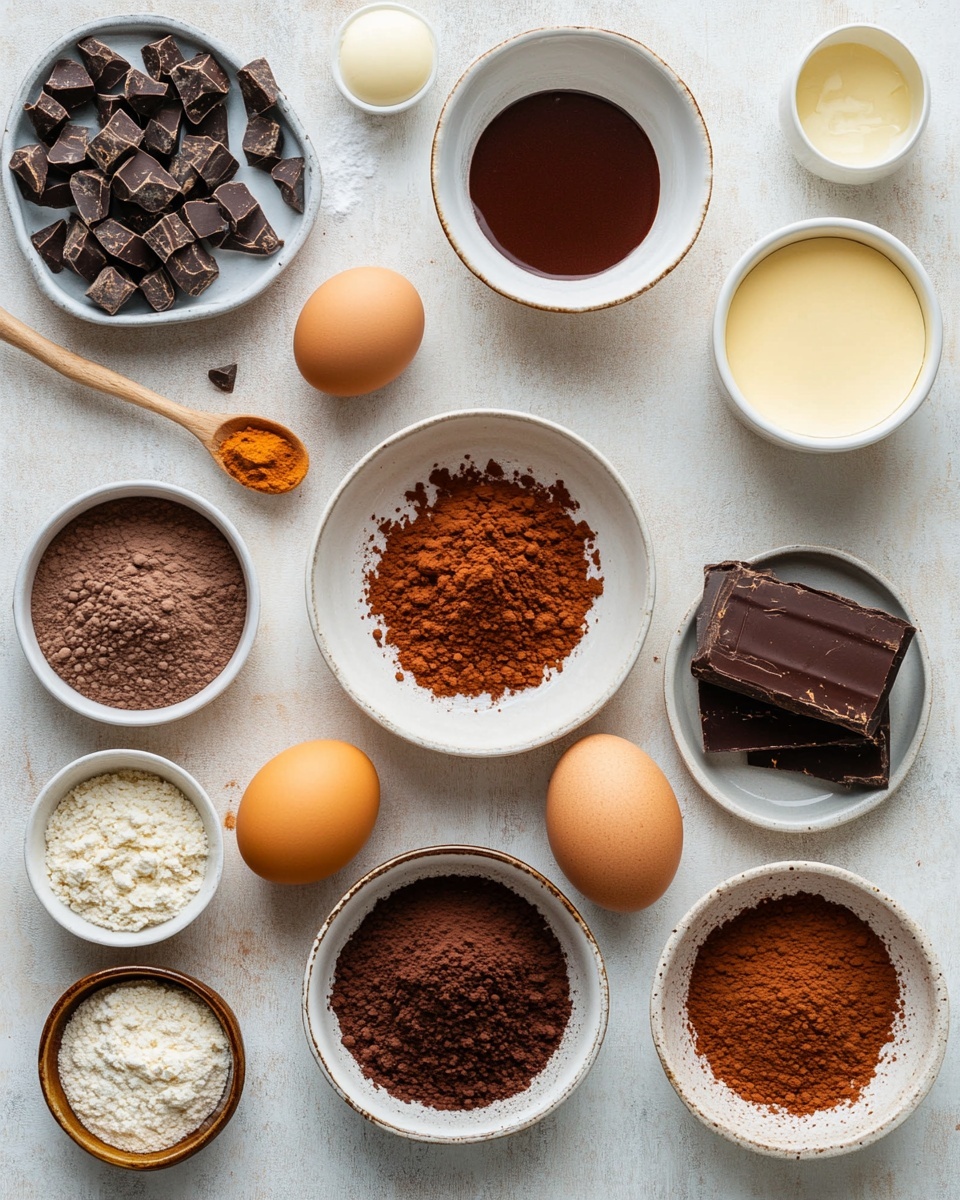
These ingredients come together like old friends — the cocoa and vinegar create that signature red velvet flavor, while the cream cheese layer adds a delightful richness. When shopping, I always opt for good-quality cream cheese and real cocoa powder; they really elevate the final taste.
- Unsalted Butter: Melted butter keeps the brownies moist but lets you control the salt content perfectly.
- Unsweetened Cocoa Powder: This adds a hint of deep chocolate flavor that balances the sweetness without getting too heavy.
- Salt: Just a pinch to enhance all those lovely flavors.
- Granulated Sugar: Adds sweetness and structure to both the brownie and cream cheese layers.
- Large Eggs: Eggs bind the batter and provide richness—room temperature works best for even mixing.
- Vanilla Extract: Pure vanilla gives warmth and depth to the cream cheese layer.
- Apple Cider Vinegar (optional): This helps develop that classic red velvet tang and brightens the color.
- Red Food Coloring (gel preferred): Gel coloring gives that vibrant color without adding extra liquid.
- All Purpose Flour: Provides structure, so your brownies hold together but remain tender.
- Full-fat Cream Cheese: Make sure it’s softened to room temp for a perfectly smooth cream cheese layer.
Variations
I love playing around with this recipe to tailor it to different occasions or dietary needs. It’s flexible enough to handle a few swaps while still tasting incredible, so don’t hesitate to personalize it for your own kitchen vibes.
- Gluten-Free Version: I once swapped in a gluten-free flour blend with great results—just be sure to check your blend’s protein content for the best texture.
- Reduced Sugar: Cutting back the sugar slightly didn’t crash the flavor; I just added a bit more vanilla to keep it lively.
- Chocolate Chips Addition: Tossing in a handful of white or semi-sweet chocolate chips into the cream cheese layer gives a fun melty surprise.
- Vegan Adaptation: I’m still experimenting here but believe me, using flax eggs and vegan cream cheese can work if you’re up for it!
How to Make Red Velvet Brownies with Cream Cheese Layer Recipe
Step 1: Melt and Mix the Base
Start by melting your unsalted butter gently in a saucepan or microwave—just warm enough to melt, not brown. Once melted, whisk in your cocoa powder and salt until fully combined. Then stir in the granulated sugar until smooth. This mixture should look glossy and chocolatey, which is your base for the rich red velvet flavor to build on.
Step 2: Add Eggs, Flavor, and Color
Next, beat in your eggs one at a time—this helps the batter to stay silky and well aerated. Then stir in the vanilla extract and apple cider vinegar, which gives that classic tang and helps the red color pop. Finally, mix in the red food coloring gel. I usually start with two teaspoons and add a little more if I want a deeper red hue.
Step 3: Fold in the Flour
Gently fold in the all-purpose flour with a spatula. The key here is not to overmix—stop once you see no more flour streaks. Overmixing can make your brownies tough rather than tender, so slow and steady wins the race.
Step 4: Prepare the Cream Cheese Layer
In a separate bowl, beat together the softened cream cheese, granulated sugar, egg, and vanilla extract until smooth and creamy. Making sure the cream cheese is room temperature is crucial for a lump-free layer—if yours is still cold, pop it in the microwave for 10 seconds before mixing.
Step 5: Layer and Bake
Pour half of the red velvet batter into your greased or parchment-lined baking pan. Gently spread the cream cheese layer over it in an even layer. Then dollop and spread the remaining red velvet batter on top carefully—not mixing, but covering the cream cheese. Bake at 350°F (175°C) for about 30-35 minutes. Keep an eye on it; the edges should be set, but a toothpick inserted in the red velvet layer might come out with a few moist crumbs—that’s perfect for chewy brownies.
How to Serve Red Velvet Brownies with Cream Cheese Layer Recipe
Garnishes
I often sprinkle a pinch of powdered sugar or a few red velvet crumbs on top just before serving. Sometimes, I add a light dusting of cocoa powder or chopped pecans if I want a bit more texture and contrast—plus, pecans add a lovely nutty note that complements the sweetness.
Side Dishes
These brownies are rich enough to stand on their own, but I love pairing them with a simple scoop of vanilla ice cream or a dollop of whipped cream. Fresh berries such as raspberries or strawberries also cut through the richness beautifully and add a fresh twist.
Creative Ways to Present
For special occasions, I like cutting the brownies into small bite-sized squares and serving them on a decorative platter with edible flowers or a drizzle of chocolate sauce. Another fun idea is to stack them as little brownie sandwiches with extra cream cheese frosting between layers—kids especially love that!
Make Ahead and Storage
Storing Leftovers
Once cooled, store your Red Velvet Brownies with Cream Cheese Layer in an airtight container in the fridge. They’ll stay fresh for about 4-5 days, but honestly, in my house, they rarely last that long! Chilling also firms up the cream cheese layer, making the brownies easier to slice.
Freezing
I’ve frozen these brownies successfully by wrapping individual squares tightly in plastic wrap and then placing them in a freezer-safe bag. They keep well for up to 3 months. When you’re ready, just thaw them overnight in the fridge to maintain that creamy texture.
Reheating
If you want to enjoy them warm, I recommend reheating a brownie square in the microwave for about 15 seconds. The cream cheese layer softens just right without melting away, giving you that fresh-baked feel in seconds.
FAQs
-
Can I use a different type of vinegar instead of apple cider vinegar?
Absolutely! Distilled white vinegar works just as well and is often used in red velvet recipes to react with the baking soda for that classic tender crumb and vibrant color. Just use the same amount and you’ll be good to go.
-
What if I don’t have gel food coloring?
You can use liquid food coloring, but it may require a bit more to achieve that deep red color, which can slightly alter the texture by adding more liquid. Gel coloring is more concentrated and is my go-to for this recipe to keep the batter perfectly balanced.
-
How do I prevent the cream cheese layer from mixing into the brownie layers?
The trick is to spread the cream cheese layer gently and evenly without disturbing the brownie batter underneath, then carefully dollop and spread the remaining brownie batter on top without swirling. Using a spatula or the back of a spoon helps keep the layers distinct and beautiful.
-
Can I make these brownies vegan or dairy-free?
While this recipe calls for eggs and cream cheese, you can try using vegan cream cheese alternatives and flax or chia eggs. Keep in mind, the texture and flavor will differ slightly, and you might need some trial and error, but it’s definitely possible!
-
How do I know when the brownies are done baking?
Look for brownies with set edges and a slightly soft center. A toothpick inserted into the red velvet part should come out with a few moist crumbs, not wet batter. This ensures the fudge-like chewy texture you’re aiming for.
Final Thoughts
This Red Velvet Brownies with Cream Cheese Layer Recipe is one of those delightful desserts that feels both indulgent and comforting. I love how every bite feels like a little celebration of texture and flavor — that creamy, tangy layer against the chewy red velvet base is just heavenly. I really recommend giving this a try next time you want to wow your family or friends, or just treat yourself after a long day baking it in your own kitchen. You’ll be making these over and over, I promise!
Print
Red Velvet Brownies with Cream Cheese Layer Recipe
- Prep Time: 15 minutes
- Cook Time: 35-40 minutes
- Total Time: 50-55 minutes
- Yield: 16 brownies (4×4 grid of 2-inch squares) 1x
- Category: Dessert
- Method: Baking
- Cuisine: American
Description
These Red Velvet Brownies are a decadent treat combining the rich, fudgy texture of classic brownies with a vibrant red hue and a creamy, tangy cream cheese layer. Perfect for special occasions or an indulgent dessert, they offer a perfect balance of chocolate and cream cheese flavors with a moist, tender crumb.
Ingredients
Brownie Batter
- ½ cup (1 stick/115g) unsalted butter, melted
- 3 tablespoons (20g) unsweetened cocoa powder
- ¼ teaspoon salt
- ¾ cup plus 2 tablespoons (175g) granulated sugar
- 2 large eggs
- ¾ teaspoon vanilla extract
- ½ teaspoon apple cider vinegar (or distilled white vinegar), optional
- 2–3 teaspoons red food coloring (gel preferred)
- ⅔ cup (95g) all purpose flour
Cream Cheese Layer
- 8 ounces (225g) full-fat cream cheese, room temperature
- ¼ cup (50g) granulated sugar
- 1 large egg
- ½ teaspoon pure vanilla extract
Instructions
- Prepare the Brownie Batter: In a medium bowl, combine the melted butter, unsweetened cocoa powder, and salt. Mix until smooth and well incorporated. Add the sugar and stir until evenly combined. Incorporate the eggs one at a time, beating well after each addition. Stir in the vanilla extract and vinegar, if using, then add the red food coloring and mix until the batter is uniformly red. Finally, gently fold in the all-purpose flour until just combined, taking care not to overmix.
- Make the Cream Cheese Layer: In a separate bowl, beat the room temperature cream cheese until smooth and creamy. Add granulated sugar, egg, and vanilla extract, and continue to beat until the mixture is well combined and smooth, with no lumps.
- Assemble the Brownies: Preheat the oven to 350°F (175°C). Grease or line an 8×8 inch (20×20 cm) baking pan with parchment paper. Pour half of the red velvet brownie batter into the pan and spread it evenly. Carefully dollop the cream cheese mixture over the brownie layer, spreading gently for an even layer. Top with the remaining brownie batter and smooth the surface.
- Bake the Brownies: Bake in the preheated oven for 35-40 minutes, or until a toothpick inserted in the center comes out with just a few moist crumbs attached. Avoid overbaking to ensure fudgy texture. Remove from oven and allow to cool completely in the pan on a wire rack before slicing.
- Serve and Store: Once cooled, cut the brownies into squares. Serve as a decadent dessert or snack. Store leftovers in an airtight container in the refrigerator for up to 4 days, or freeze for longer storage.
Notes
- Use gel food coloring for a more vibrant red without thinning the batter.
- The vinegar helps enhance the red color and balances the sweetness.
- Room temperature cream cheese ensures a smooth cream cheese layer.
- Do not overmix the batter to keep brownies tender and moist.
- Allow brownies to cool thoroughly before cutting for cleaner slices.
Keywords: Red Velvet Brownies, Cream Cheese Brownies, Chocolate Brownies, Fudgy Brownies, Dessert Recipes, American Desserts