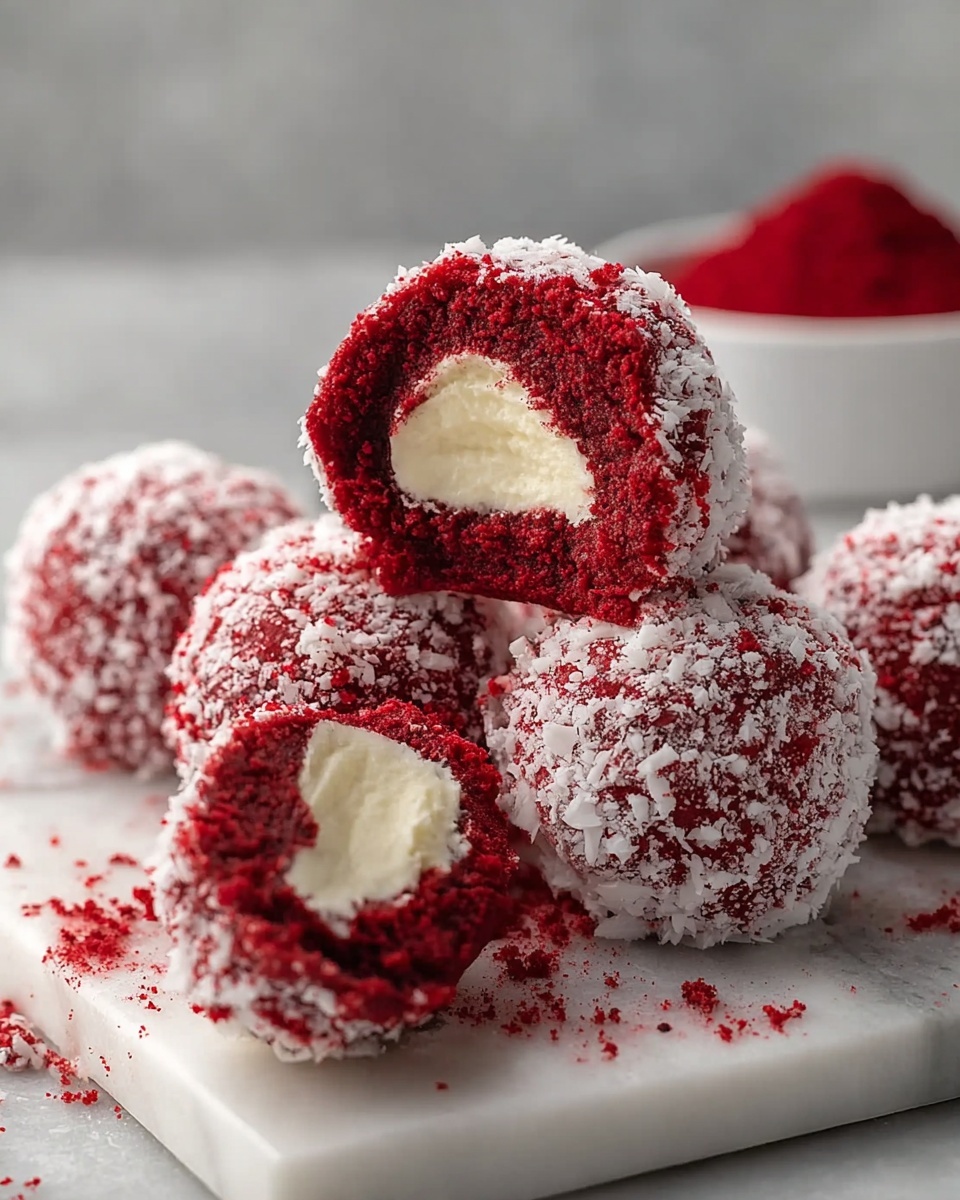
Red Velvet Snowballs Recipe
If you’re looking for a festive, melt-in-your-mouth treat, this Red Velvet Snowballs Recipe is an absolute winner. These little snowball cookies are soft, full of that classic red velvet cocoa flavor, and coated in powdered sugar so they look like they’ve just come in from the snow — adorable and delicious! They’re perfect for holiday parties, afternoon coffee breaks, or anytime you need a sweet pick-me-up with a twist.
What I love most about this Red Velvet Snowballs Recipe is how simple it is to make, yet it delivers such a beautiful result every time. Whether you’re baking for family or friends, or just treating yourself, these cookies bring that feeling of cozy indulgence without a ton of fuss. Plus, the powdered sugar coating gives them a delicate sweetness that perfectly balances the rich, buttery dough inside.
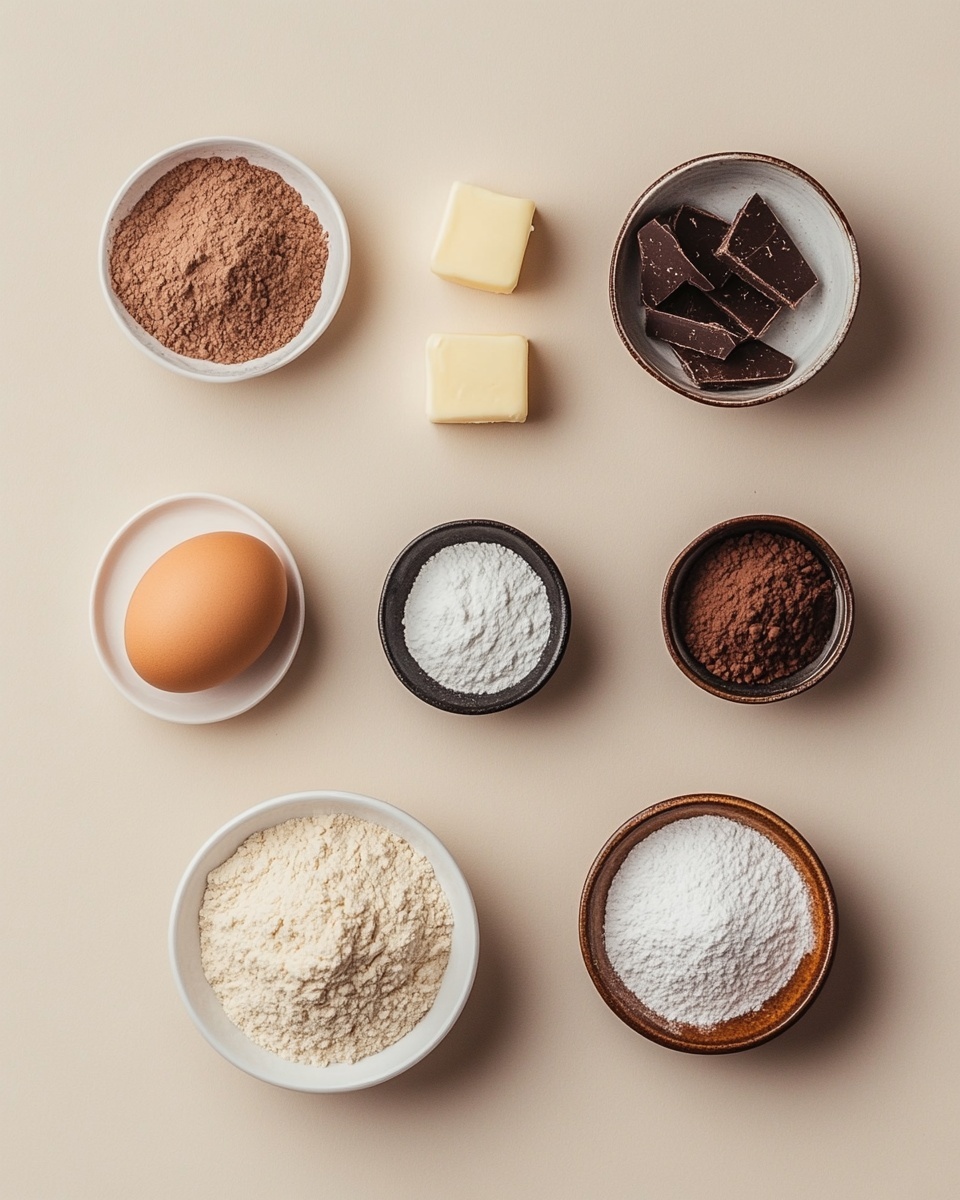
Ingredients You’ll Need
Each ingredient in this Red Velvet Snowballs Recipe plays a key role — from delivering that classic cocoa note to giving the cookies their signature red color and that irresistible soft texture. When you shop, opting for good quality cocoa and fresh powdered sugar will really make your cookies shine.
- All-purpose flour: The foundation of your cookie dough; makes for the perfect crumb without being too dense.
- Cocoa powder: Adds that deep red velvet chocolate flavor; I prefer natural unsweetened cocoa for authenticity.
- Baking powder: Helps the snowballs rise just enough to stay soft and tender.
- Salt: Just a pinch to balance out the sweetness and enhance flavor.
- Unsalted butter: Make sure it’s softened to room temperature — it mixes easier and keeps the texture perfect.
- Granulated sugar: Adds sweetness and gives the cookies structure.
- Large egg: Binds everything together for that soft, cake-like texture.
- Vanilla extract: A splash of vanilla deepens the flavor — don’t skip it!
- Red food coloring: This is what gives those snowballs their stunning red hue. You can use gel or liquid, but gel tends to be more vibrant without adding much liquid.
- Powdered sugar: For coating the warm cookies — it adds that snowy, delicate outer layer that gives these cookies their name.
Variations
What I love most about this Red Velvet Snowballs Recipe is how easy it is to tweak to suit different tastes or dietary needs. Feel free to get creative and make it your own!
- Gluten-free version: I’ve swapped the all-purpose flour for a gluten-free blend with great success — just make sure it includes xanthan gum for structure.
- White chocolate snowballs: Try folding in some white chocolate chips for a sweet surprise inside the snowballs — it adds a nice contrast to the cocoa.
- Less sugary coating: If you prefer less sweetness on the outside, lightly dust with cocoa powder mixed with powdered sugar instead of pure powdered sugar.
- Natural coloring: For those who want to skip artificial dyes, beet powder can lend a subtle red tint, though the color is more muted.
How to Make Red Velvet Snowballs Recipe
Step 1: Mix Dry Ingredients Together
Start by whisking together the flour, cocoa powder, baking powder, and salt in a medium bowl. This helps distribute all the dry ingredients evenly and ensures your snowballs bake up perfectly balanced. I like to sift these together for an extra smooth dough, but it’s not mandatory.
Step 2: Cream Butter and Sugar
In a large bowl, beat the softened butter and granulated sugar until creamy and light in color — about 2-3 minutes with a hand mixer or stand mixer. This step is crucial because it creates the fluffy texture inside the cookies. If your butter isn’t fully softened, you might struggle to get this creamy texture, so make sure to plan ahead.
Step 3: Add Egg, Vanilla, and Red Coloring
Next, beat in the egg, vanilla extract, and red food coloring until everything is well combined. The dough will start to take on that gorgeous red hue here — it’s such a satisfying moment just seeing how vibrant this gets!
Step 4: Combine Wet and Dry Ingredients to Form Dough
Gradually add the dry ingredients to the wet ingredients, mixing just until you have a smooth, soft dough. Avoid overmixing here — you want it just combined so the snowballs stay tender after baking. If your dough feels too sticky, a quick chill in the fridge for 20 minutes helps make shaping easier.
Step 5: Shape and Bake the Snowballs
Preheat your oven to 350°F (175°C). Scoop tablespoon-sized balls of dough and gently roll them between your palms to form smooth spheres. Place them spaced on a parchment-lined baking sheet. Bake for 10-12 minutes — the cookies will be soft and just set, not browned. I recommend testing the first batch to perfect your timing since ovens vary.
Step 6: Coat with Powdered Sugar While Warm
As soon as the snowballs come out of the oven, carefully roll them in powdered sugar. The warmth helps the sugar stick beautifully, giving that soft, snowy exterior. Then, place them on a wire rack to cool completely. You might want to do a final dusting once fully cool for the prettiest finish.
How to Serve Red Velvet Snowballs Recipe
Garnishes
I usually keep the garnish simple since the powdered sugar coating is already stunning. But for a festive touch, a little sprinkle of finely chopped pistachios or edible silver glitter can add that wow factor. Sometimes I even drizzle a bit of white chocolate over the top for extra indulgence.
Side Dishes
These snowballs go perfectly with a hot cup of coffee or a warm mug of cocoa. I also like pairing them with a light fruit salad or fresh berries to balance the richness. They’re such a cozy treat to enjoy anytime you need a little sweet break.
Creative Ways to Present
For holiday gatherings, I’ve arranged these Red Velvet Snowballs on tiered trays shaped like little snowy landscapes with powdered sugar “snow” dusted around them. Placing them in pretty cupcake liners also makes them easy to pick up and adds a festive pop of color on your dessert table.
Make Ahead and Storage
Storing Leftovers
I usually store leftover Red Velvet Snowballs in an airtight container at room temperature for up to 3 days. Since they’re soft, keeping them sealed well helps maintain moisture. If they start to dry out a bit, a quick zap in the microwave for 10-15 seconds does wonders.
Freezing
If you want to make these ahead of time, the dough freezes beautifully — just shape the balls and freeze them on a tray before transferring to a freezer bag. When ready to bake, pop them straight into the oven (add a minute or so to baking time). You can also freeze baked snowballs in an airtight container for up to 2 months.
Reheating
To refresh baked or thawed snowballs, warm them in the microwave for about 15 seconds or heat in a 300°F oven for 5 minutes. This brings back their soft texture and makes them feel fresh out of the oven again. Just re-coat with a little powdered sugar if needed after reheating.
FAQs
-
Can I use natural or Dutch-process cocoa powder for this Red Velvet Snowballs Recipe?
Both natural and Dutch-process cocoa powders work, but they affect the color and flavor slightly. Natural cocoa gives a brighter red tone when combined with vinegar or buttermilk, but since this recipe doesn’t use those acids, you’ll mostly notice a difference in flavor intensity. Dutch-process is smoother and mellower but can mute the red color a bit. I usually stick with natural cocoa for the classic red velvet taste.
-
Why do I need to roll the cookies in powdered sugar while they’re warm?
Rolling the cookies in powdered sugar while they’re still warm helps the sugar stick to their surface, creating that signature sweet, snowy coating. If you wait until they cool completely, the powdered sugar won’t adhere as well and might just fall off. For an even coating, I sometimes roll them twice – once warm and once after they’re fully cooled.
-
Is there a substitute for red food coloring in this recipe?
You can use natural alternatives like beet powder or pomegranate juice, but the color will be more subtle and less vibrant than with traditional red food coloring. If you’re avoiding artificial dyes but still want that iconic red look, gel food coloring tends to be the best compromise in terms of brightness without adding too much liquid.
-
How do I prevent my Red Velvet Snowballs from spreading too much during baking?
Make sure your butter is softened, not melted, to keep the dough firm but workable. Also, chilling the dough for at least 20 minutes before baking can help the cookies hold their shape better. Using parchment paper or a silicone baking mat prevents sticking and encourages even baking, which also helps prevent too much spreading.
-
Can I make these cookies gluten-free?
Absolutely! I’ve substituted all-purpose flour with a 1:1 gluten-free baking flour blend that contains xanthan gum, which helps mimic the texture of regular flour. Just be sure to check the blend’s instructions for best results. The cookies turn out just as soft and flavorful!
Final Thoughts
Honestly, this Red Velvet Snowballs Recipe holds a special place on my cookie tray. It’s a recipe I come back to every holiday season and also when I just want a cozy, comforting treat that’s a little different than your average chocolate chip cookie. Give these snowballs a try—you’ll love how they look, smell, and taste. Once you have a batch in your oven, you’ll be hooked just like me, eagerly waiting for that first powdered sugar-coated bite!
Print
Red Velvet Snowballs Recipe
- Prep Time: 20 minutes
- Cook Time: 12 minutes
- Total Time: 32 minutes
- Yield: 24 cookies 1x
- Category: Dessert
- Method: Baking
- Cuisine: American
Description
Red Velvet Snowballs are soft, chewy cookies with a rich cocoa flavor and a vibrant red hue, coated in powdered sugar to create a delightful, melt-in-your-mouth treat perfect for holidays and special occasions.
Ingredients
Dry Ingredients
- 1 1/2 cups all-purpose flour
- 1/2 cup cocoa powder
- 1 teaspoon baking powder
- 1/4 teaspoon salt
Wet Ingredients
- 1/2 cup unsalted butter, softened
- 1 cup granulated sugar
- 1 large egg
- 1 teaspoon vanilla extract
- 1 tablespoon red food coloring
For Coating
- 1 cup powdered sugar
Instructions
- Prepare Dry Ingredients: In a medium bowl, sift together the all-purpose flour, cocoa powder, baking powder, and salt to ensure even distribution and remove any lumps.
- Cream Butter and Sugar: In a large mixing bowl, beat the softened unsalted butter and granulated sugar together with an electric mixer until the mixture is light and fluffy, which should take about 3-4 minutes.
- Add Wet Ingredients: Beat in the large egg until fully incorporated, followed by the vanilla extract and red food coloring, mixing well to achieve a consistent red color throughout the batter.
- Combine Dry and Wet Ingredients: Gradually add the dry ingredient mixture to the wet mixture, stirring gently after each addition just until combined to form a smooth dough. Avoid overmixing to maintain cookie tenderness.
- Form the Snowballs: Using a small cookie scoop or tablespoon, scoop out portions of dough and roll them gently into balls between your palms.
- Bake the Cookies: Preheat the oven to 350°F (175°C). Place the dough balls on a baking sheet lined with parchment paper or a silicone mat, spacing them about 2 inches apart. Bake for 10-12 minutes or until the cookies are just set and slightly puffy.
- Coat with Powdered Sugar: Remove the cookies from the oven and let them cool for about 2 minutes until they are warm but not hot. Roll the cookies in the powdered sugar coating to cover them entirely, creating the signature snowball appearance.
- Cool Completely: Transfer the coated cookies to a wire rack and allow them to cool completely. As they cool, the powdered sugar sets, creating a delicate outer shell while the inside remains soft and chewy.
Notes
- Ensure butter is softened but not melted to achieve the right cookie texture.
- For even coloring, mix red food coloring thoroughly into the wet ingredients.
- If cookies spread too much during baking, chill the dough for 30 minutes before baking.
- Use powdered sugar for coating while cookies are still warm to ensure the sugar adheres well.
- Store cookies in an airtight container at room temperature for up to 5 days.
Keywords: Red Velvet Cookies, Snowball Cookies, Chocolate Cookies, Holiday Cookies, Powdered Sugar Coating