Easy Baked Salmon Sushi Cups (Viral Recipe) Recipe
If you’ve been scrolling through social media and stumbled upon the Easy Baked Salmon Sushi Cups (Viral Recipe) Recipe, you know exactly what I’m talking about—the one everyone can’t stop raving about. These bite-sized delights pack all the flavors of sushi into an easy-to-make baked treat that’s perfect for casual dinners, parties, or those nights when you want sushi without the fuss of rolling. I fell for this recipe the moment I tried it because it’s approachable, delicious, and kind of fun to make with friends or family.
What makes this Easy Baked Salmon Sushi Cups (Viral Recipe) Recipe truly special is how quickly you can have sushi-inspired bites on your table with minimal prep. No need for fancy sushi-making skills or expensive fish cuts; it’s all about combining simple ingredients that work beautifully together. Trust me, once you’ve made these, you’ll want to share this recipe with everyone you know—and maybe keep a batch on hand for whenever that sushi craving strikes.
Ingredients You’ll Need
Each ingredient plays a key role to bring out the flavors and texture that make these baked sushi cups so irresistible. Plus, you’ll find that most of these ingredients are pantry staples—or easy to find at your local supermarket or Asian grocery store.
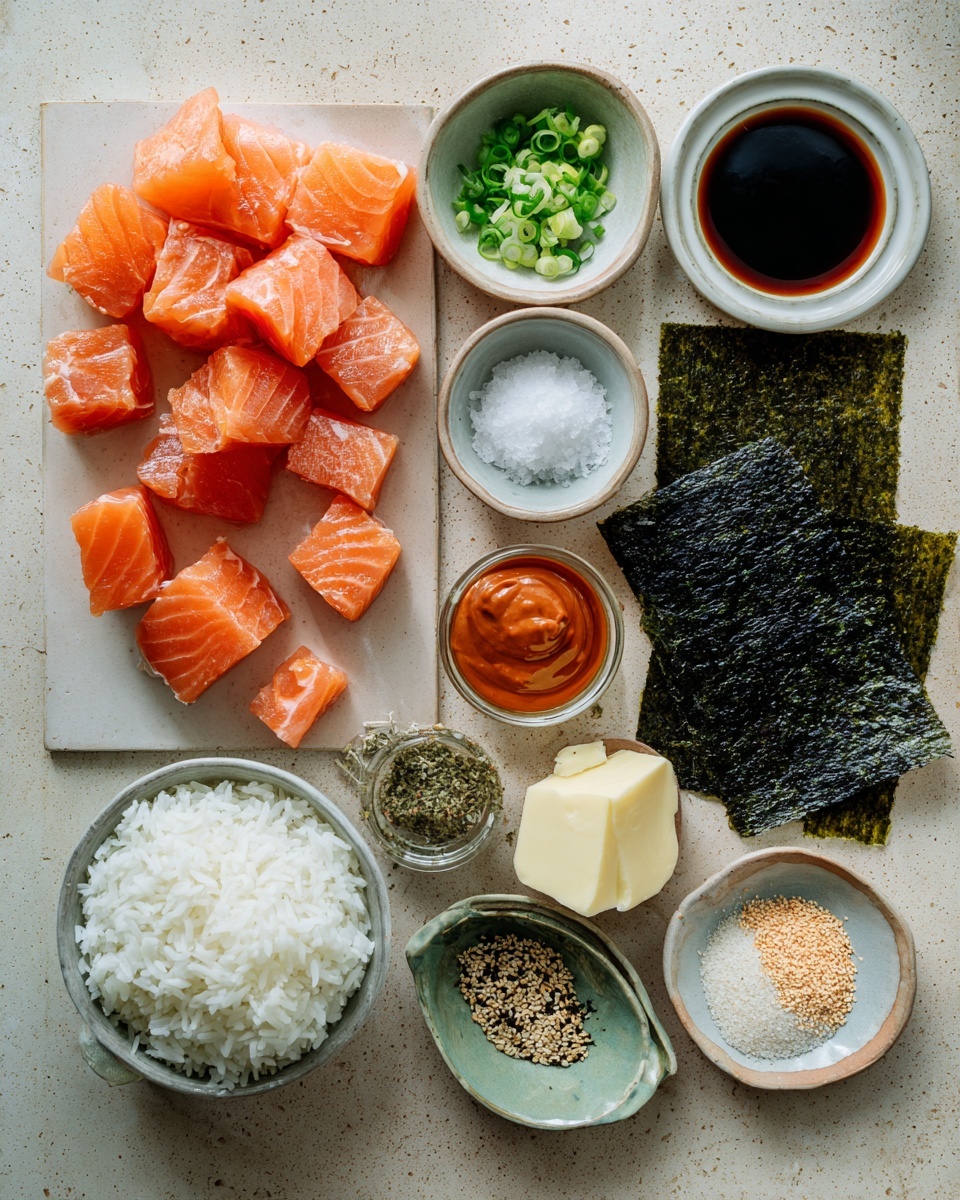
- Salmon: Fresh, cubed salmon is best here—you want tender pieces that cook evenly in the oven.
- Light soy sauce: Adds a salty, umami depth without overpowering the salmon’s flavor.
- Kewpie Mayo: Japanese mayo lends a creamy, slightly tangy richness; it’s a must-have for that authentic taste.
- Sriracha: For a gentle kick of heat that balances the creaminess perfectly.
- Sesame oil: Just a hint for that nutty aroma and complexity.
- Sushi rice: Short grain rice that becomes sticky when cooked, perfect for holding the cups together.
- Rice vinegar: Mixed with sugar to season the rice, giving it that classic tangy sushi flavor.
- White sugar: Sweetens the vinegar mixture just right so the rice isn’t too sharp.
- Nori sheets: Cut into squares, these seaweed wrappers hold your sushi cups and add that essential savory bite.
- Furikake: A sprinkle of this Japanese seasoning adds texture and a burst of flavor on top.
- Green onion: Fresh and crisp, for garnish that brightens each bite.
- Cooking spray: To lightly grease your muffin tin so nothing sticks and cleanup’s easy.
Variations
I love how versatile the Easy Baked Salmon Sushi Cups (Viral Recipe) Recipe can be—it’s like a little blank canvas for sushi creativity. Feel free to swap or add ingredients to suit your taste buds or what’s in your fridge that day.
- Vegetarian variation: Instead of salmon, use diced avocado and cucumber with a touch of soy sauce. It’s surprisingly satisfying and super fresh.
- Spicy boost: I sometimes mix extra sriracha or add a sprinkle of chili flakes to the salmon mixture if I’m feeling bold.
- Crunchy element: Adding tempura bits or toasted sesame seeds on top before baking adds a nice crunch that I adore.
- Gluten-free option: Make sure to use gluten-free soy sauce to keep it safe for those with dietary restrictions.
- Seasonal twist: Swap salmon for cooked shrimp or even crab meat—both work perfectly baked in these sushi cups.
How to Make Easy Baked Salmon Sushi Cups (Viral Recipe) Recipe
Step 1: Prepare the sushi rice
Start by cooking your sushi rice according to the package directions—getting it just right is super important because this sticky rice is the base that holds everything together. While still warm, mix your rice vinegar and sugar (I microwave this combo until the sugar dissolves). Pour this over the rice and gently fold it in without smashing the grains. Set it aside to let those flavors meld while you prep the salmon.
Step 2: Mix the salmon toppings
In a bowl, toss your cubed salmon with light soy sauce, Kewpie mayo, sriracha, and sesame oil. The key here is to mix until everything is evenly coated but be gentle so you don’t break up the salmon pieces. It’s like giving your salmon a delicious flavor hug before it goes into the oven.
Step 3: Prepare the nori and muffin tin
Cut your nori sheets into four squares each—you’ll want them to fit snugly inside your muffin tin cups. Lightly grease the muffin tray with cooking spray to prevent sticking. Then, lay each nori square inside a muffin cup, pressing gently so it lines the shape.
Step 4: Assemble your sushi cups
Spoon a layer of your seasoned sushi rice into each nori cup and press it lightly to form a base. Then, add a generous layer of the salmon mixture on top. Try not to overfill so everything cooks evenly and doesn’t spill over.
Step 5: Bake to perfection
Bake the sushi cups at 400°F for about 15 minutes. Keep an eye out because you want the salmon to be cooked through but still moist, and the tops to have a slight golden tint. Don’t overcook it or the salmon will dry out—this step is all about that perfect balance.
Step 6: Garnish and serve
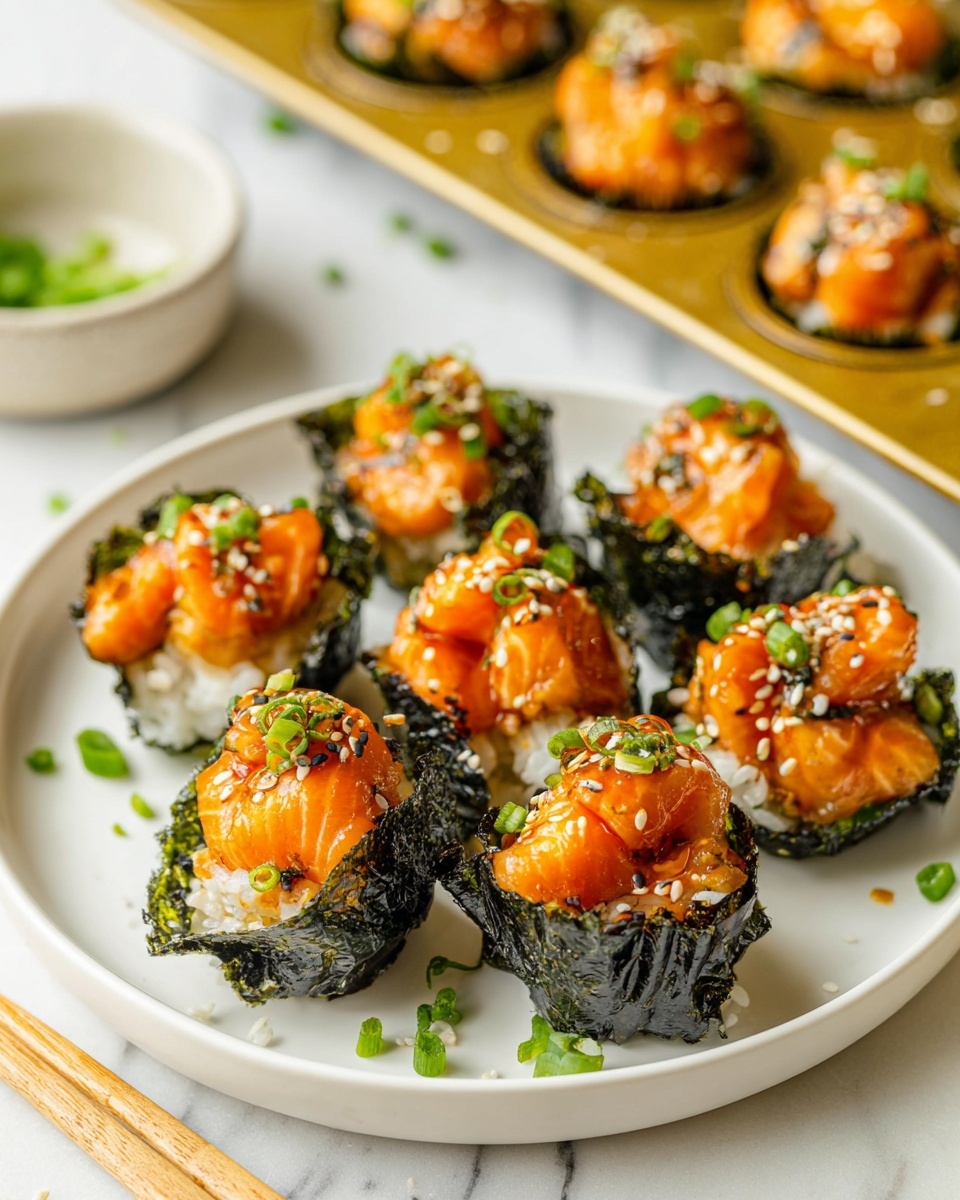
Once out of the oven, let your sushi cups cool for a few minutes. Then drizzle on a bit more sriracha or spicy mayo if you like extra heat. Finally, sprinkle furikake and chopped green onions for that authentic look and burst of flavor. Serve immediately and watch these little cups disappear in no time!
How to Serve Easy Baked Salmon Sushi Cups (Viral Recipe) Recipe
Garnishes
I’m all about those fresh, vibrant garnishes with this dish. Furikake adds just the right amount of crunch and umami, while a sprinkle of chopped green onions brightens every bite. Sometimes I add a few sesame seeds or thinly sliced avocado for extra creaminess—totally optional but delicious!
Side Dishes
Pair these sushi cups with a light side to keep things balanced. A crisp cucumber salad or edamame makes for a refreshing contrast. If you want to go all out, a bowl of miso soup or a seaweed salad can turn this into a more filling and authentic sushi night.
Creative Ways to Present
For special occasions, I like arranging the sushi cups on a bamboo sushi board lined with fresh shiso leaves or banana leaf for a pop of color. Adding small dipping bowls with soy sauce, wasabi, and pickled ginger around the platter makes the experience feel restaurant-worthy and super fun for guests.
Make Ahead and Storage
Storing Leftovers
If you’ve got leftovers (and it’s perfectly fine if you don’t), store them in an airtight container in the fridge. I’ve found these sushi cups keep well for about 2 days. Just be sure to eat them cold or reheat carefully to preserve texture.
Freezing
I don’t usually freeze these because the texture of sushi rice and salmon changes after thawing, but if you want to try, freeze them in a single layer on a sheet pan before transferring to a bag. Thaw overnight in the fridge and reheat gently.
Reheating
To reheat, avoid the microwave if you can—it tends to make the rice mushy. Instead, I pop them in a 350°F oven for 5-7 minutes or until warmed through. This keeps the nori a little crisp and the salmon tender without drying it out.
FAQs
-
Can I use frozen salmon for this recipe?
Absolutely! Just make sure to thaw it completely and pat it dry before mixing with the other ingredients. This helps prevent sogginess and ensures even cooking in the oven.
-
Is it necessary to use Kewpie mayo, or can I substitute?
Kewpie mayo offers a sweet tang that complements the salmon perfectly, but you can use regular mayo if you don’t have it. If you do, consider adding a little rice vinegar or lemon juice to mimic the slight tanginess.
-
How spicy are the sushi cups?
The spiciness mainly comes from the sriracha in the salmon mixture and any extra you drizzle on top. You can adjust the amount based on your spice tolerance, or omit altogether for a milder version.
-
Can I make this recipe gluten-free?
Yes, just be sure to use gluten-free soy sauce instead of regular soy sauce. Everything else should be naturally gluten-free.
-
Can I prepare these sushi cups ahead of time?
You can assemble them a few hours before baking and keep covered in the fridge. Just bring them to room temperature before baking so they cook evenly.
Final Thoughts
Honestly, this Easy Baked Salmon Sushi Cups (Viral Recipe) Recipe has become one of my go-to dishes when I want something that feels special but isn’t complicated. It’s approachable enough for weeknight dinners, but impressive enough to serve to friends. Plus, the combination of creamy mayo, spicy sriracha, and fresh green onions keeps me reaching for seconds (and sometimes thirds!). Give it a try—you’ll enjoy how simple and delicious sushi can be without the sushi chef training!
Print
Easy Baked Salmon Sushi Cups (Viral Recipe) Recipe
- Prep Time: 15 minutes
- Cook Time: 15 minutes
- Total Time: 30 minutes
- Yield: 12 servings 1x
- Category: Appetizer
- Method: Baking
- Cuisine: Japanese
Description
These Easy Baked Salmon Sushi Cups are a delightful twist on traditional sushi, combining flavorful marinated salmon with perfectly seasoned sushi rice baked in crispy nori cups. Ready in just 30 minutes, this viral recipe is perfect for a crowd-pleasing appetizer or a fun main dish that’s both convenient and delicious.
Ingredients
Salmon Mixture
- 1 lb salmon, cubed
- 1 tbsp light soy sauce
- 1 tbsp Kewpie Mayo
- 1 tbsp Sriracha
- 1 tsp sesame oil
Sushi Rice
- 1 ½ cup uncooked sushi rice
- 1 tbsp rice vinegar
- 2 tsp white sugar
Assembly & Garnish
- 3 large nori sheets
- furikake, for garnish
- 1 green onion, chopped, for garnish
- cooking spray
Instructions
- Cook Sushi Rice: Prepare the sushi rice according to the package instructions until fully cooked and fluffy.
- Season the Rice: In a microwave-safe bowl, combine rice vinegar and sugar. Microwave for 30 seconds or until sugar dissolves. Pour this mixture over the hot cooked rice and gently fold to combine. Set aside to cool slightly.
- Preheat Oven: Set your oven to 400℉ (200℃) to prepare for baking the sushi cups.
- Prepare Salmon Mixture: In a bowl, mix cubed salmon with light soy sauce, Kewpie mayo, Sriracha, and sesame oil until evenly coated. Set aside.
- Prepare Nori Sheets: Cut each nori sheet into 4 squares large enough to fit inside the muffin tin cups.
- Assemble Sushi Cups: Lightly grease a muffin tin with cooking spray. Place each nori square into the muffin tin cups, add a spoonful of seasoned sushi rice, pressing lightly to shape, then top with the salmon mixture.
- Bake: Bake in the preheated oven at 400℉ for 15 minutes until the salmon is cooked through and the tops are slightly golden.
- Garnish and Serve: Remove from oven and let cool for a few minutes. Drizzle more Sriracha or spicy mayo if desired, then sprinkle with furikake and chopped green onions. Serve immediately and enjoy!
Notes
- Use sushi-grade salmon for best quality and safety since it is only lightly cooked.
- You can adjust the spiciness by modifying the amount of Sriracha in the salmon mixture.
- Spraying the muffin tin with cooking spray helps prevent sticking and makes removal easier.
- Make sure to press the rice firmly but gently to create a sturdy base for the salmon topping.
- Leftovers can be refrigerated and eaten cold or gently reheated, but best enjoyed fresh.
Keywords: baked salmon sushi cups, sushi cups, salmon appetizer, easy sushi recipe, baked sushi, seafood appetizer, viral sushi recipe