Simple Scone Recipe
There’s something downright comforting about biting into a warm, flaky scone fresh from the oven, isn’t there? This Simple Scone Recipe has been my go-to when I want that cozy homemade feeling without fussing over complicated steps. The beauty here is in its simplicity: a straightforward combination of pantry staples that come together beautifully, making it perfect for lazy weekend breakfasts or impromptu afternoon tea sessions.
What I love most about this Simple Scone Recipe is how versatile it is. Whether you want to keep it classic or jazz things up with berries or chocolate, it’s forgiving, fast, and so rewarding. Trust me, once you try these, you’ll realize fresh scones at home are just as good as your favorite bakery’s — sometimes even better.
Ingredients You’ll Need
These ingredients play really nicely together to create tender, flaky scones with just the right touch of sweetness and fluffiness. Pro tip: using cold butter and buttermilk makes a noticeable difference in texture!
- All-purpose flour: The base for that soft yet sturdy crumb; using fresh flour makes a subtle difference.
- Granulated sugar: Adds sweetness without overpowering and helps give a slight golden crust.
- Baking powder: Your rising agent that lifts the scones into fluffy perfection.
- Salt: Just a pinch enhances all the flavors you’re building.
- Cold unsalted butter: The secret to flaky layers; make sure it’s well chilled before mixing.
- Buttermilk: Adds tanginess and moisture; if you don’t have it, you can make a quick substitute with milk and vinegar.
- Vanilla extract: A little flavor boost that brings warmth and depth to each bite.
- Large egg: Helps bind everything together and gives a nice golden color when you brush it on top.
- Add-Ins (optional): Whether it’s chocolate chips, fresh berries like raspberries or blueberries, or chopped strawberries, these add a burst of flavor and personality to your scones.
Variations
I always encourage you to make this Simple Scone Recipe your own. Sometimes I keep it plain for that classic taste, but other times I love adding fresh or frozen berries for a juicy surprise inside. Don’t hesitate to experiment!
- Berry Scones: I find that adding a little extra flour when using juicy fresh fruits helps keep the dough from getting too wet and sticky.
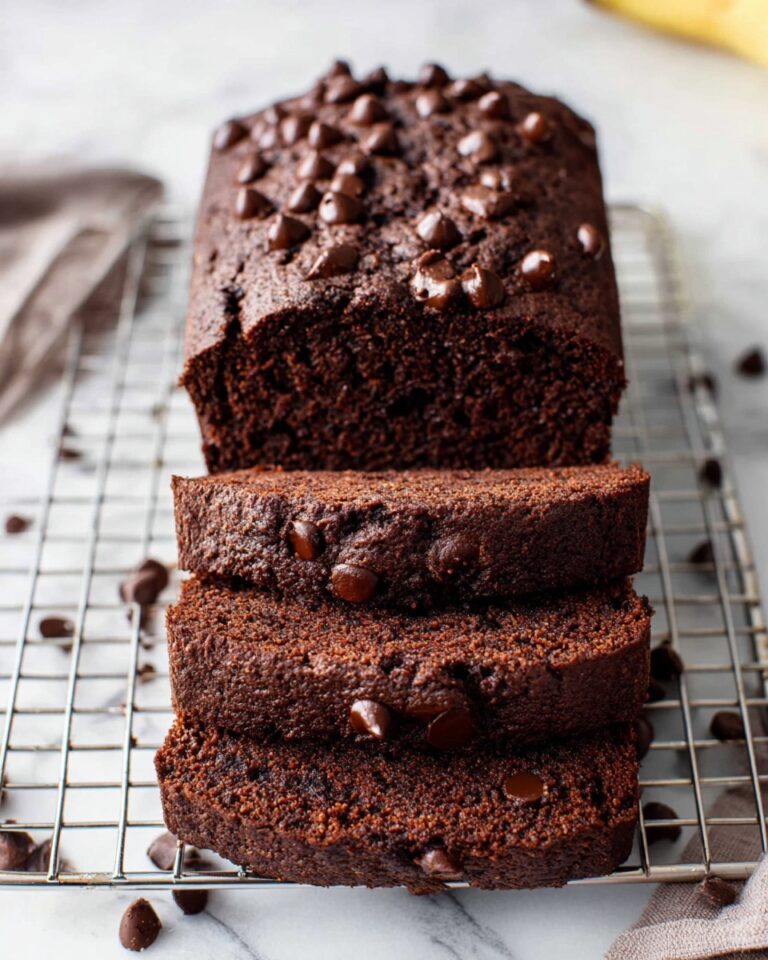
- Chocolate Chip Scones: Mini chocolate chips worked wonders for me because they distribute evenly and melt just right.
- Gluten-Free: I’ve swapped in a 1:1 gluten-free flour blend with great results—these scones still turn out tender and flaky.
- Dairy-Free: Using a plant-based milk with a splash of vinegar can replace buttermilk, and cold coconut oil can stand in for butter.
- Spiced Scones: Add a pinch of cinnamon or nutmeg for a cozy autumn twist that’s great with your morning coffee.
How to Make Simple Scone Recipe
Step 1: Prep the Dry Ingredients and Butter
Start by combining your flour, sugar, baking powder, and salt in a large bowl. Now, here’s a tip from my own kitchen: make sure your butter is really cold and cut into cubes before adding it in. Use your hands or a pastry cutter to work the butter into the dry ingredients until the mixture resembles pea-sized crumbs. This little step is what gives your scones those luscious flaky layers, so don’t rush it!
Step 2: Mix in the Wet Ingredients and Add-Ins
Create a well in the center of your dry mix, then pour in the buttermilk, vanilla, and egg. Gently stir everything together with a spatula until the dough is thick and a bit sticky — don’t overmix! If you’re adding chocolate chips or berries, now’s the time to fold them in carefully to avoid smashing your fruit.
Step 3: Knead and Fold for Flaky Layers
Turn your dough out onto a lightly floured surface and gently knead until all the flour is incorporated. It should be a soft, slightly sticky ball. Here’s a trick I’ve learned: fold your dough like a letter a few times (fold in half, press down, turn 90 degrees, fold in half again) to help create flaky layers. Do this 4-5 times, then shape the dough into a thick round disc.
Step 4: Chill, Cut, and Freeze
Pop your disc-shaped dough in the fridge for about 5–10 minutes to firm up. Then, use a sharp knife or pizza cutter to slice it into 8 equal wedges. Here’s my favorite hack: freeze the scones for 30 minutes before baking; this helps maintain their shape and improves rise and texture during baking.
Step 5: Brush and Bake
Before baking, brush the tops with an egg wash made from one egg plus a tablespoon of water — this adds a gorgeous golden sheen. If you like a bit of sparkle, sprinkle some coarse sanding sugar on top. Bake in a preheated 400ºF oven for 20 to 26 minutes or until golden brown and cooked through. Let them cool just enough to handle before diving in!
How to Serve Simple Scone Recipe

Garnishes
I’m a big fan of classic clotted cream and jam with my scones — it never gets old. But if you want to keep things simple, a dab of butter melting on a warm scone is just as delightful. Fresh berries or a drizzle of honey also make for lovely, natural garnishes.
Side Dishes
Pair these scones with a piping hot cup of tea or coffee for the ultimate cozy treat. For brunch, I sometimes serve them alongside scrambled eggs or fresh fruit salad to create a well-rounded meal that feels special but effortless.
Creative Ways to Present
When hosting, I like arranging these scones on a tiered cake stand with little bowls of various jams, lemon curd, and whipped cream. It turns a simple scone into an inviting display that guests love digging into.
Make Ahead and Storage
Storing Leftovers
If you have leftovers (which rarely happens in my house), keep them in an airtight container at room temperature for up to two days or pop them in the fridge to extend freshness for up to five days. I usually reheat them slightly before serving to revive that fresh-baked softness.
Freezing
One of my favorite things about this Simple Scone Recipe is how freezer-friendly it is. I freeze the unbaked scones on a baking sheet until firm, then transfer them to a freezer bag. They keep well up to two months and can be baked straight from frozen—just add a few extra minutes to the baking time.
Reheating
To reheat, I pop scones in a warm oven (about 300°F) for 5 to 10 minutes or until warmed through. This keeps them flaky, soft, and tastes like they were just baked fresh!
FAQs
-
Can I use regular milk instead of buttermilk in this Simple Scone Recipe?
Absolutely! If you don’t have buttermilk, you can make a simple substitute by combining 1 cup of milk with 1 tablespoon of white vinegar or lemon juice. Let it sit for 5 minutes before using. This adds the tanginess and acidity that buttermilk provides, helping your scones rise beautifully.
-
How do I keep my scones flaky and tender?
Keep your butter cold and handle the dough gently. Overmixing can lead to tough scones, so combine ingredients until just incorporated. Folding the dough a few times also helps create those flaky layers I’m sure you’ll love.
-
Can I make this recipe gluten-free?
Yes! Using a 1:1 gluten-free flour blend, like King Arthur’s Measure for Measure Flour, works really well. The texture might be slightly different, but the scones will still be tender and delicious.
-
Can I add fruit without making the dough too wet?
Great question! When adding juicy fruits like raspberries or strawberries, add a bit extra flour (about ¼ to ¾ cup depending on the fruit) to balance the moisture. This helps keep the dough from becoming too sticky and ensures your scones hold their shape.
-
How do I store leftover scones to keep them fresh?
Store leftover scones in an airtight container at room temperature for up to 2 days or in the refrigerator for up to 5 days. Reheat them gently in the oven before serving to refresh their texture.
Final Thoughts
This Simple Scone Recipe has become a staple in my kitchen because it’s just that approachable and rewarding. Whether you’re new to baking or a seasoned pro, these scones are a lovely way to enjoy homemade goodness without stress. I’m confident you’ll find that perfect flaky texture and buttery flavor that makes scones so irresistible—so go ahead, give it a try and make it your own favorite!
Print
Simple Scone Recipe
- Prep Time: 10 minutes
- Cook Time: 35 minutes
- Total Time: 45 minutes
- Yield: 8 scones 1x
- Category: Baked Goods
- Method: Baking
- Cuisine: British
Description
This simple scone recipe yields tender, flaky scones perfect for breakfast or teatime. Made with basic pantry ingredients like all-purpose flour, cold butter, buttermilk, and eggs, these scones come together quickly and can be customized with optional add-ins such as chocolate chips or fresh berries. The recipe includes step-by-step instructions to ensure a light, layered texture through a lamination folding technique, finishing with a golden, soft crust when baked.
Ingredients
Plain Scones:
- 2 ¼ cups (270g) all-purpose flour
- ½ cup (99g) granulated sugar
- 1 Tbsp baking powder
- ½ tsp salt
- ½ cup (113g) cold unsalted butter, cubed
- ½ cup (118ml) buttermilk
- 1 tsp vanilla extract
- 1 large egg
Add-Ins (optional, total 1-1.5 cups):
- 1 cup (170g) chocolate chips (mini chocolate chips recommended)
- 1 cup (170g) white chocolate chips
- 1 cup (120g) fresh raspberries, broken into pieces and frozen
- 1 cup (150g) blueberries
- 1 cup (167g) strawberries, chopped
Instructions
- Adjust flour for berries: If using raspberries, add an extra ¾ cup (90g) flour; if using blueberries or strawberries, add an extra ¼ cup (30g) flour to offset moisture from fresh fruit.
- Combine dry ingredients and cut in butter: In a large bowl, mix flour, sugar, baking powder, and salt. Add cold, cubed butter and cut it into the mixture with your hands or a pastry cutter until pea-sized butter pieces remain.
- Add wet ingredients and combine: Make a well in the flour mixture and pour in buttermilk, vanilla extract, and egg. Gently mix with a spatula until a thick, sticky dough forms. Stir in any desired add-ins evenly.
- Knead the dough: On a floured surface or silicone mat, gently knead the dough until fully incorporated. Add 1-2 tablespoons extra flour if the dough feels too sticky.
- Lamination folds: Fold the dough in half, press down slightly, turn 90 degrees, and fold in half again. Repeat this folding and turning 4-5 times to create flaky layers.
- Shape and chill: Form the dough into an 8-10 inch disc about 1.5 to 2 inches thick. Refrigerate the disc for 5-10 minutes.
- Cut into wedges: Use a knife or pizza cutter to slice the disc into 8 equal wedges.
- Prepare for baking: Arrange scones 2-3 inches apart on a baking sheet lined with a silicone mat or parchment paper.
- Freeze and preheat oven: Freeze the scones for 30 minutes. During the last 5 minutes, preheat the oven to 400ºF (204ºC).
- Add egg wash and bake: Brush scone tops with egg wash (1 large egg mixed with 1 Tbsp water), buttermilk, or heavy cream. Optionally sprinkle with coarse sanding sugar. Bake for 20-26 minutes until lightly golden.
- Cool and serve: Remove from oven and allow scones to cool slightly before serving.
Notes
- Gluten-Free: Substitute all-purpose flour with a 1:1 gluten-free flour blend such as King Arthur’s Gluten Free Measure for Measure Flour with excellent results.
- Storage: Store scones in an airtight container at room temperature for up to 2 days or refrigerate up to 5 days.
- Make Ahead: Shape and cut dough, refrigerate overnight, and bake straight from the fridge the next day.
- Freezing: Freeze unbaked scones on a baking sheet until solid, then transfer to a freezer bag. Freeze up to 2 months. Bake from frozen, adding 2-3 minutes to baking time.
Keywords: scones, simple scones, breakfast pastry, baked scones, berry scones, chocolate chip scones, buttermilk scones